dBadge2
1 /51Pages

dBadge2
1 /51Pages
Catalog excerpts
Thank you for purchasing the Casella dBadge2 Personal Noise Dosimeter. We hope that you will be pleased with it and the service that you receive from us and our distributors. If you do have any queries, concerns or problems, please do not hesitate to contact us. Casella prides itself on providing precision instrumentation since 1799, supplying eminent figures including Darwin and Livingstone. A lot has changed in our 200+ year history but what does remain is our commitment to reliable, trustworthy and credible solutions. For more information or to find out more about Casella and our products,...
Open the catalog to page 2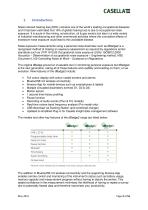
Noise induced hearing loss (NIHL) remains one of the world’s leading occupational diseases and it has been estimated that 16% of global hearing loss is due to occupational noise exposure. It is acute in the mining, construction, oil & gas sectors but also in a wide variety of industrial manufacturing and other commercial activities where the cumulative effects of excessive noise exposure could lead to this avoidable disease. Noise exposure measurements using a personal noise dosimeter such as dBadge2 is a recognised method of making an exposure assessment as required by regulations and/or standards...
Open the catalog to page 3
Personal noise exposure measurement can be confusing given the plethora of parameters available and the combination required to meet different standards and regulations but the dBadge2 has been specifically designed to simplify the process. Like its iconic predecessor, the dBadge2 concept is to capture every possible noise exposure related parameter during a measurement run and make it available for subsequent download and analysis. The user has only to choose the most relevant parameters to display on the screen. The dBadge2 thus uses a ‘multiple simulated dosimeter’ concept to display noise...
Open the catalog to page 4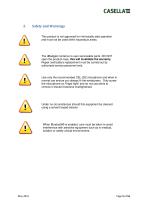
Safety and Warnings This product is not approved for intrinsically safe operation and must not be used within hazardous areas. The dBadge2 contains no user serviceable parts. DO NOT open the product case, this will invalidate the warranty. Repair and battery replacement must be carried out by authorised service personnel only. Use only the recommended CEL-252 microphone and when in normal use ensure you always fit the windscreen. Only screw the microphone on ‘finger tight’ and do not use pliers to remove it should it become overtightened. Under no circumstances should this equipment be cleaned...
Open the catalog to page 5
Typical Steps in a Noise Assessment Perform a walkthrough survey to identify areas or tasks with problem Identify the standards and noise ordinance regulations for your Plan your personal noise exposure monitoring campaign Develop Corrective Actions as required protocol windscreen & Calibrate Events & Activities
Open the catalog to page 7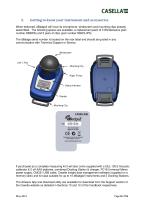
Getting to know your instrument and accessories When delivered, dBadge2 will have its microphone, windscreen and mounting clips already assembled. The following spares are available; a replacement pack of 5 Windscreens (part number DB2WS) and 5 pairs of clips (part number DB2CLIPS). The dBadge serial number is located on the rear label and should be quoted in any communication with Technical Support or Service. If purchased as a complete measuring kit it will also come supplied with a CEL-120/2 Acoustic calibrator & 2 off AAA batteries, combined Docking Station & charger, PC18 Universal Mains...
Open the catalog to page 8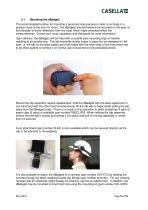
The recommended location for mounting a personal noise exposure meter is normally in a position close to the ear (10-15cm). The dBadge2 should therefore be mounted on the apex of the shoulder to avoid reflections from the head which might otherwise affect the measurements. Consult your local Legislation and Standards for more information. Upon delivery, the dBadge2 will be fitted with crocodile-style mounting clips on flexible webbing to aid positioning. The clip assembly simply snaps in place but are designed to ‘fail safe' i.e. the tab on the black plastic part that mates with the main body...
Open the catalog to page 9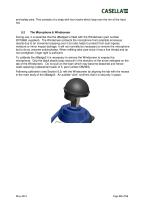
and safety pins. This consists of a strap with four hooks which loop over the rim of the hard hat. During use, it is essential that the dBadge2 is fitted with the Windscreen (part number 207069B, supplied). The Windscreen protects the microphone from potential erroneous results due to air movement passing over it but also helps to protect from dust ingress, moisture or minor impact damage. It will not normally be necessary to remove the microphone but to do so unscrew anticlockwise. When refitting take care since it has a fine thread and do not overtighten; finger tight is sufficient. To calibrate...
Open the catalog to page 10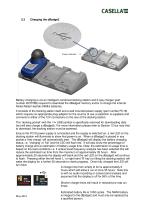
Power Indicator Battery charging is via an intelligent combined docking station and 3-way charger (part number 207078B) required to download the dBadge2 memory and/or to charge the internal Nickel Metal Hydride (NiMH) batteries. It consists of the docking station itself and a wall mounted power supply (part number PC18) which requires an appropriate plug adaptor for the country of use (a selection is supplied) and connects to either of the 12V connectors on the rear of the docking station. The ‘docking pocket’ with the USB symbol is specifically reserved for downloading data (but will also charge...
Open the catalog to page 11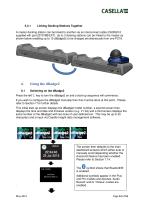
Linking Docking Stations Together A master docking station can be linked to another via an interconnect cable (C6359/0.2 supplied wth part 207078B/EXT). Up to 3 docking stations can be linked to the master as shown below enabling up to 12 dBadge2s to be charged simultaneously from one PC18. Press the left ‘L’ key to turn the dBadge2 on and a start-up sequence will commence. If you wish to configure the dBadge2 manually then this must be done at this point. Please refer to Section 7 for further details. This initial start-up screen displays the dBadge2 model number, a second screen then displays...
Open the catalog to page 12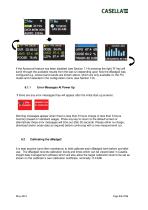
If the Autoscroll feature has been disabled (see Section 7.14) pressing the right ‘R’ key will scroll through the available results from the last run depending upon how the dBadge2 was configured e.g. octave band results are shown above, which are only available on the Pro model and if selected in the configuration menu (see Section 7.8). 6.1.1 Error Messages At Power Up If there are any error messages they will appear after the initial start-up screens: Warning messages appear when there is less than 9 hours charge or less than 9 hours memory (based on standard usage). Press any key to return...
Open the catalog to page 13All Casella catalogs and technical brochures
 CASELLA Dust-Detective
2 Pages
 Vortex3
4 Pages
 Tipping Bucket Rain Gauge
2 Pages
 APEX2
APEX228 Pages
 dBadge Noise Dosimeters
8 Pages
 Sampling accessories
24 Pages
 CEL-712 Real-time Monitoring
4 Pages
 62x series
4 Pages
 120 Calibrator
2 Pages
 Microdust Pro
2 Pages
 350/352 dBadge
8 Pages
 Short Form Catalogue UK
4 Pages


Archived catalogs
 APEX Personal Sampling Pumps
4 Pages

- Pump
- Industrial pump
- Pump with electric motor
- Pump for the chemical industry
- Diaphragm pump
- Analysis software solution
- High-speed pump
- Rugged pump
- Intrinsically safe pump
- Monitoring software solution
- Watertight pump
- Air pump
- Portable calibrator
- Mobile pump
- Temperature calibration system
- EDM software
- Portable detector
- Real-time monitoring module
- Large pump