- Catalogs
- Capetti Elettronica
- WSD15TIIDR IM
WSD15TIIDR IM
1 /5Pages

WSD15TIIDR IM
1 /5Pages
Catalog excerpts

The WSD15TIDR and WSD15TIIDR measure and store the environmental temperature (acquired inside the case) and the uniaxial and, respectively, biaxial tilt. They can be either vertical (Vertical WSD15TIDR and WSD15TIIDR, for wall installation), or horizontal (Horizontal WSD15TIIDRO for countertop installation). 1 Measured axes The probe part number depends on the number and the orientation of the measured axes, and the type of installation (vertical/horizontal). For simplicity, the external label indicates the correspondence between the measured axes and the number of recorded measure channels, by means of the three icons below: X The front side of the cube corresponds to the labeled side; the black side represents the side the drawn rotation refers to, including the direction. The example represents a WSD15TIIDR probe, vertically installed, where CH2 is the tilt relative to the horizontal axis parallel to the wall, positive from the front. CH3 is the side tilt around the axis normal to the wall, positive when measured counterclockwise. For a horizontal probe, the label faces up, so that CH3 will correspond to the second picture. WA0140E_R07-WSD15TIDR_WSD15TIIDR_WSD15TIIDRO CAPETTI ELETTRONICA s.r.l. - Strada Stratta 57 10090 CASTIGLIONE TORINESE - TORINO - ITALY VAT 04837130014 - Phone 011.981.98.11 - Fax 011.981.98.210 e-mail [email protected] - web www.capetti.it
Open the catalog to page 1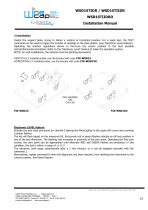
2 Installation Fasten the support plate, trying to obtain a vertical or horizontal position. For a quick test, the TEST command can be used to trigger the transfer of readings to the base station (see "Electronic Level Feature). Operating the bracket regulations allows to fine-tune the sensor position in the best possible vertical/horizontal orientation. Refer to the "Electronic Level" feature to make the operation quicker. NOTE: for wall installations, the antenna must be pointing downwards. VERTICALLY installed probe: use the bracket with code FIX-WSD15 HORIZONTALLY installed probe: use the...
Open the catalog to page 2
Reading RESET feature Issue command 6 twice in a row to activate the measure reset process. The first command activates the Level (this can be useful in order to improve the tool's position), the second instance of the command stores the reading, which will be used as the initial offset. After an unintentional reset it is always possible to place again the tool near the mechanical zero (with the Level), and repeat the reset process. The WineCapManager software allows to show and possibly reset the offset stored in the probe using a remote, radio command. WSD15TIIDR Probe The Electronic Level...
Open the catalog to page 3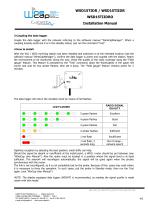
WSD15TIDR / WSD15TIIDR WSD15TIIDRO Installation Manual 3 Coupling the data logger Couple the data logger with the network referring to the software manual "WineCapManager". When a coupling already exists but it is in the standby status, just run the command "Test". After the WLI / WDG receiving station has been installed and switched on at the intended location (see the software manual "WineCapManager"), confirm the data logger is active and coupled with the station. Reach the environment to be monitored. Along the way, check the quality of the radio coverage using the "Field gauge" feature....
Open the catalog to page 4
WSD15TIDR / WSD15TIIDR WSD15TIIDRO Installation Manual 5 Shutting off / Reactivating the data logger If the device is shut off for a long time inactivity, approach the WineCapKey to the upper left corner, wait for 4 amber flashes and move the WineCapKey away. Confirm alternate green/red flashes, approach it again and wait for further 4 flashes. Confirm the red led turns on twice for 2 seconds. Issue the "TEST" command to reactivate the data logger. For electromagnetic compatibility - EN 61000 - 3 - 2 This symbol indicates that this product is compliant with the European Directive 2002/95/EC,...
Open the catalog to page 5All Capetti Elettronica catalogs and technical brochures
 WSD02-TT10K
1 Page
 WSD12-TT10KB1
1 Page
 WSD12-TT10K
1 Page
 WSD12T-DD
3 Pages
 WSD12-4VW
3 Pages
 WSD04T-T100
1 Page
 WSD04T-T1K
1 Page
 WSD02T-KK
1 Page
 WSD02TH-AV
2 Pages
 WSD04TH
1 Page
 WR12
WR121 Page
 WSD12-4NTC10KB1
2 Pages
 WSD12PB-THEE
2 Pages
 MWLI-MB
2 Pages
 MWDG-4DI-GSM
2 Pages
 MWDG-ETH-B
2 Pages
 WSS10T
1 Page
 WSS02T-T100
1 Page
 WSD12-EVTT IM
6 Pages
 WSD12-EVTT
1 Page
 WSD12-CC
1 Page
 WSD02-PQ
1 Page
 WSD12-PQPQ
1 Page
 WSD12-4P
1 Page
 WSD15TIIDR
1 Page
 WSD12T-Ex
1 Page
 WSD12-VW IM
4 Pages
 WSD12-VW
1 Page
 WSD12T-IIDR
1 Page
 WSD12PS-4AI
1 Page
 WSD00TH
1 Page
 WSD02T-TT1K
1 Page
 WSD02T-T1K
1 Page
 WSD02T-T100
1 Page
 WSD02T-TT100
1 Page
 WSD15TIDR(A)
1 Page
 WSD15TIIDRO
1 Page
 WSD12-PQ
1 Page
 WSD12-LVD
1 Page
 WSD12T-AVMS1
1 Page
 WSD12-THEE
1 Page
 WSD12-TT1K
1 Page
 WSD02T-DD
1 Page
 WSD04T
1 Page
 WSD02-TT1K
1 Page
 WSD02TH-DD
1 Page
 WSD02-CC
1 Page
 WSD00LP
1 Page
 WSD10TGII
1 Page
 WSD12-4DI
1 Page
 WSD10MiGG
1 Page
 WSD00TH2
1 Page
 WSD00TH2CO
1 Page
 WSD00TH2L
1 Page
 WSA02Rx
1 Page
 WST02TS(A)
2 Pages
 SD12-VW
1 Page
 SD15TIIDR
1 Page
 SD02T-T100
1 Page
 SD02T-TT100
1 Page
 SD04T-T100
1 Page
 SD00TH2 Smart Datalogger
1 Page
Archived catalogs
 MWDG
MWDG2 Pages


- Bourn And Koch temperature sensor
- Transformer
- Dry transformer
- Bourn And Koch data-logger
- Bourn And Koch resistance temperature sensor
- Bourn And Koch temperature data-logger
- Bourn And Koch communication gateway
- Current transformer
- Bourn And Koch USB data-logger
- Bourn And Koch waterproof temperature sensor
- Bourn And Koch industrial gateway
- Fieldbus gateway
- Bourn And Koch Ethernet gateway
- Encapsulated transformer
- Bourn And Koch humidity and temperature sensor
- Bourn And Koch wireless data-logger
- Bourn And Koch stainless steel temperature sensor
- Current sensor
- Datalogger without display
- Bourn And Koch serial gateway