- Catalogs
- Buckleys (UVRAL) Limited
- User Manual: Wet Roof Pro2
- Company
- Products
- Catalogs
- News & Trends
- Exhibitions
User Manual: Wet Roof Pro2
1 /36Pages

User Manual: Wet Roof Pro2
1 /36Pages
Catalog excerpts

Flat roof leak detector kit Instruction manual Please read this manual before using the equipment
Open the catalog to page 1
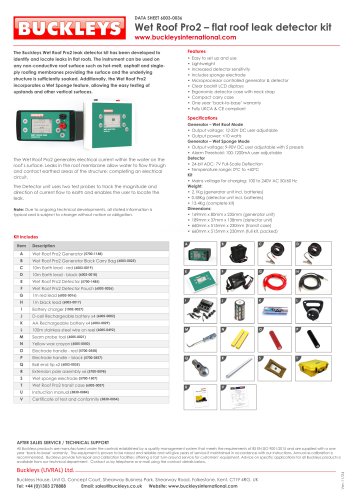
General Description The Wet Roof Pro2 leak detector compliments the Buckleys Dry Roof Pro2 test instrument to provide a complete roof test system for all occasions. The Wet Roof Pro2 has been designed to assist the user to detect the presence and source of leaks on roofing technologies that incorporate insulating membrane overlays. With large easy to read graphics displays and user-friendly icons enabling fast accurate roof surveys to be undertaken. The Wet Roof Pro2 leak detector kit comprises two main elements: A ‘Generator unit’ provides stabilised low frequency pulses. The positive output...
Open the catalog to page 3
Instruction Manual Technical Specification Generator Output pulse voltage: 32 V DC Output (Wet Roof Mode) 90V, 67.5V, 24V, 9V DC Output (Wet Sponge Mode) Output power: Operating temperature: Relative humidity: Detector Operating temperature: Battery charger Input voltage (In-car): Input voltage (Mains): Output voltage: Accessories Survey pole length: 2 x 3 Section - 1000mm & Handles (Red & Black) Trace wire: Transit case weight: 13.4Kg (full kit with accessories) Interconnecting leads: 1 x 10m, red plug - trace wire 1 x 10m, black plug - substrate 1 x 1m, red plug - right survey pole 1 x 1m,...
Open the catalog to page 4
Unpacking The Buckleys Wet Roof Pro2 leak detector kit and all associated items necessary to conduct a roof survey are supplied in a robust transit case. Retain all outer packaging to re-use in future should you need to store or return the Wet Roof Pro2 for servicing. Please note any damage to the outer packaging before checking the kit contents. When first unpacking the Wet Roof Pro2 kit carefully check each item and report any missing or damaged items. The full kit comprises the following items: 1 x Generator unit 1 x Generator unit carry bag 1 x Detector...
Open the catalog to page 5
Instruction Manual Controls and Connections Generator (Wet Roof Mode) The Wet Roof Pro2 generator unit is housed in a robust waterproof closure with all connections and controls mounted on the front panel. The Generator provides two functions: in addition to the standard generator application, to be used with the matching detector, a wet-sponge test function is included. The wet-sponge test is used without a detector, the generator will display the output current which may be used to determine the presence of a leak. For further details please see page 15 below. Ground Increase/Up Menu /Yes Trace...
Open the catalog to page 6
The Generator output will be live whenever it is turned on. This is current-limited, and the unit will not be damaged if the output is shorted, although the alarm will sound & the screen backlight will turn red to alert you. Pressing the “Menu/Yes” button will open the User Menu. Press and hold the “Menu/Yes” button until the User Menu is displayed. The output voltage and alarm current can be adjusted easily by selecting the appropriate menu option and then using the “Increase” and “Decrease” buttons to the left of the screen. Press the “Yes” button to accept the revised value and press the “Back”...
Open the catalog to page 7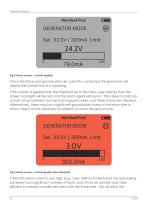
Instruction Manual Fig.4 Home screen – current applied Once the trace and ground wires are correctly connected the generator will display the current that it is supplying. If this current is greater than the threshold set in the menu (see above) then the screen backlight will be red, and the alarm signal will sound. This is likely to indicate a short circuit between the trace and ground wires, and these should be checked. Alternatively, there may be a significant ground point close to the trace wire, in which case it will be necessary to isolate it or move the ground wire. Fig.5 Home screen –...
Open the catalog to page 8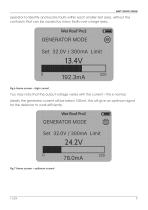
operator to identify and locate faults within each smaller test area, without the confusion that can be caused by many faults over a large area. Fig.6 Home screen – high current You may note that the output voltage varies with the current – this is normal. Ideally the generator current will be below 100mA, this will give an optimum signal for the detector to work efficiently. Fig.7 Home screen – optimum current
Open the catalog to page 9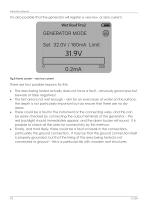
Instruction Manual It is also possible that the generator will register a very low, or zero current. Fig.8 Home screen – very low current There are four possible reasons for this: The area being tested actually does not have a fault – obviously good news but beware of false negatives! The test area is not wet enough – aim for an even layer of water on the surface, the depth is not particularly important but do ensure that there are no dry areas. There could be a fault in the instrument or the connecting wires, and this can be easily checked by connecting the output terminals of the generator...
Open the catalog to page 10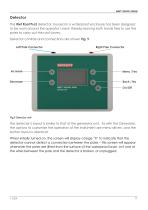
Detector The Wet Roof Pro2 detector, housed in a waterproof enclosure has been designed to be worn around the operator’s neck thereby leaving both hands free to use the poles to carry out the roof survey. Detector controls and connections are shown Fig. 9. Left Pole Connector Right Pole Connector The detector’s layout is similar to that of the generator unit. As with the Generator, the options to customise the operation of the instrument are menu-driven, and the button layout is identical. When initially turned on, the screen will display a large “X” to indicate that the detector cannot detect...
Open the catalog to page 11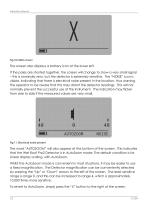
Instruction Manual The screen also displays a battery icon at the lower left. If the poles are shorted together, the screen will change to show a very small signal – this is nominally zero, but the detector is extremely sensitive. The “NOISE” icon is visible, indicating that there is electrical noise present in the location, thus warning the operator to be aware that this may distort the detector readings. This will not normally prevent the successful use of the instrument. The indication may flicker from side to side if the measured values are very small. Fig 11. Electrical noise present The...
Open the catalog to page 12All Buckleys (UVRAL) Limited catalogs and technical brochures
 Datasheet: Wet Roof Pro2
1 Page
 Brochure: DCCT Pro2
4 Pages
 Quick start guide: Lab Pro2
12 Pages
 Quick start guide: PHD Pro2
12 Pages
 Quick start guide: Geo Pro2
12 Pages
 Quick start guide: Dry Roof Pro2
12 Pages
 AC Spark testers
4 Pages
 Subsea product range
4 Pages
 Geomembrane tester
4 Pages


- Calibration system
- Portable tester
- Voltage testing system
- Real-time monitoring module
- Measurement monitoring module
- Insulation testing system
- Cabling tester
- Tester with LCD screen
- Electrical installation tester
- Environmental monitoring system
- Continuous monitoring module
- Continuity tester
- Electrochemical electrode
- Battery testing system
- Digital monitoring module
- Remote monitoring module
- Portable leak detector
- Leak detector with integrated display
- Liquid leak detector