Catalog excerpts

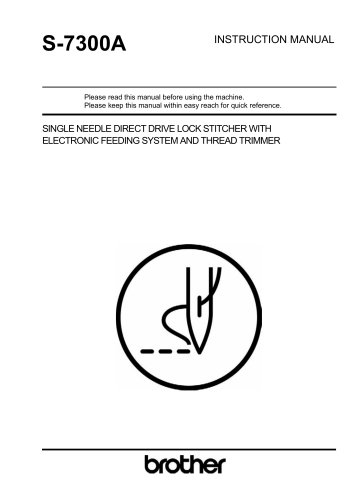
INSTRUCTION MANUAL Please read this manual before using the machine. Please keep this manual within easy reach for quick reference. SINGLE NEEDLE DIRECT DRIVE LOCK STITCHER WITH ELECTRONIC FEEDING SYSTEM AND THREAD TRIMMER
Open the catalog to page 1
Thank you very much for buying a BROTHER sewing machine. Before using your new machine, please read the safety instructions and the explanations given in the instruction manual. With industrial sewing machines, it is normal to carry out work while positioned directly in front of moving parts such as the needle and thread take-up, and consequently there is always a danger of injury that can be caused by these parts. Follow the instructions from training personnel and instructors regarding safe and correct operation before operating the machine so that you will know how to use it correctly.
Open the catalog to page 2
SAFETY INSTRUCTIONS [1] Safety indications and their meanings This instruction manual and the indications and symbols that are used on the machine itself are provided in order to ensure safe operation of this machine and to prevent accidents and injury to yourself or other people. The meanings of these indications and symbols are given below. The instructions which follow this term indicate situations where failure to follow the instructions will result in death or serious injury. The instructions which follow this term indicate situations where failure to follow the instructions could...
Open the catalog to page 3
A DANGER Wait at least 5 minutes after turning off the power switch and disconnecting the power cord from the wall outlet before opening the cover of the control box. Touching areas where high voltages are present can result in severe injury. Do not allow any liquids to get onto this sewing machine, otherwise fire, electric shocks or operating problems may occur. If any liquid gets inside the sewing machine (machine head or control box), immediately turn off the power and disconnect the power plug from the electrical outlet, and then contact the place of purchase or a qualified technician....
Open the catalog to page 4
This sewing machine should only be used by operators who have received the necessary training in safe use beforehand. The sewing machine should not be used for any applications other than sewing. Be sure to wear protective goggles when using the machine. If goggles are not worn, there is the danger that if a needle breaks, parts of the broken needle may enter your eyes and injury may result. Turn off the power switch at the following times. The machine may operate if the treadle is depressed by mistake, which could result in injury. • When threading the needle • When replacing the bobbin...
Open the catalog to page 5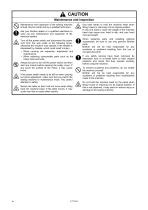
Maintenance and inspection of the sewing machine V v should only be carried out by a qualified technician. Ask your Brother dealer or a qualified electrician to carry out any maintenance and inspection of the electrical system. Turn off the power switch and disconnect the power cord from the wall outlet at the following times, otherwise the machine may operate if the treadle is depressed by mistake, which could result in injury. • When carrying out inspection, adjustment and maintenance • When replacing consumable parts such as the rotary hook and knife Always be sure to turn off the power...
Open the catalog to page 6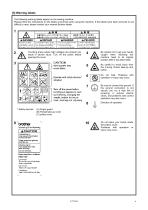
The following warning labels appear on the sewing machine. Please follow the instructions on the labels at all times when using the machine. If the difficult to read, please contact your nearest Brother dealer. labels have been removed or are Touching areas where high voltages are present can result in severe injury. Turn off the power before opening the cover. CAUTION Moving parts may cause injury. Operate with safety devices* installed. Turn off the power before carrying out operations such - as threading, changing the needle, bobbin, knives or hook, cleaning and adjusting Be careful not...
Open the catalog to page 7
Transformer box (100 V/400 V system only)
Open the catalog to page 8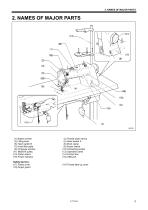
2. NAMES OF MAJOR PARTS (1) Bobbin winder (3) Lifting lever (5) Hand switch B (7) Knee lifter plate (9) Oil gauge window (11) Machine pulley (13) Cotton stand (15) Power indicator (2) Thread wiper device (4) Hand switch A (6) Work clamp (8) Power switch (10) Oil feeding pocket (12) Operation panel (14) Control box Safety devices: (17) Pulley cover (18) Thread take-up cover
Open the catalog to page 13
3. INSTALLATION CAUTION Machine installation should only be carried out by a qualified technician. Contact your Brother dealer or a qualified electrician for any electrical work that may need to be done. The sewing machine weighs approximately 34.5 kg (76lb). The installation should be carried out by two or more people. Do not connect the power cord until installation is complete. The machine may operate if the treadle is depressed by mistake, which could result in injury. Secure the table so that it will not move when tilting back the machine head. If the table moves, it may crush your...
Open the catalog to page 14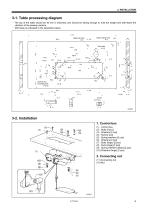
3-1. Table processing diagram • The top of the table should be 40 mm in thickness and should be strong enough to hold the weight and with-stand the vibration of the sewing machine. • Drill holes as indicated in the illustration below. Cotton stand hole *i7 ’ ix:u Head rest hole (9) Spring washers (large) [2 pcs]
Open the catalog to page 15
3. Rubber cushions (1) Rubber cushions [2 pcs] 4. Machine head (1) Hinges [2 pcs] (2) Machine head (3) Head rest NOTE: ・Bind the cords together and pass them through the cord hole. ・Tap the head rest (3) securely into the table hole. If the head rest (3) is not pushed in as far as it will go, the machine head will not be sufficiently stable when it is tilted back. 5. Machine head seal 1. Tilt back the machine head, and then peel off the sticker (1). 2. Peel off the protective sheet (3) from the operation panel (2).
Open the catalog to page 16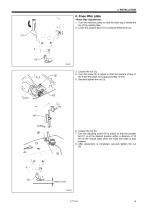
6. Knee lifter plate 1. Turn the machine pulley so that the feed dog is below the top of the needle plate. 2. Lower the presser foot (1) by using the lifting lever (2). 3. Loosen the nut (3). 4. Turn the screw (5) to adjust so that the amount of play in the knee lifter plate (4) is approximately 10 mm. 5. Securely tighten the nut (3). 6. Loosen the nut (6). 7. Turn the adjusting screw (8) to adjust so that the presser foot (7) is at the desired position within a distance of 16 mm of the needle plate when the knee liter plate is fully pressed. 8. After adjustment is completed, securely...
Open the catalog to page 17All Brother catalogs and technical brochures
-
WF1
4 Pages
-
T-8421C,T-8422C
12 Pages
-
SL-777B
2 Pages
-
RH-9820
4 Pages
-
S-7300A DigiFlex Feed
8 Pages
-
S-7250A
4 Pages
-
BE-438HX/HS
4 Pages
-
BAS-370H / BAS-375H
8 Pages
-
HE-800C
2 Pages
-
BAS-360H / BAS-365H
2 Pages
-
BAS-311HN_326H
71 Pages
-
BAS-300Series
8 Pages
-
GT-3
2 Pages
-
S-7220C
63 Pages
-
S-7100A
53 Pages
-
KE-430FX / BE-438FX
6 Pages
-
KE-430HX/HS
4 Pages
-
S-1000A
2 Pages
-
KE-430FS
2 Pages
-
HE-800B
4 Pages
-
BAS-311HN/-326H/-341H/-342H
8 Pages
-
BE-438FX
6 Pages
-
BAS-342G
6 Pages
-
BAS-326G
6 Pages
-
BAS-311H
6 Pages
-
BAS-300G-484/484SF
2 Pages

