BAS-311HN_326H
1 /71Pages

BAS-311HN_326H
1 /71Pages
Catalog excerpts

INSTRUCTION MANUAL Please read this manual before using the machine. Please keep this manual within easy reach for quick reference. DIRECT DRIVE PROGRAMMABLE ELECTRONIC PATTERN SEWER
Open the catalog to page 1
Thank you very much for buying a BROTHER sewing machine. Before using your new machine, please read the safety instructions below and the explanations given in the instruction manual. With industrial sewing machines, it is normal to carry out work while positioned directly in front of moving parts such as the needle and thread take-up lever, and consequently there is always a danger of injury that can be caused by these parts. Follow the instructions from training personnel and instructors regarding safe and correct operation before operating the machine so that you will know how to use it correctly....
Open the catalog to page 2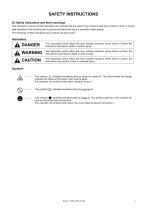
[1] Safety indications and their meanings This instruction manual and the indications and symbols that are used on the machine itself are provided in order to ensure safe operation of this machine and to prevent accidents and injury to yourself or other people. The meanings of these indications and symbols are given below. This symbol (A) indicates something that you should be careful of. The picture inside the triangle indicates the nature of the caution that must be taken. (For example, the symbol at left means “beware of injury”.) This symbol ((^)) indicates something that you must not do....
Open the catalog to page 3
AWait at least 5 minutes after turning off the power switch and disconnecting the power cord from the wall outlet before opening the control box cover. Touching areas where high voltages are present can result in severe injury. Do not allow any liquids to get onto this sewing machine, otherwise fire, electric shocks or operating problems may occur. If any liquid gets inside the sewing machine (machine head or control box), immediately turn off the power and disconnect the power plug from the electrical outlet, and then contact the place of purchase or a qualified technician. Environmental requirements...
Open the catalog to page 4
To prevent problems, do not use objects with sharp points to operate the LCD panel. This sewing machine should only be used by operators who have received the necessary training in safe use beforehand. The sewing machine should not be used for any applications other than sewing. Be sure to wear protective goggles when using the machine. If goggles are not worn, there is the danger that if a needle breaks, parts of the broken needle may enter your eyes and injury may result. Turn off the power switch at the following times. If the foot switch is depressed by mistake, the sewing machine might start...
Open the catalog to page 5
The following warning labels appear on the sewing machine. Please follow the instructions on the labels at all times when using the machine. If the labels have been removed or are difficult to read, please contact your nearest Brother dealer. _ CAUTION *Safety devices Devices such as eye guard, finger guard, thread take-up cover, side cover, rear cover, solenoid cover, inner cover, outer cover, fixed cover and gas spring support cover Be careful not to get your hand caught when tilting back the machine head and returning it to its original position. brother Lubricating Oil for Machining Be sure...
Open the catalog to page 6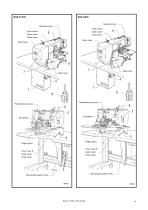
Solenoid cover Inner cover L Inner cover L Outer cover Outer cover Fixed cover Fixed cover Rear cover Rear cover Side cover Side cover Thread take-up cover Thread take-up cover Finger guard Finger guard Outer cover Outer cover Fixed cover Fixed cover Gas spring support cover Gas spring support cover
Open the catalog to page 7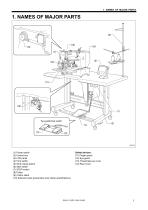
1. NAMES OF MAJOR PARTS 1. NAMES OF MAJOR PARTS Two-pedal foot switch (1) Power switch (2) Control box (3) LCD panel (4) Foot switch (5) Work clamp switch (6) Start switch (7) STOP switch (8) Pulley (9) Cotton stand (10) Solenoid valve (pneumatic work clamp specifications) Safety devices: (11) Finger guard (12) Eye guard (13) Thread take-up cover (14) Rear cover
Open the catalog to page 9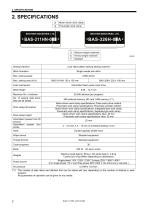
(*1) The number of data items and stitches that can be stored will vary depending on the number of stitches in each program. No guarantees of operation can be given for any media.
Open the catalog to page 10
Machine installation should only be carried out by a qualified technician. Contact your Brother dealer or a qualified electrician for any electrical work that may need to be done. The sewing machine head weighs approximately 88kg. The installation should be carried out by three or more people. Do not connect the power cord until installation is complete. If the foot switch is depressed by mistake, the sewing machine might start operating and injury could result. Hold the machine head with both hands when tilting it back or returning it to its original position. Furthermore, do not apply excessive...
Open the catalog to page 11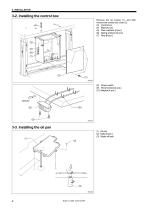
3-2. Installing the control box Remove the six screws (1), and then remove the control box cover (2). (3) Control box (4) Bolts [4 pcs.] (5) Plain washers [4 pcs.] (6) Spring washers [4 pcs.] (7) Nuts [8 pcs.] (8) Power switch (9) Wood screws [2 pcs.] (10) Staples [4 pcs.] 3-3. Installing the oil pan (1) Oil pan (2) Nails [6 pcs.] (3) Waste oil tank
Open the catalog to page 12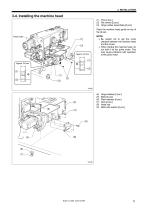
3-4. Installing the machine head (1) Pins [2 pcs.] (2) Set screws [2 pcs.] (3) Hinge rubber assemblies [2 pcs.] Place the machine head gently on top of the oil pan. Pulse motor NOTE: • Be careful not to get the cords clamped between the machine head and the oil pan. • When holding the machine head, do not hold it by the pulse motor. This may cause problems with operation of the pulse motor. Hinge holders [2 pcs.] Bolts [4 pcs.] Plain washers [4 pcs.] Nuts [4 pcs.] Head rest Bolts with washer [4 pcs.]
Open the catalog to page 13
(10) Auxiliary plate (11) Bolts with washer [8 pcs.] Loosen the eight bolts with washer (11), and adjust so that the auxiliary plate (10) is 0 to 0.5 mm above the needle plate. Needle plate NOTE: • Install the auxiliary plate (10) so that it is horizontal. If the auxiliary plate (10) is lower than the needle plate, the feed plate may get caught on the needle plate. Move the work clamp arm all the way to the right when looking from the front of the sewing machine (the direction of the arrow in the illustration), and then gently tilt back the machine head. NOTE: • Three or more people should tilt...
Open the catalog to page 14All Brother catalogs and technical brochures
 WF1
WF14 Pages
 T-8421C,T-8422C
12 Pages
 SL-777B
2 Pages
 RH-9820
4 Pages
 S-7300A DigiFlex Feed
8 Pages
 S-7250A
4 Pages
 BE-438HX/HS
4 Pages
 BAS-370H / BAS-375H
8 Pages
 HE-800C
2 Pages
 BAS-360H / BAS-365H
2 Pages
 BAS-300Series
8 Pages
 GT-3
GT-32 Pages
 S-7300A
108 Pages
 S-7220C
63 Pages
 S-7100A
53 Pages
 KE-430FX / BE-438FX
6 Pages
 KE-430HX/HS
4 Pages
 S-1000A
2 Pages
 KE-430FS
2 Pages
 HE-800B
4 Pages
 BAS-311HN/-326H/-341H/-342H
8 Pages
 BE-438FX
6 Pages
 BAS-342G
6 Pages
 BAS-326G
6 Pages
 BAS-311H
6 Pages
 BAS-300G-484/484SF
2 Pages


- Brother fixed sewing machine
- Industrial printer
- Brother fabric sewing machine
- Brother single-needle sewing machine
- Brother lockstitch sewing machine
- Brother single-thread sewing machine
- Ink
- Color printer
- Thermal transfer printer
- High-speed sewing machine
- Brother twin-needle sewing machine
- Brother direct-drive sewing machine
- Brother sewing machine with thread trimmer
- USB interface printer
- High-speed printer
- Brother electronic sewing machine
- Floor-standing printer
- High-quality printer
- Chain stitch sewing machine
- Brother programmable sewing machine