DressView
1 /32Pages

DressView
1 /32Pages
Catalog excerpts
…when it comes to quality! BMR GmbH
Open the catalog to page 1
DressView Dressing system
Open the catalog to page 2
Issue June 2017 1 Introduction - Overview Main Menu 3.2.1 Adjusting the rotational speed of the spindle 3.3 Adjusting the rotational speed Display mode / changing the function Invert colors Negative values Shadow or Ghost images Time base Automatic scaling the time base Additional display functions Basics Behaviour of the inputs and outputs 3.5.1 Digital inputs and outputs (not yet implemented) 3.5.2 Analogue inputs and outputs (not yet implemented) …when it comes to quality! BMR GmbH
Open the catalog to page 3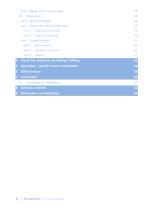
4l Use of the system in the drilling ® 5l DressView -specific inputs and 6l USB-Interface 7l Connection 8l Delivery contents 9l Dimensions and Mounting 2 I DressView Dressing system
Open the catalog to page 4
1 Introduction - Overview In the abrasive industry grinding tools are worn or dull after a certain process time and cannot thus guarantee the precision in machining. In this case, they must be brought in form or sharpened again, which is called "dressing". This dressing is generally a very important feature because it is controlling directly the quality of the product but on the other hand a lot of process time is lost. The goal is to produce always the most accurate surface precision and simultaneously remove as little material as possible. When dressing, there are two basic methods, first the...
Open the catalog to page 5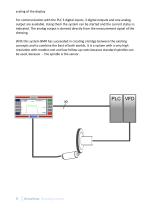
scaling of the display For communication with the PLC 3 digital inputs, 3 digital outputs and one analog output are available. Using them the system can be started and the current status is indicated. The analog output is derived directly from the measurement signal of the . irectly dressing. With this system BMR has succeeded in creating a bridge between the existing concepts and to combine the best of both worlds. It is a system with a very high resolution with modest cost and low follow p costs because standard spindles can follow-up be used, because - the spindle is the sensor. DressView...
Open the catalog to page 6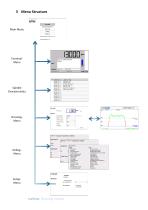
Main Menu Bmrt Terminal Spindle Diagramm Dressing Debug Options Vcrsien date 18.2.201 & Vi 0 Con/erter:o200 V2.1 A Spindle Characteristics Language Terminal General German f English show varolnad set varioload (%) 0 Scot Window: •* Terminal
Open the catalog to page 8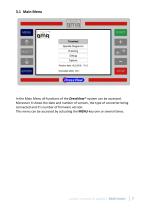
In the Main Menu all functions of the DressView®-system can be accessed accessed. Moreover it shows the date and number of version, the type of converter being oreover connected and it's number of firmware version. This menu can be accessed by actuating the MENU-key one or several times. key …when it comes to quality! BMR GmbH
Open the catalog to page 9
The Terminal-Menu is the window where all basic functions of the converter can be Menu controlled. With the Keys " "START", "STOP", "+", "-" and "double arrow it is possible, double arrow" to start and stop the spindle and to set up it's rotational speed. Furthermore the current status messages of the converter are displayed, such as selected characteristic, direction of rotation and load status. If an error appears it will displayed in the status area, whose background then turn red. e 3.2.1 Adjusting the rotational speed of the spindle Adjusting the rotational speed is carried out with the...
Open the catalog to page 10
Characteristic-Menu Menu To change the current selected spindle characteristic or list all available characteristics, it has to be moved to the Main Menu by pressing MENU. Being there, Main-Menu it has to be navigated with the SELECT or Arrow Keys to the point " "Characteristic Selection" and confirmed with ENTER. " After that, a list of all characteristics being stored in the converter will be uploaded and displayed. The current selected characteristic is marked with a green marker. To select a certain characteristic to be used in the inverter, in the characteristics haracteristic menu it has...
Open the catalog to page 11
In case it is intended to carry out a dressing with the system, it has to be moved from the current window to the Main Main-Menu with the MENU-Key and the menu point Key Dressing to be selected. From there it is entered the DressView DressView®-configuration menu. DressView-Configuration menu onfiguration In the DressView®-Configuration menu all basic settings of the dressing window can onfiguration be set up being required in advance for dressing operation. All settings will be saved and after reentering automatically reloaded. Adjusting the rotational speed With pressing on "+" or "-" the digit...
Open the catalog to page 12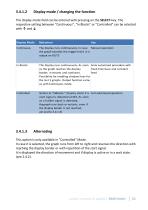
The display mode field can be entered with pressing on the SELECT-key. The respective setting between "Continuous", "In Blocks" or "Controlled" can be selected with ^ and ^ Display Mode Behaviour Use This option is only available in "Controlled" Mode. In case it is selected, the graph runs from left to right and reverses the direction with reaching the display border or with repetition of the start signal. It is displayed the direction of movement and if display is active or in a wait state. (see 2.4.2).
Open the catalog to page 13
This checkbox inverts the colors of the dressing window. The background color changes to black respectively dark grey and the text color to white. This Option could set to "show" and "hide". At counter direction dressing the option "hide" should be chosen, because only positive values occur. If the values falls below 0% (through omission of a coolant jet or prolonged running of the spindle), the line is limited to 0%. At synchronous dressing, the option "show" can be selected, as there only negative values can occur during the dressing process. Important here is zeroing at idle, but with...
Open the catalog to page 14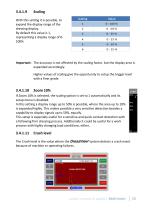
With this setting it is possible, to expand the display range of the dressing display. By default this value is 1, representing a display range of 0100% Important: The accuracy is not affected by the scaling factor, but the display area is expanded accordingly. Higher values of scaling give the opportunity to setup the trigger level with a finer grade 3.4.1.10 Zoom 10% If Zoom 10% is selected, the scaling option is set to 1 automatically and its setup menu is disabled. In this setting a display range up to 50% is possible, where the area up to 10% is expanded highly. This makes possible a very...
Open the catalog to page 15All BMR GmbH catalogs and technical brochures
 Catalogue
52 Pages
 SFU 0102
28 Pages
 SFU 400
15 Pages
 SFU 0102/0202
28 Pages
 SFU 0103/0203
30 Pages
 SFU 0303
56 Pages
 SFU0300
24 Pages
 SFU-ErrorFlags
7 Pages
 RS232 Control Commands
6 Pages
 SpindlecoolerKG-T 500
24 Pages
 Folnet P S / P S 300
8 Pages
 Folnet P
8 Pages
 Folnet3-NT
8 Pages
 Folnet 1 NT
8 Pages
 Folnet 1
8 Pages
 Folinv 12/3
4 Pages
 SFU 0401
10 Pages
 SFU 0302 19”
28 Pages
 SFU 0302 SSE
30 Pages
 SFU 0101/0201
17 Pages
 SFU 0100
2 Pages
 SFU 0303/4
48 Pages
 SFU 0303/2
50 Pages
 SFU0052
12 Pages
 SFU 0200/1
24 Pages
 SFU 0103
24 Pages
 SFU 0156
20 Pages
 SFU 0150
20 Pages
 KG-T 500
20 Pages

- Measuring machine
- Automatic measurement system
- Frequency inverter
- Measuring system for industrial applications
- Compact frequency inverter
- Digital output frequency inverter
- IP20 frequency inverter
- Motor frequency converter
- Vector control frequency inverter
- LED driver
- Integration frequency inverter
- Fieldbus frequency inverter
- Induction frequency converter
- Cabinet frequency inverter
- Low-voltage frequency inverter
- Asynchronous motor frequency inverter
- Vector-controlled frequency inverter
- Digital display frequency inverter
- Panel frequency inverter
- Synchronous motor frequency inverter