Group: ITW Industrial finishing

Catalog excerpts

The Binks Model 84-120 Ceramic FluidRegulator is an industry-proven ceramic regulator that assures uniform finishes on part after part... day after day. > 1. Increase Pressure:Turn in wingscrew (31).2. Decrease Pressure:Turn out wingscrew (31) while gun is triggered.3. Read instructions on back cover ofregulator. > 1. Plugged Regulator:Use thebypass screw (23) to open bypass while triggering gun. Close bypass and trigger gun.Ifregulator fails to return tonormal operation,open bypass and blow back gun. Close bypass and return to normal operation.If thesefail,remove and inspect regulator and connecting supply line.2.A ruptured or worn actuator tube(11)at valve section causes regulated fluid pressure to climb to line pressure when gun is not in use. Replace actuator tube. Inspect valveseat (20) and valve gate assembly (19) for wear.3.Standby or replacement regulatorsshould be stored with the bypass screw (23) open and the wing screw (31) turned out. > Turn the wing screw (31) out so that no spring pressure is exerted on plate (15). Be sure bypass is closed. Remove set screw (5) and loosen adjustment lock nut (22). Connect inlet to fluid pressure supply and turn adjustment screw (21) down until outlet flow is just cut off. Tighten lock nut and replace set screw to cover thread. > Disassemble regulator. Do notremove bonnet thread inserts (14) or tubing seal bodies (25) except for replacement.Thoroughly clean all parts until free ofabrasive material. Grease all moving parts. Assemble parts in back of regulator body first,including back cover (24). Turn body over. Insert tubing seal(26) into one end of actuator tube (11) and push other end into regulator body (13) through outlet. Pull tube into body until tube end with seal is in place in the tubing seal body (25).Wind tube into the spiral cast inregulator body and push end out through inlet. Turn tube if necessary to remove any twists or kinks.Insert tubing seal into end of tubeand secure tube in inlet tubing seal body. Center the plate (15) on thread of rod (16) and fasten plate down over tube with lock nut (1). Assemble the remaining parts on theregulator body. Regulator is now ready to be tested.Connect inlet to water pressuresupply (60-80 lbs.) and outlet to a gun and hose. Be sure bypass is closed.While triggering gun,regulate thepressure with wing screw (31) over the range of pressures used on the production line. If pressure cannot be regulated low enough,adjust per the following instructions. > Replaces Part Sheet 1417R-2 Part Sheet77-1417R-3 size="-1">
Open the catalog to page 1All Binks catalogs and technical brochures
-
 AG-364
4 Pages
-
 Premium Elevator Systems
7 Pages
-
 RVC
RVC2 Pages
-
 AGMD PRO
2 Pages
-
 AX200L AIR MOTOR ASSEMBLIES
10 Pages
-
 AIR ASSIST PUMP ASSEMBLY
16 Pages
-
 BINKS MX SERIES
4 Pages
-
 AA1600M
6 Pages
-
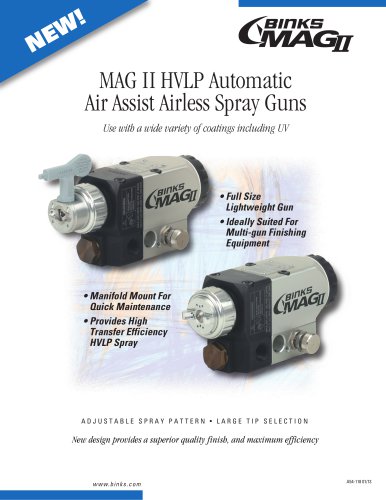 MAG II
4 Pages
-
 2100
21004 Pages
-
 75
752 Pages
-
 AG-363
2 Pages
-
 GEMINI II Series
8 Pages
-
 LEL Spray Guns
2 Pages
-
 MX412
MX41228 Pages
-
 BINKS TROPHY SERIES
60 Pages


Archived catalogs
-
 Rhino Automatic Spray Gun
1 Pages
-
 Sun Skeeter
4 Pages
-
 Magnalube-G
5 Pages
-
 A-F High Efficiency Filter
3 Pages
-
 Air Motor Oil - Motor Oil
7 Pages
-
 Cleaner
5 Pages
-
 Desiccant (air dryer)
4 Pages
-
 Premium Desiccant
4 Pages
-
 Lubricating Oil
4 Pages
-
 White Booth Coat
6 Pages
-
 Binks Pump Purj - Pump Purg
4 Pages
-
 Watt Lube
3 Pages
-
 Scrubs
4 Pages
-
 A-F Filter
3 Pages
-
 Wet Sol Plus
5 Pages
-
 Spray Gun Lube
4 Pages
-
 Booth Filter
4 Pages
-
 spray vantage 3
2 Pages


