Twist & Dry Nozzle Assembly Tips
Twist & Dry Nozzle Assembly Tips
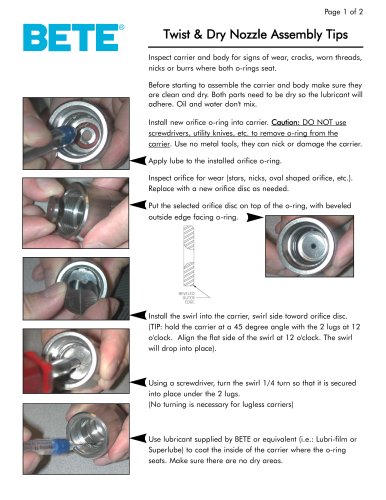
- Inspect the carrier and body for wear, cracks, worn threads, nicks, or burrs where o-rings seat.
- Ensure both the carrier and body are clean and dry before assembly to ensure proper lubricant adhesion.
- Install a new orifice o-ring into the carrier without using metal tools to avoid damage.
- Apply lubricant to the installed o-ring.
- Inspect the orifice for wear and replace if necessary.
- Place the orifice disc on top of the o-ring with the beveled edge facing the o-ring.
- Install the swirl into the carrier, aligning it properly and securing it with a 1/4 turn using a screwdriver.
- Use BETE or equivalent lubricant to coat the inside of the carrier and body threads generously.
- Ensure lubricant is applied to the o-ring groove to prevent sticking.
- Install the backup ring into the body o-ring groove, ensuring it snaps into place.
- Install a new o-ring on the body, rolling it into the groove without stretching.
- Position the o-ring next to the backup ring and apply lubricant before installing into the carrier.
- Screw the carrier onto the body, ensuring alignment to avoid cross-threading.
- Hand tighten the carrier; do not use a wrench.
- Ensure the orifice is seated against the inside of the carrier.
Catalog excerpts

Inspect carrier and body for signs of wear, cracks, worn threads,nicks or burrs where both o-rings seat.Before starting to assemble the carrier and body make sure theyare clean and dry. Both parts need to be dry so the lubricant will adhere. Oil and water don't mix.Install new orifice o-ring into carrier. Caution: DO NO T use screwdrivers, utility knives, etc. to remove o -ring from the carrier . Use no metal tools, they can nick or damage the carrier.Apply lube to the installed orifice o-ring. Inspect orifice for wear (stars, nicks, oval shaped orifice, etc.).Replace with a new orifice disc as needed.Put the selected orifice disc on top of the o-ring, with beveledoutside edge facing o-ring. Install the swirl into the carrier, swirl side toward orifice disc.(TIP: hold the carrier at a 45 degree angle with the 2 lugs at 12 o'clock. Align the flat side of the swirl at 12 o'clock. The swirl will drop into place).Using a screwdriver, turn the swirl 1/4 turn so that it is securedinto place under the 2 lugs. (No turning is necessary for lugless carriers)Use lubricant supplied by BETE or equivalent (i.e.: Lubri-film orSuperlube) to coat the inside of the carrier where the o-ring seats. Make sure there are no dry areas. >
Open the catalog to page 1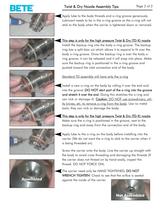
Page 2 of 2 Apply lube to the body threads and o-ring groove generously.Lubricant needs to be in the o-ring groove so the o-ring will not stick to the body when the carrier is tightened down or removed. This step is only for the high pressure Twist & Dry (TD -K K) nozzle . Install the backup ring into the body o-ring groove. The backup ring has a split bias cut which allows it to expand to fit over the body o-ring groove. Once the backup ring is over the body o- ring groove, it can be released and it will snap into place. Make sure the backup ring is positioned in the o-ring groove and pushed...
Open the catalog to page 2All BETE catalogs and technical brochures
 WL metric
1 Page
 PJ metric
1 Page
 NF
NF1 Page
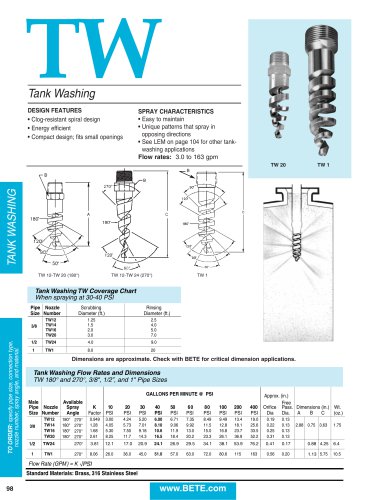
 TW metric
1 Page
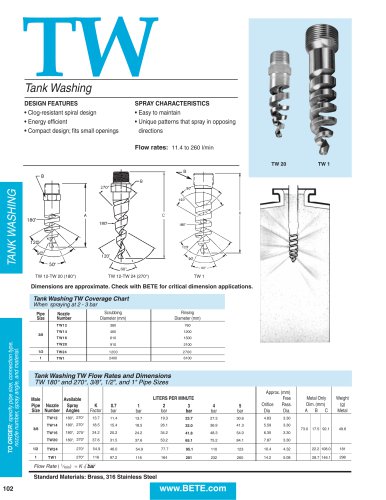
 TW
TW1 Page
 AFF metric
1 Page
 TF10-170
1 Page
 TF24
TF241 Page
 TF FM Approved
1 Page
 TF metric
1 Page
 MaxiPass®
2 Pages
 HydroClaw®
2 Pages
 XAAD
XAAD1 Page
 ST
ST1 Page
 XA Components & Options
1 Page
 Engineering Information
9 Pages
 Custom In-House Fabrications
2 Pages
 BETE Spray Nozzle Catalog
134 Pages
 Line Card
2 Pages
 Bottle, Drum & Tank Washing
16 Pages
 BETE Metric Catalog
132 Pages
 LEM
LEM1 Page
 NFH
NFH1 Page
 BJH
BJH1 Page
 TurboMix
1 Page
 Twist & Dry
5 Pages
 TF29
TF291 Page
 N fire protection
1 Page
 AFF
AFF1 Page
 CLUMP
CLUMP1 Page
 HydroWhirl Orbitor
2 Pages
 HydroWhirl ® Poseidon
1 Page
 HydroWhirl S
1 Page
 SAM
SAM2 Pages
 XA Accessories
4 Pages
 XA
XA7 Pages
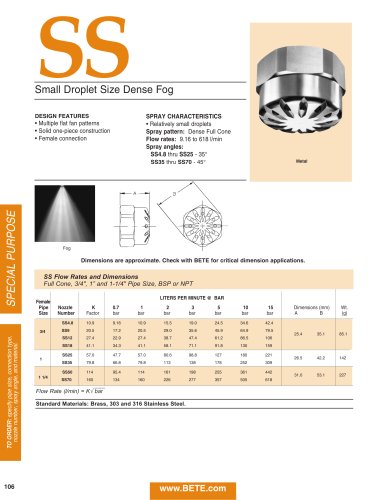
 SS
SS1 Page
 UltiMist
1 Page
 L
L1 Page
 p
p1 Page
 PJ
PJ1 Page
 MicroWhirl
1 Page
 SPN
SPN1 Page
 EZ FF NF SPN
2 Pages
 FF
FF2 Pages
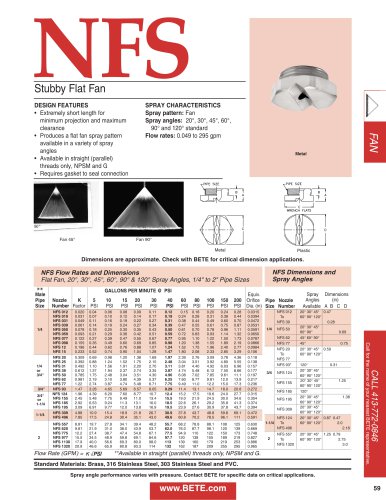 nfs
nfs1 Page
 NFD
NFD1 Page
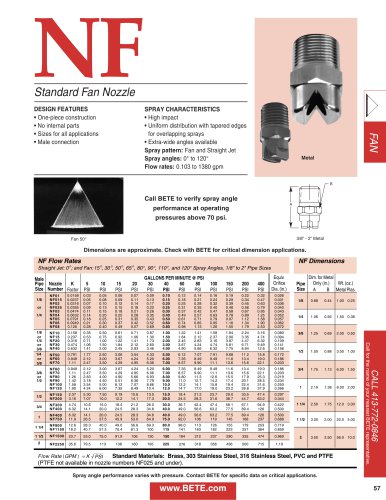 NF
NF1 Page
 NFV
NFV1 Page
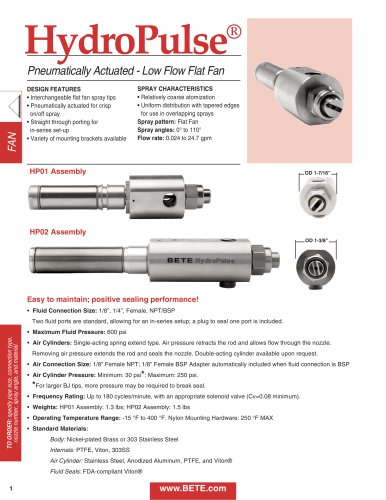 HydroPulse
4 Pages
 BJ
BJ2 Pages
 Spillback
2 Pages
 THW
THW2 Pages
 NCJ
NCJ1 Page
 TH
TH2 Pages
 WTX
WTX2 Pages
 WT
WT2 Pages
 TC
TC1 Page
 NCFL
NCFL1 Page
 NCK
NCK1 Page
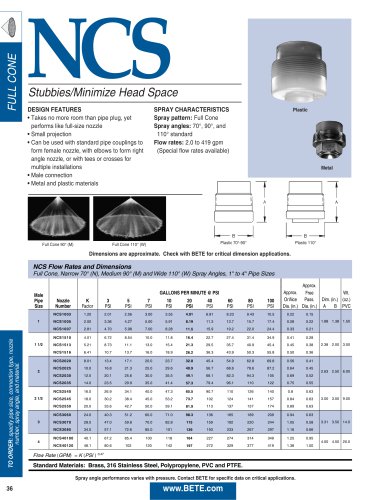 NCS
NCS1 Page
 NC
NC2 Pages
 SF
SF3 Pages
 EZFF
EZFF2 Pages
 WTZ
WTZ1 Page
 CW
CW2 Pages
 WL
WL1 Page
 STXP
STXP1 Page
 TFXP
TFXP1 Page
 Spray Coverage
1 Page
 Bete accessories
1 Page
 MATERIALS
1 Page
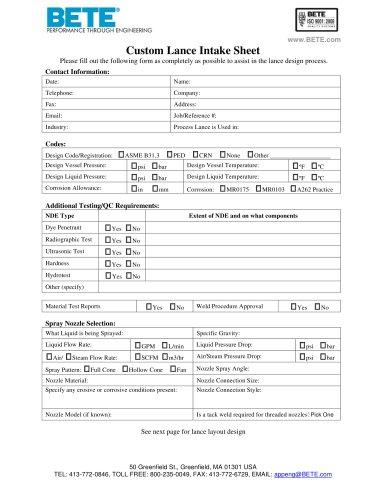 Custom Lance Intake Sheet
2 Pages
 Pollution Control
8 Pages
 Food Industry
8 Pages
 Fire Protection
8 Pages
 DUR O LOK®
6 Pages
 Chemical Processing
8 Pages
 Spray Nozzle Catalogs
127 Pages
 MaxiPass ® L
1 Page
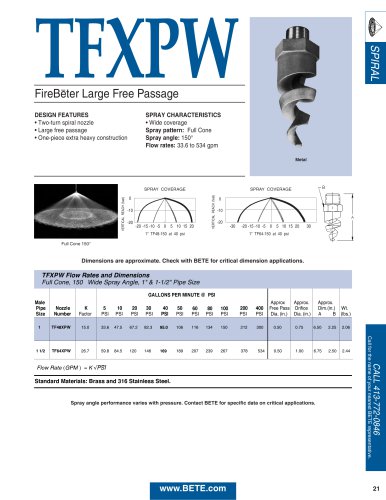 TFXPW
TFXPW1 Page
 N
N2 Pages
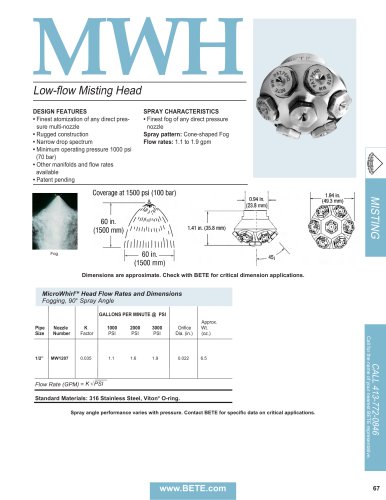 MicroWhirlTM Head (MWH)
1 Page
 MaxiPassTM (MP)
2 Pages
 LP
LP1 Page
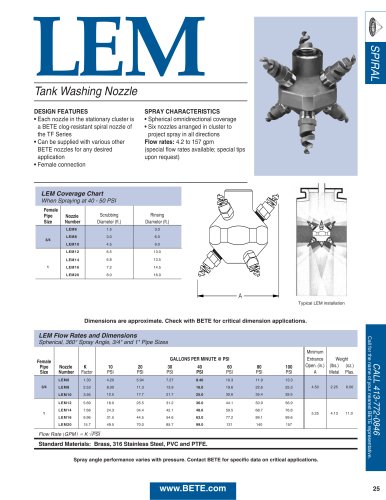 LEM
LEM1 Page
 IS
IS1 Page
 FluidBed
1 Page
 Spray Drying
11 Pages
 Bottle, Drum & Tank Washing
16 Pages
 TD/TD-K
4 Pages
 SC
SC2 Pages
 FINZTM
1 Page


Archived catalogs
 SpiralAir
2 Pages
 SpiralAirTM
2 Pages
 TF_2021
1 Page
 TF
TF1 Page
 TW
TW1 Page
 N Fire Protection
2 Pages
 Spray dry manual
25 Pages
- Spray tip
- Liquid nozzle
- Stainless steel nozzle
- Cleaning nozzle
- Multi-jet nozzle
- Air nozzle
- Screw-in single nozzle
- Cooling nozzle
- Industrial tip
- Flat tip
- Brass atomizing nozzle
- Plastic nozzle
- Nozzle for the chemical industry
- Full-cone nozzle
- Nozzle for the food industry
- Water nozzle
- Nozzle for the steel industry
- 90° atomizing nozzle
- Washing nozzle
- 60° atomizing nozzle