InstaShow™ S
1 /71Pages

InstaShow™ S
1 /71Pages
Catalog excerpts
Copyright Copyright © 2020 by BenQ Corporation. All rights reserved. No part of this publication may be reproduced, transmitted, transcribed, stored in a retrieval system or translated into any language or computer language, in any form or by any means, electronic, mechanical, magnetic, optical, chemical, manual or otherwise, without the prior written permission of BenQ Corporation. Disclaimer BenQ Corporation makes no representations or warranties, either expressed or implied, with respect to the contents hereof and specifically disclaims any warranties, merchantability or fitness for any particular...
Open the catalog to page 2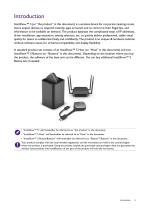
Introduction InstaShow™ S (or “the product” in this document) is a wireless device for corporate meeting rooms. Users expect devices to respond instantly, apps to launch and to control at their fingertips, and information to be available on demand. The product bypasses the complicated steps of IP addresses, driver installation, app execution, setting selection, etc. to quickly deliver professional, stable visual quality for teams to collaborate freely and confidently. The product is an unique all-hardware solution without software issues for universal compatibility and display flexibility. A...
Open the catalog to page 5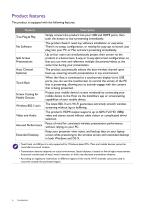
Product features The product is equipped with the following features: Features True Plug & Play No Software Split Screen Presentations Auto Channel Selection Touch Back Screen Casting for Mobile Devices Wireless 802.11ac/n Video and Audio Assured Performance Extended Desktop Description Simply connect the product into your USB and HDMI ports, then push the button to start presenting immediately. The product doesn't need any software installation or execution. There's no setup, configuration, or waiting for pop-ups to launch. Just plug into your PC or Mac and start presenting immediately. Up to...
Open the catalog to page 6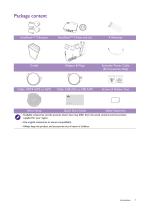
Package content OPEN Adapter & Plugs Extender Power Cable (EU Countries Only) Screws & Rubber Foot Quick Start Guide Velcro Strap Quick Start Guide Safety Statement • Available accessories and the pictures shown here may differ from the actual contents and the product supplied for your region. • Use original accessories to ensure compatibility. • Always keep the product and accessories out of reach of children.
Open the catalog to page 7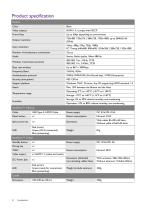
Product specification Feature Color Video outputs HDMI 1.4, comply with HDCP Frame Rate Output resolution Input resolution Number of simultaneous connections Stereo, Radio quality 16bits 48KHz Wireless transmission protocol Data rate wireless Frequency Band Authentication protocol Security (encryption) Support platform Windows, MAC, Chrome. Any OS supporting HDMI standard 1.4 Max. 15M between the Button and the Host Operating: 0°C to +40°C (+32°F to +104°F) Temperature range Storage: -10°C to +60°C (+14°F to +140°F) Storage: 5% to 90% relative humidity, non-condensing Operation: 10% to 80% relative...
Open the catalog to page 8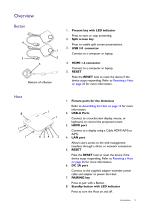
Present key with LED indicator Press to start or stop presenting. Split screen key Press to enable split screen presentations. USB 3.0 connector Connect to a computer or laptop. Connect to a computer or laptop. RESET Poke the RESET hole to reset the device if the device stops responding. Refer to Resetting a Host on page 26 for more information. Refer to Assembling the Host on page 12 for more information. USB-A Ports Fixture parts for the Antennas Connect to a touchscreen display, mouse, or keyboard, to control the projected screen. HDMI port Connect to a display using a Cable HDMI A(M) to A(M)....
Open the catalog to page 9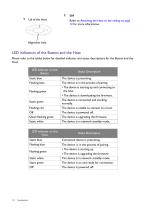
Lid Refer to Attaching the Host to the ceiling on page 12 for more information. Alignment hole LED indicators of the Button and the Host Please refer to the tables below for detailed indicator and status descriptions for the Button and the Host. LED indicator on the Button Static blue Flashing blue Flashing green Static green Flashing red Off Quick flashing green Static white LED indicator on the Host Status Description The device is presenting. The device is in the process of pairing • The device is starting up and connecting to the host. • The device is downloading the firmware. The device...
Open the catalog to page 10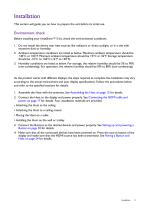
Installation This section will guide you on how to prepare the unit before its initial use. Environment check Before installing your InstaShow™ S kit, check the environmental conditions. 1. Do not install the device near heat sources like radiators or direct sunlight, or in a site with excessive dust or humidity. 2. Ambient temperature conditions are listed as below. Maximum ambient temperature should be +40°C or 104°F. Minimum ambient temperature should be +0°C or 32°F. Storage temperature should be -10°C to +60°C (14°F to 140°F). 3. Humidity conditions are listed as below. For storage, the...
Open the catalog to page 11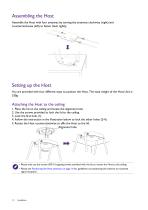
Assembling the Host Assemble the Host with four antennas by turning the antennas clockwise (right) and counterclockwise (left) to fasten them tightly. Setting up the Host You are provided with four different ways to position the Host. The total weight of the Host Unit is 330g. Attaching the Host to the ceiling 1. Place the lid on the ceiling and locate the alignment hole. 2. Use the screws provided to lock the lid to the ceiling. 3. Lock the first hole (1). 4. Follow the instruction in the illustration below to lock the other holes (2-4). 5. Rotate the Host counterclockwise to affix the Host...
Open the catalog to page 12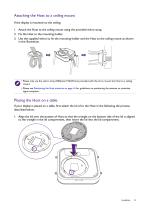
Attaching the Host to a ceiling mount If the display is mounted on the ceiling: 1. Attach the Host to the ceiling mount using the provided velcro strap. 2. Fix the Host to the mounting holder. 3. Use the supplied velcro to fix the mounting holder and the Host to the ceiling mount as shown in the illustration. • Please only use the velcro strap (300(L)mm*25(W)mm) provided with the kit to mount the Host to a ceiling mount. • Please see Positioning the Host antennas on page 16 for guidelines on positioning the antenna to maximize signal reception. Placing the Host on a table If your display is placed...
Open the catalog to page 13
2. Turn the lid counter-clockwise until it clicks into place. 3. When the lid is correctly installed on the Host the alignment hole on the lid should be pointed to the LOCK print at the front side of the Host. 4. Attach the rubber feet to the recesses on the lid and put the Host right next to the display. • Please only use the rubber foot provided with the kit to attach to the Host. • Please see Positioning the Host antennas on page 16 for guidelines on positioning the antenna to maximize signal reception.
Open the catalog to page 14All BenQ catalogs and technical brochures
 VC01A 4K UHD Video Bar
4 Pages
 dvy31_dvy32_dvy23
2 Pages
 DMS Local
44 Pages
 Display Pilot
15 Pages


- Digital imager
- Visible imager
- LCD screen
- LCD display panel
- Industrial camera module
- Automation software solution
- Management software solution
- HDMI monitor
- VESA mounting monitor
- Box PC
- Windows PC
- Process software
- Windows software
- Real-time software
- LED monitor
- Computer-aided design software
- Cloud-based software
- USB monitor
- Control software