


DMS Local

DMS Local
DMS Local is a software tool for IT administrators to manage multiple digital projectors remotely via a local network, ideal for environments like office buildings or schools with multiple classrooms.
To run DMS Local, a computer needs at least an Intel i7 2.6GHz CPU, 8GB RAM, 2GB hard disk space, and a display resolution of 1054x640 or higher. It supports Windows 7 and Windows 10. Projectors must have an RJ-45 Ethernet port with LAN control functionality.
1. Connect projectors and computer to the same network using RJ-45 cables or Wi-Fi.
2. Install DMS Local on the computer.
3. Configure projector settings to enable network standby mode.
Launch DMS Local via the Windows Start menu or desktop icon. An activation code from the BenQ website is required. Update the projector database post-activation.
Add projectors to the DMS Local device tree for management. The main page includes a device tree, projector panel, and options to refresh status, add projectors, access settings, and set up a login password.
DMS Local supports creating groups, renaming, deleting projectors, and monitoring their status. It allows scheduling tasks, sending error notifications via email, and generating error reports. Firmware updates and backup of projector listings are also available.
The manual includes a troubleshooting section for common issues encountered while using DMS Local.
This document provides detailed instructions on managing projectors using DMS Local, including setting up, adding, organizing, and controlling projectors.
Ensure your computer and projectors are on the same network. Use the 'Add new device' option to scan and select projectors. Name projectors for easy identification.
Projectors appear in a device tree and can be organized into groups. You can rename or delete projectors and create sub-groups for better management.
The device tree displays projectors' status using icons: Online, Standby, Offline, and Error, helping quickly identify projector conditions.
The projector panel provides detailed status information, including power status, operating status, and error messages. The information tab offers additional details like MAC address, IP address, and usage statistics.
The control tab allows users to manage projectors individually or in groups. It supports custom command codes for BenQ and non-BenQ projectors. A virtual keypad is available for BenQ projectors.
Error messages provide insights into issues like system errors, lamp errors, fan errors, and temperature errors. Detailed descriptions help in troubleshooting.
This document serves as a comprehensive guide for using DMS Local to efficiently manage and control projectors, ensuring optimal performance and organization.
The quick settings section allows users to control various projector functions such as input source, screen blanking, lamp mode, audio muting, aspect ratio, brightness, picture mode, volume, network function, and monitor output. Some features are not available for multiple projectors and are marked with an asterisk (*).
This section enables users to create custom controls using direct commands. For BenQ projectors, commands must be in ASCII format, while non-BenQ projectors require hexadecimal format. Users can create one-time commands or save them as custom buttons.
The scheduling feature allows users to automate tasks for individual or groups of projectors. Tasks can be set to occur at specific times and frequencies, with options for daily, weekly, monthly, or custom schedules. DMS Local must remain open for tasks to execute.
DMS Local can send e-mail alerts for specified errors. Users can configure which errors trigger alerts and set up multiple recipient addresses. The system supports various e-mail services for sending alerts.
Users can set a login password for DMS Local to restrict access. Additional functions include generating error reports, updating projector firmware, and backing up projector listings. Error reports only include projectors with recorded errors.
Common issues include connection problems and adding projectors to DMS Local. Solutions involve checking connections, ensuring projectors are powered on, and verifying network settings.
Catalog excerpts

User Manual For Projector Management
Open the catalog to page 1
Copyright Copyright 2019 BenQ Corporation. All rights reserved. No part of this publication may be reproduced, transmitted, transcribed, stored in a retrieval system or translated into any language or computer language, in any form or by any means, electronic, mechanical, magnetic, optical, chemical, manual or otherwise, without the prior written permission of BenQ Corporation. All other logos, products, or company names mentioned in this manual may be the registered trademarks or copyrights of their respective companies, and are used for informational purposes only. Disclaimer BenQ Corporation...
Open the catalog to page 2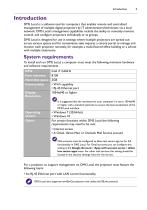
Introduction DMS Local is a software tool for computers that enables remote and centralized management of multiple digital projectors by IT administrators/technicians via a local network. DMS Local’s management capabilities include the ability to remotely monitor, control, and configure projectors individually or as groups. DMS Local is designed for use in settings where multiple projectors are spread out across various spaces and for convenience sake requires a central portal to manage and monitor each projector remotely, for example a multi-floored office building or a school with multiple...
Open the catalog to page 5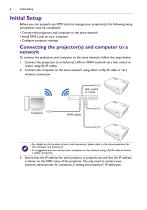
Initial Setup Initial Setup Before you can properly use DMS Local to manage your projector(s) the following setup procedures must be completed: • Connect the projectors and computer to the same network • Install DMS Local on your computer • Configure projector settings Connecting the projector(s) and computer to a network To connect the projectors and computer to the same network, follow the steps below: 1. Connect the projectors to an Ethernet LAN or WAN network via a hub, switch or router using RJ-45 cables. 2. Connect the computer to the same network using either an RJ-45 cable or via a wireless...
Open the catalog to page 6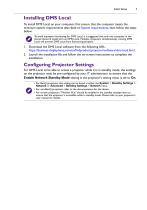
Initial Setup Installing DMS Local To install DMS Local on your computer, first ensure that the computer meets the minimum system requirements described on System requirements, then follow the steps below: To avoid improper functioning for DMS Local, it is suggested that only one computer in the shared network install and run DMS Local. Multiple computers simultaneously running DMS Local will prevent DMS Local from functioning properly. 1. Download the DMS Local software from the following URL: https://business-display.benq.com/en/findproduct/projector/software/dms-local.html. 2. Launch the installation...
Open the catalog to page 7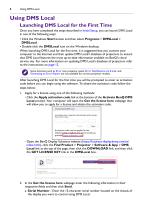
Using DMS Local Launching DMS Local for the First Time Once you have completed the steps described in Initial Setup, you can launch DMS Local in one of the following ways: • Click the Windows Start button and then select Programs > DMSLocal > DMSLocal. • Double-click the DMSLocal icon on the Windows desktop. When launching DMS Local for the first time, it is suggested that you connect your computer to the Internet and then update DMS Local’s database of projectors to ensure that DMS Local features the most up-to-date information available on BenQ’s cloud service site. For more information on...
Open the catalog to page 8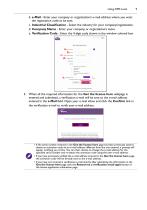
b. e-Mail - Enter your company or organization’s e-mail address where you want the registration code to be sent. c. Industrial Classification - Select the industry for your company/organization. d. Company Name - Enter your company or organization’s name. e. Verification Code - Enter the 4-digit code shown in the window colored box. 3. When all the required information for the Get the license here webpage is entered and submitted, a verification e-mail will be sent to the e-mail address entered in the e-Mail field. Open your e-mail inbox and click the Confirm link in the verification e-mail to...
Open the catalog to page 9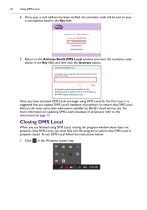
4. Once your e-mail address has been verified, the activation code will be sent to your e-mail address listed in the Key field. 5. Return to the Activate BenQ DMS Local window and enter the activation code shown in the Key field, and then click the Activate button. Once you have activated DMS Local and begin using DMS Local for the first time, it is suggested that you update DMS Local’s database of projectors to ensure that DMS Local features the most up-to-date information available on BenQ’s cloud service site. For more information on updating DMS Local’s database of projectors refer to the...
Open the catalog to page 10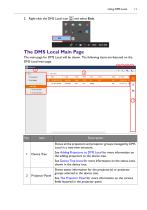
2. Right-click the DMS Local icon The DMS Local Main Page The main page for DMS Local will be shown. The following items are featured on the DMS Local main page. 3 4 5 6 Description Shows all the projectors and projector groups managed by DMS Local in a tree-view structure. Device Tree See Adding Projectors to DMS Local for more information on the adding projectors to the device tree. See Device Tree Icons for more information on the status icons shown in the device tree. Projector Panel Shows status information for the projector(s) or projector groups selected in the device tree. See The Projector...
Open the catalog to page 11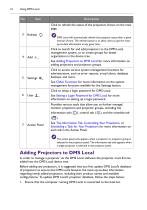
Description Click to refresh the status of the projectors shown on the main page. DMS Local will automatically refresh the projector status after a given interval of time. The refresh button is to allow users to get the most up-to-date information at any given time. Click to search for and add projectors to the DMS Local management system, or to create groups for better organization in the device tree. See Adding Projectors to DMS Local for more information on adding projectors and projector groups. Click to access various system management functions for administrators, such as error reports,...
Open the catalog to page 12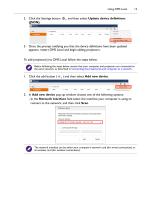
2. Click the Settings button (JSON). and then select Update device definitions 3. Once the prompt notifying you that the device definitions have been updated appears, restart DMS Local and begin adding projectors. To add projector(s) to DMS Local follow the steps below: Before following the steps below, ensure that your computer and projectors are connected to the same network, as described in Connecting the projector(s) and computer to a network. ) and then select Add new device. 2. In Add new device pop-up window choose one of the following options: - In the Network Interface field select the...
Open the catalog to page 13All BenQ catalogs and technical brochures
 VC01A 4K UHD Video Bar
4 Pages
 dvy31_dvy32_dvy23
2 Pages
 InstaShow™ S
71 Pages
 Display Pilot
15 Pages


- Digital imager
- Visible imager
- LCD display panel
- LCD screen
- Industrial camera module
- Automation software solution
- Management software solution
- HDMI monitor
- VESA mounting monitor
- Box PC
- Windows PC
- Process software
- Real-time software
- Windows software
- LED monitor
- Computer-aided design software
- USB monitor
- Cloud-based software
- Control software