- Catalogs
- Beijing Breeze Technology Co.,Ltd
- Breeze TV06 WIFI Datasheet
Breeze TV06 WIFI Datasheet
1 /1Page
Breeze TV06 WIFI Datasheet
1 /1Page
Catalog excerpts

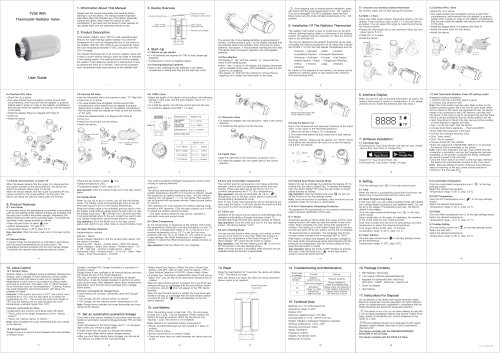
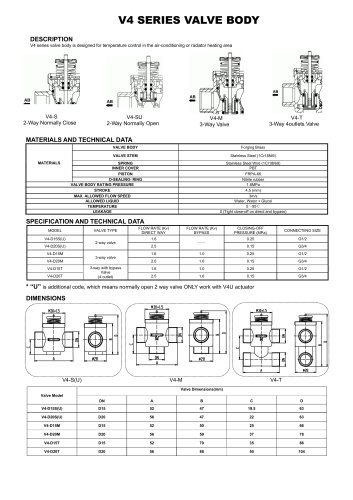
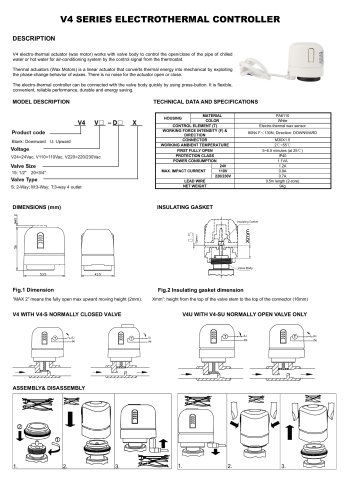
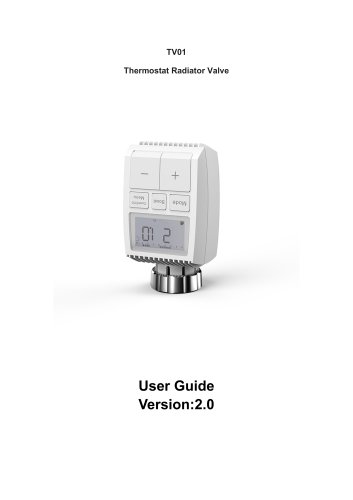
Thermostat Radiator Valve User Guide 1. Information About This Manual Please read this manual completely and carefully before starting to use the device. The manual contains important information about the intended use of the device. Especially observe the safety notes. Keep the manual for later consultation. If you hand over the device to other persons for use, please hand over the operating manual as well. Thermostatic radiator valve (TRV) is a self-regulating valve fitted to hot water heating system radiator, to control the temperature of a room by changing the flow of hot water to the radiator. With the TRV TV06 you can conveniently adjust the room temperature between 5-30°C, and save more than 15% of energy. The radiator thermostat fits to all common radiator valves and is easy to mount-without having to drain any water or intervene in the heating system. The additional boost function enables the radiator to be heated up quickly for a brief period of time by opening the valve for 5 minutes. There will be a pleasant room temperature right away because of the radiated heat. • 2 x AA batteries are required for TRV to work, please get prepared. • Temperature is shown in degrees Celsius. • Insert 2 new LR6(mignon/AA) batteries in the battery compartment, making sure they are the right way round. The service life of new alkaline batteries is approximately 6 months. A battery symboK h!-!r ) on the display indicates that the batteries need to be replaced. After removing the empty batteries, wait approx. 1 minute before inserting the new ones. This device does not support operation with rechargeable batteries. The display of ‘ InS ’ with the rotating ‘ n ’ shows that the motor is still travelling back. • When ‘ AdA ’ is shown in the display, the radiator thermostat can be installed on the valve. After installation, press the pair button to run adaptive. • The display of ‘AdA’with the rotating'n ’shows that an adapting run to adapt the thermostat to the valve. A If the adapting runs is initiated before installation, press pair button and the motor travels back to the ‘ InS ’ position. If an error message(F1,F2,F3) is displayed, press the Pair/ Boost button and the motor similarly travels back to the ‘ InS ’ position. 5. Installation Of The Radiator Thermostat The radiator thermostat is easy to install and can be done without draining heating water or intervening in the heating system. No special tools are required, nor does the heating have to be switched off. The ring nut attached to the radiator thermostat can be used universally and without accessories for all valves with a thread size of M30 x 1.5 from the most popular manufacturers such as: • Danfoss •Heimeier *MNG • Junkers • Landis&Gyr (Duodyr) • Honeywell-Braukmann • Oventrop •Schlosser • Comap *Valf Sanayii • Mertik Maxitrol -Watts *Wingenroth (Wiroflex) • R.B.M *Tiemme »Jaga -Siemens By means of the adapters in the delivery, the device can be installed on radiator valves of type Danfoss RA, Danfoss RAV and Danfoss RAVL. 5.1 Unscrew your existing radiator thermostat No worries, water will not leak during this process. Screw the TV06 smart radiator thermostat directly onto the radiator if the connector type is M30 x 1.5 (picture shown as below). You can adjust the angle to make the led facing the viewer properly. • Rotate the thermostat dial to the maximum value, the max value may be 6 or 8. 5.3 Danfoss RAVL Valve • The valve bodied have elongated notches around their circumference, which ensure that the adapter is properly seated when it snaps on: snap on the adapter completely,so that the pins inside the adapter are lined up with the notches on the valve. • Install the adapter,Plane A is aligned with Plane B. • Install the round tube into the device. • The valve bodied have elongated notches around their circumference, which ensure that the adapter is properly seated when it snaps on: snap on the adapter completely,so that the pins inside the adapter are lined up with the notches on the valve. • Install the adapter,Plane A is aligned with Plane B. • tate the thermostat dial to the maximum value, “N” Align Dial. • The valve bodied have elongated notches around their circumference, which ensure that the adapter is properly seated when it snaps on: snap on the adapter completely,so that the pins inside the adapter are lined up with the notches on the valve. • Install the adapter,Plane A is aligned with Plane B. • Install the round tube into the device. • Select the length of the ejector rod according to the following brands or valve sizes, and the size of ejector rod is 15 / 17 / 19 / 24mm. • To install the ejector rod with the correct size into the hole. • To install the adapter onto M28 * 1.5 valve. Amazon Alexa is an intelligent personal assistant developed by Amazon, and is capable of voice interaction. Smart radiator thermostat works with Alexa to allow you to regulate the temperature of each room in your system by using a wake-word and an instruction. The wake-work is “Alexa”followed by an instruction such as“set temperature.” Currently, Amazon has made interaction and communication with Alexa only available in English. Example: If the current set-point is 16°C, the current room temperature is 19°C and you ask Alexa to increase the temperature by 2°C - the current set-point will change to 18°C but the heating will not start because the room temperature is already higher than 18°C. Common commands for Alexa • Listed below are common commands used with Alexa: • “Alexa, what is the target temperature of the <device name>?” • “Alexa, set <device name> to twenty.” Note: Alexa considers the smart thermostat and room names as the devices. Google Home is a brand of smart speakers that work similarly to Amazon Echo. Google’s intelligent PA, Google Assistant, is equivalent to Amazon’s Alexa. Google Home is also available on all Android devices and does not require the use of the ‘Smart Speakers’. The user can speak a profusion of commands to request information, or ask the Google Assistant to perform an action such as play music, video playback, report news, access home automation. All of this can all be controlled from a Google Home device. Common commands for Google Home • Listed below are common commands used with Google Home: • “OK Google, set the <device name> to twenty” • “OK Google, set the <device name> temperature to 24” Note: Google home considers the smart thermostat and room names as the devices. 11. Set an automation scenarios linkage If you have a door sensor installed in your home, then you can realize an automation scenarios linkage between TRV and door sensor. Under“Automation”in the“Smart”page, click“+” on the upper right corner, you will see a page called • Create Smart that will guide you through the setting. • Here, we take When device status changes setting. • After you click When device status changes, you will see all the devices you added to the Tuya Smart app. • Select Smart Door Sensor->Select Function->Smart Door Sensor->ON/OFF->Set up Task->Run the device->TRV-> Open Window Detection->ON/OFF->Save->Next->Save. • A prompt box “Automation created.Start using it?”will pop up, select“Yes”, you can see all the automation scenarios you’ve created. When the door/window sensor is opened, the Tuya Smart app interface will pop up a message that the door/window sensor is turned on, and an( M)icon will appear on the TRV device interface. When the door/window sensor is closed, the Tuya Smart app interface will pop up a message that the door/window sensor is turned off, and an ( [p ) icon will disappear on the TRV device interface. When the battery power is less than 12%, the low power prompt icon ( j=lRj- ) will be displayed. Please replace the battery as soon as possible, When the the device only displays ( !-,!-!!- )the device is not available. Note: Reasons for excessive battery consumption: • Router mismatch(Although we have tested 217 types of routers). • Poor network status. • Router disconnection or power outage. • There are more than two walls between the device and the router. Press the reset buttons for 5 seconds, the device will display “FAC”. The device run reset. After the device runs reset, the data will not be saved,the device needs to be repaired. Reset (long press 5 seconds ) Batteries: 2x 1.5 V LR6/mignon/AA emperature range: 5-30C Display: LED Maximum radiated power: 19.5 dBm Working environment: Indoor Safety :CE/ROHS Battery life: 6 months 1 WiFi Radiator Thermostat 1 Adapters for Danfoss(RA,RAV and RAVL) 28x1.5mmvCaleffivGiacominivEjector rod 1 Screw for adapter 1 User Manual Do not dispose of the device with regular domestic waste! Electronic equipment must be disposed of at local collection points for waste electronic equipment in compliance with the Waste Electrical and Electronic Equipment Directive. ZtZ The device is not a toy, do not allow children to play with it. Do not leave packaging material lying around. Plastic films/ bags, pieces of polystyrene, etc. can be dangerous in the hands of a child. Housed batteries should not be disposed of with regular domestic waste! Instead, take them to your local battery disposal point. This device complies with the EN62368/EN300328/ EN301489 of the CE Rules. This device complies with the ROHS 2.0 Rules.
Open the catalog to page 1All Beijing Breeze Technology Co.,Ltd catalogs and technical brochures
 Breeze V1 Datasheet
2 Pages
 Breeze V7-06 Datasheet
2 Pages
 Breeze Valve Datasheet
8 Pages
 Breeze V3-W3D15 Datasheet
2 Pages
 Breeze BC204 Datasheet
3 Pages
 Breeze BC204-E Datasheet
6 Pages
 Breeze BC207-E Datasheet
3 Pages
 BC207W-T
3 Pages
 Breeze BC205W-T Datasheet
3 Pages
 BC205-E WIFI Datasheet
3 Pages
 Breeze BC205-E Datasheet
2 Pages
 Breeze BC203-E Datasheet
2 Pages
 Breeze BC203 Datasheet
2 Pages
 Breeze BC35-4 Datasheet
2 Pages
 Breeze BC105W-4D Datasheet
2 Pages
 Breeze BC104W-4 Datasheet
2 Pages
 Breeze BC105-4DM Datasheet
2 Pages
 Breeze BC107-4EDM Datasheet
3 Pages
 Breeze BC107-2A/4A Datasheet
3 Pages
 Breeze BC107-4DM Datasheet
3 Pages
 Breeze BC103-4ADM Datasheet
2 Pages
 Breeze BC103-4EDM Datasheet
2 Pages
 Breeze BC103-4DM Datasheet
2 Pages
 Breeze BC105W-4ED datasheet
3 Pages

- Control valve
- Water valve
- Ball valve
- Threaded valve
- Electric valve
- Standard valve
- Chrome-plated brass valve
- 2-channel valve
- Valve actuator
- 3-way valve
- Rotary valve actuator
- Flow control valve
- Heating valve
- Electric valve actuator
- Flow-control valve
- Adjustable thermostat
- Pipeline valve
- Waterproof thermostat
- HVAC valve