- Catalogs
- Beijing Breeze Technology Co.,Ltd
- Breeze BC207-E Datasheet
Breeze BC207-E Datasheet
1 /3Pages

Breeze BC207-E Datasheet
1 /3Pages
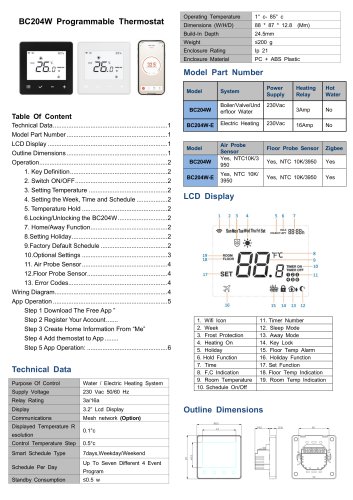
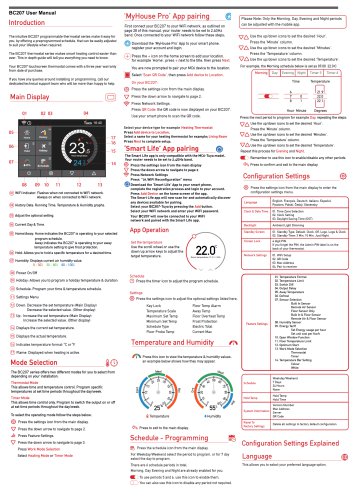
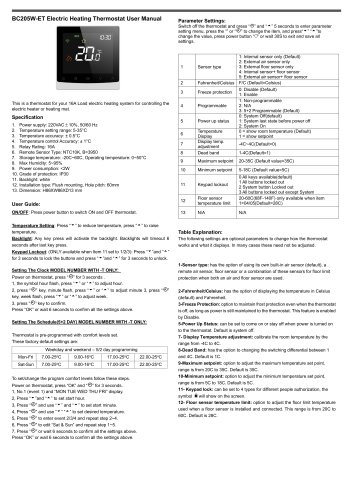
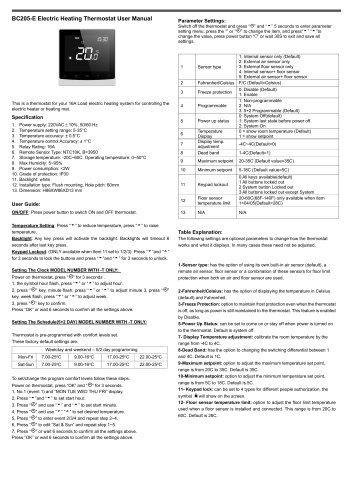
Catalog excerpts

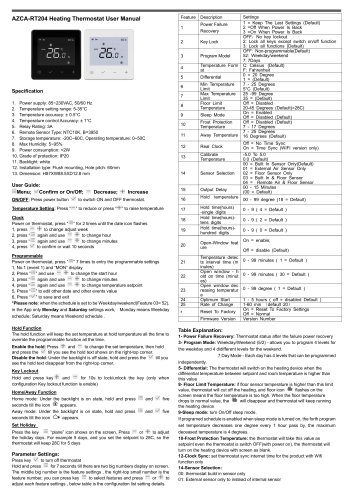
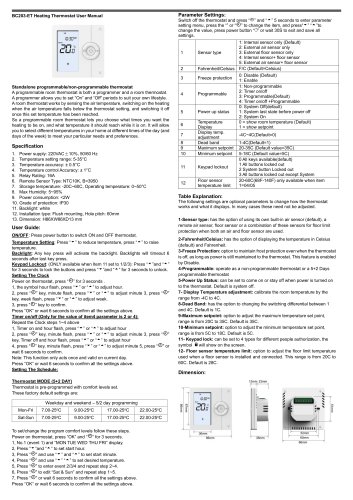
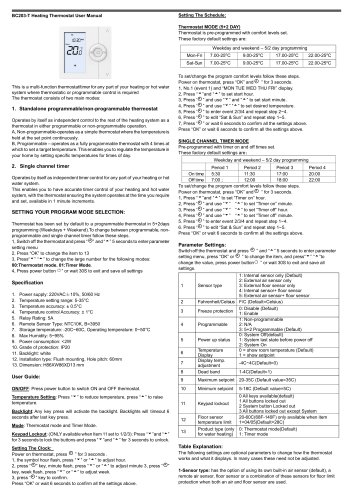
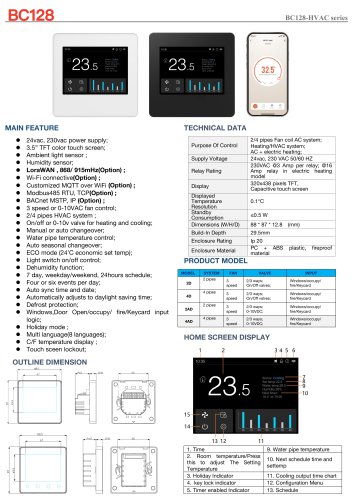
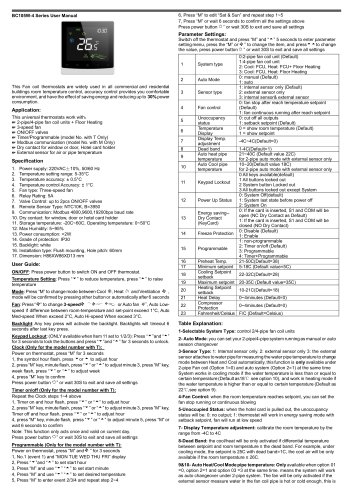
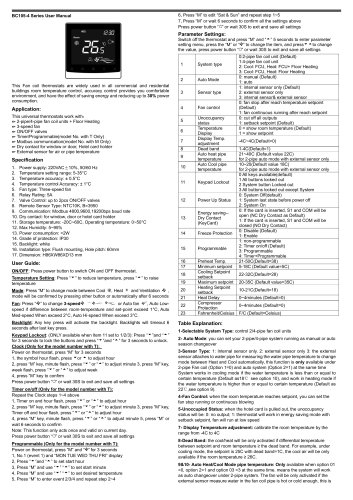
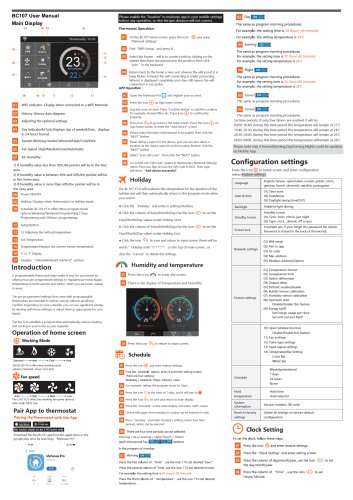
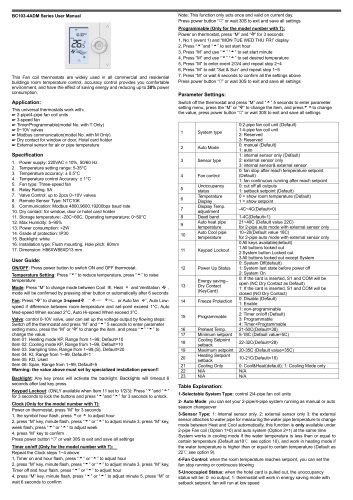
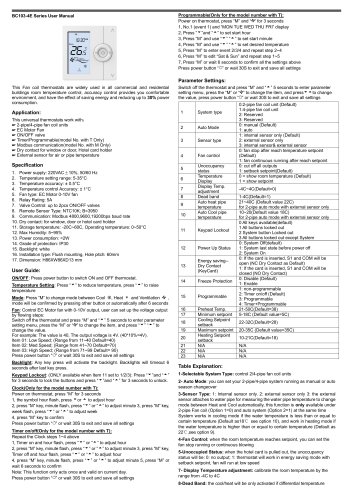
Temperature Scale Maximum: Set Temp Minimum Set Temp Schedule Type Floor Probe Temp The intuitive BC207 programmable thermostat series make it easy for you. by offering a preprogrammed schedule, that can be easily adjusted to suit your lifestyle when required. The BC207 thermostat series makes smart heating control easier than ever. This in depth guide will tell you everything you need to know. Your BC207 touchscreen thermostat comes with a three year warranty from date of purchase. If you have any queries around installing or programming, call our dedicated technical support team who will be more than happy to help. (oT) WiFi Indicator: Flashes when not connected to WiFi network. Always on when connected to WiFi network. (02) History Data: Running Time, Temperature & Humidity graphs. (03) Adjust the optional setting. @ Home/Away: Home indicates the BC207 is operating to your selected program schedule. Away indicates the BC207 is operating to your away temperature setting to give frost protection. @ Hold: Allows you to hold a specific temperature for a desired time. @ Humidity: Displays current air humidity value. @ Power On/Off @ Holiday: Allows you to program a holiday temperature & duration. (To) Schedule: Program your time & temperature schedule. @ Down: Decrease the set temperature (Main Display) Decrease the selected value. (Other display) ® Up : Increase the set temperature (Main Display) Increase the selected value. (Other display) (u) Displays the current set temperature. (T|) Displays the actual temperature. @ Indicates temperature format: °C orT. (Tt) Flame: Displayed when heating is active. Mode Selection_$© The BC207 series offers two different modes for you to select from depending on your installation. Thermostat Mode This allows time and temperature control. Program specific temperatures at set time periods throughout the day/week. Timer Mode This allows time control only. Program to switch the output on or off at set time periods throughout the day/week. To select the operating mode follow the steps below; Press the settings icon from the main display. V Press the down arrow to navigate to page 2. ■ill Press Feature Settings. Press the down arrow to navigate to page 3. Press Work Mode Selection Select Heating Mode or Timer Mode First connect your BC207 to your WiFi network, as outlined on page 28 of this manual, your router needs to be set to 2.4GHz band. Once connected to your WiFi network follow these steps; Download the 'MyHouse Pro' App to your smart phone register your account and login. (+) Press the + icon on the home screen to add your location, for example ‘Home’, press + next to the title, then press Next. You are now prompted to pair your MC6 device to the location. D Select ‘Scan QR Code’, then press Add device to Location. {3} Press the settings icon from the main display, y Press the down arrow to navigate to page 2. Press QR Code, the QR code is now displayed on your BC207. Use your smart phone to scan the QR code. Select your device type for example Heating Thermostat Press Add device to Location. Select a name for your heating thermostat for example; Living Room Press Next to complete setup. ‘Smart Life' App pairing © The Smart Life app is only compatible with the MC6-Tuya model. Your router needs to be set to 2.4GHz band. {§} Press the settings icon from the main display V Press the down arrow to navigate to page 2 Press Network Settings Press "OI.WiFi Reconfiguration" menu lj) Download the 'Smart Life' App to your smart phone, complete the registration process and login to your account. Press Add Device on the home screen of the app. The Smart Life app will now scan for and automatically discover any devices available for pairing. Select your BC207-Tuya by pressing the Add button. Select your WiFi network and enter your WiFi password. Your BC207 will now be connected to your WiFi network and paired with the Smart Life app. Set the temperature Use the scroll wheel or use the down/up arrow keys to adjust the target temperature. © Press the timer icon to adjust the program schedule. Floor Temp Alarm Away Temp Floor Overheat Temp Frost Protection Electric Total Current Max Press this icon to view the temperature & humidity values, an example below shows how they may appear. Press to exit to the main display. Schedule - Programming_§$ (j!§) Press the schedule icon from the main display For Weekday/Weekend select the period to program, or for 7 day select the day to program. There are 6 schedule periods in total. Morning, Day Evening and Night are already enabled foryou. ®L) To use periods 5 and 6, use this icon to enable them O ) You can also use this icon to disable any period not required. Please Note: Only the Morning. Day. Evening and Night periods can be adjusted with the mobile app ^7^ Use the upfdown icons to set the desired Hour1. Press the 'Minute' column. ^7 A Use the up/down icons to set the desired Minutes'. Press the ‘Temperature’ column. \7A Use the up/down icons to set the desired Temperature'. For example, the Morning schedule below is set as 07:00 22.0-C Press the next period to program for example Day. repeating the steps: Use the up/down icons to set the desired ‘Hour’. Press the Minute column. VA Use the up/down icons to set the desired 'Minutes’. \7A Use the up/down icons to set the desired 'Temperature'. Repeat this process for Evening and Night. ) Remember to use this icon to enable/disable any other periods. <3^ Press to confirm and exit to the main display. Configuration Settings_{§} {§} Press the settings icon from the main display to enter the configuration settings menu. Built In Sensor Remote Air Sensor Floor Sensor Only Built In & Floor Sensor Remote Air & Floor Sensor Set Energy usage per hour Set unit cost per Kw/h 10. Open Window Function 11. Floor Temperature Limit 13. Work Mode Selection Configuration Settings Explained Language_® This allows you to select your preferred lan
Open the catalog to page 1All Beijing Breeze Technology Co.,Ltd catalogs and technical brochures
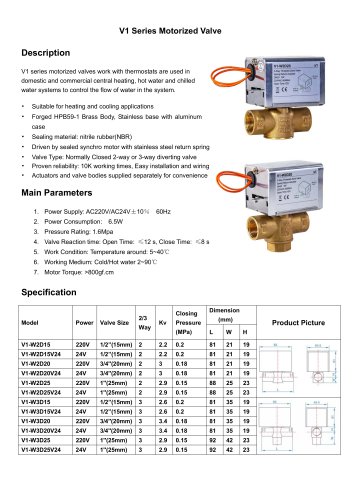 Breeze V1 Datasheet
2 Pages
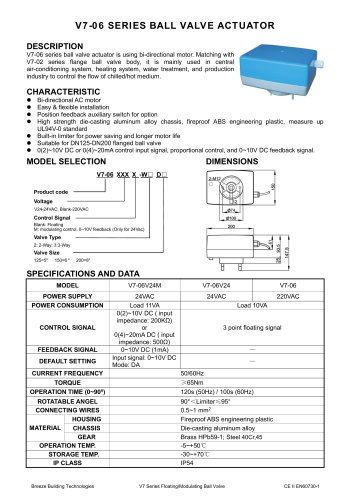 Breeze V7-06 Datasheet
2 Pages
 Breeze Valve Datasheet
8 Pages
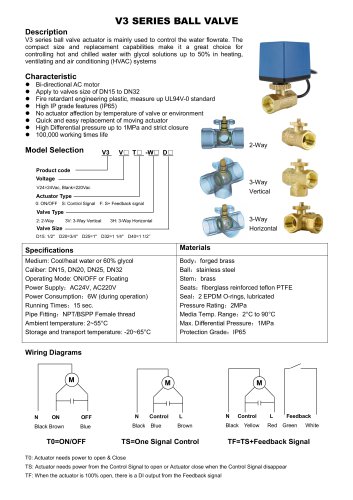 Breeze V3-W3D15 Datasheet
2 Pages
 Breeze BC204 Datasheet
3 Pages
 Breeze BC204-E Datasheet
6 Pages
 BC207W-T
3 Pages
 Breeze BC205W-T Datasheet
3 Pages
 BC205-E WIFI Datasheet
3 Pages
 Breeze BC205-E Datasheet
2 Pages
 Breeze BC203-E Datasheet
2 Pages
 Breeze BC203 Datasheet
2 Pages
 Breeze BC35-4 Datasheet
2 Pages
 Breeze BC105W-4D Datasheet
2 Pages
 Breeze BC104W-4 Datasheet
2 Pages
 Breeze BC105-4DM Datasheet
2 Pages
 Breeze BC107-4EDM Datasheet
3 Pages
 Breeze BC107-2A/4A Datasheet
3 Pages
 Breeze BC107-4DM Datasheet
3 Pages
 Breeze BC103-4ADM Datasheet
2 Pages
 Breeze BC103-4EDM Datasheet
2 Pages
 Breeze BC103-4DM Datasheet
2 Pages
 Breeze BC105W-4ED datasheet
3 Pages

- Valve
- Control valve
- Water valve
- Ball valve
- Threaded valve
- Electric valve
- Standard valve
- Chrome-plated brass valve
- 2-channel valve
- Valve actuator
- 3-way valve
- Rotary valve actuator
- Flow control valve
- Heating valve
- Electric valve actuator
- Flow-control valve
- Adjustable thermostat
- Pipeline valve
- Waterproof thermostat
- HVAC valve