- Catalogs
- Beijing Breeze Technology Co.,Ltd
- Breeze BC104W-4 Datasheet
Breeze BC104W-4 Datasheet
1 /2Pages

Breeze BC104W-4 Datasheet
1 /2Pages
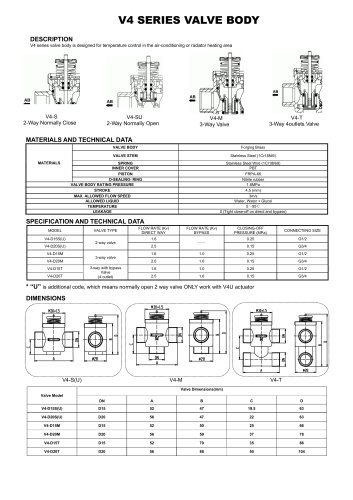
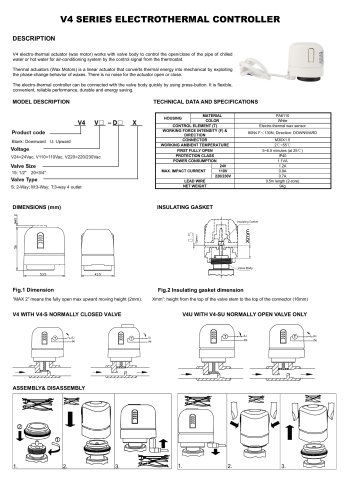
Catalog excerpts
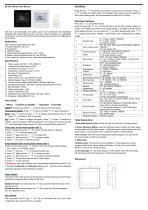
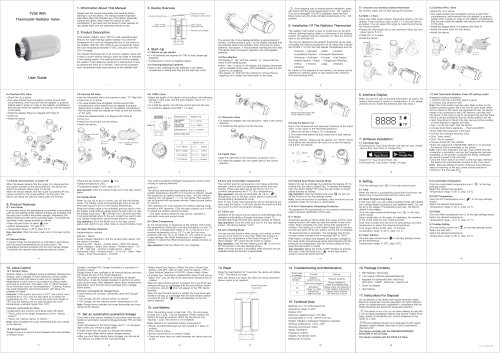
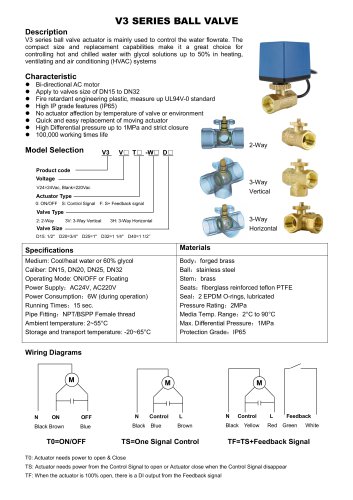
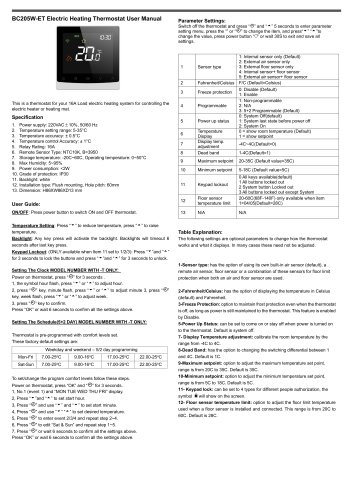
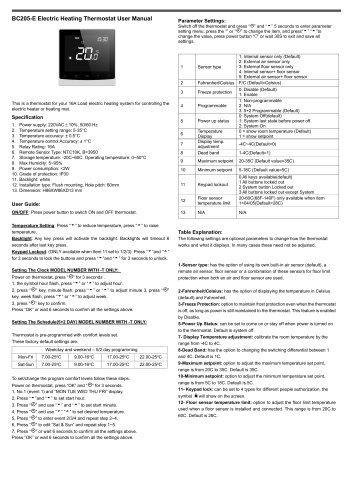
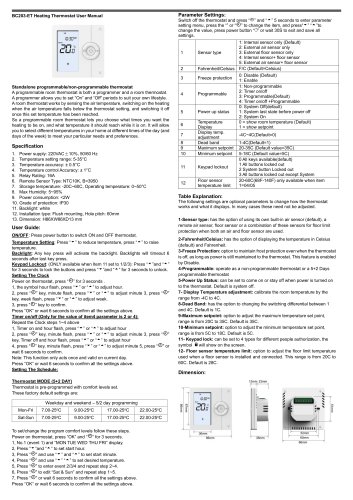
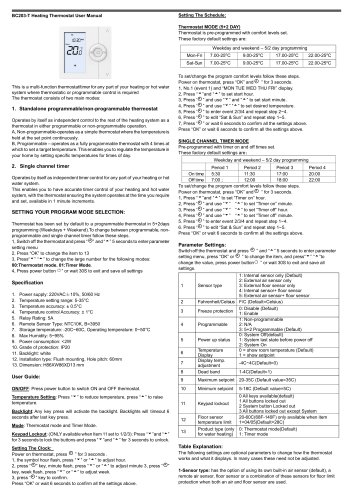
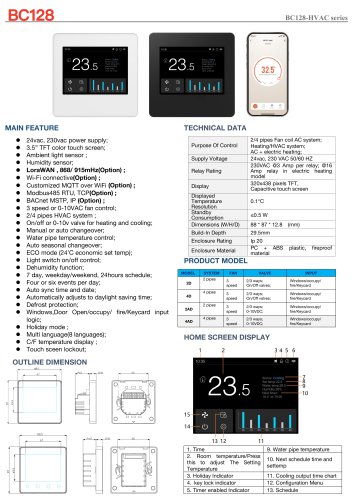
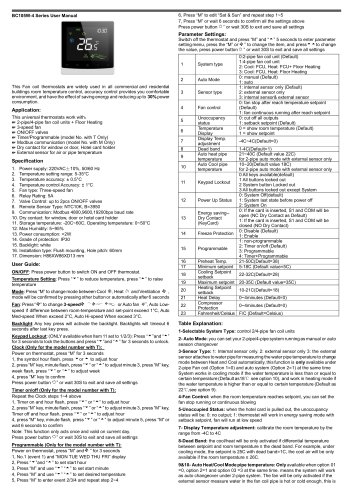
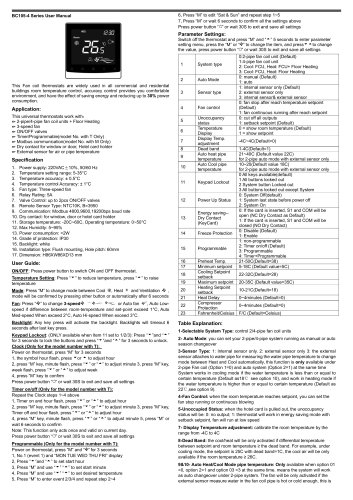
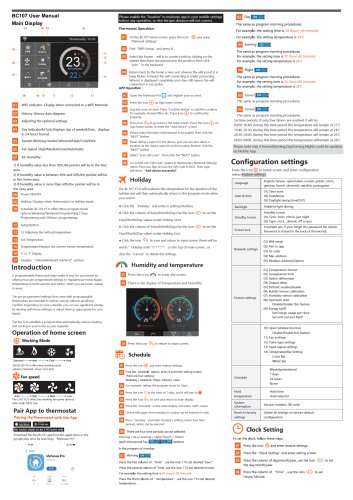
BC104-4 Series User Manual This Fan coil thermostats are widely used in all commercial and residential buildings room temperature control, accuracy control provides you comfortable environment, and have the effect of saving energy and reducing up to 30% power consumption. This universal thermostats work with: ^ 2-pipe/4-pipe fan coil units ^ 3-speed fan ^ ON/OFF valves ^ Timer/Programmable(model No. with T Only) ^ Modbus communication(model No. with M Only) ^ Dry contact for window or door, Hotel card holder(optional) 2. Temperature setting range: 5-35°C 4. Temperature control Accuracy: ± 0.5°C 7. Valve Control: up to 2pcs ON/OFF valves 8. Remote Sensor Type: NTC10K, B=3950 9. Communication: Modbus 4800,9600,19200bps baud rate 10. Storage temperature: -20C~60C, Operating temperature: 0~50°C 14. Installation type: Flush mounting, Hole pitch: 60mm = Menu; v'Confirm or On/Off; — Decrease; “Hncrease ON/OFF: Press power button ^ to switch ON and OFF thermostat. Temperature Setting: Press “ —” to reduce or press to raise temperature Mode: Press “;=” and then press — + to change mode between Cool ■$£, Heat • .press to confirm or wait 10 seconds Fan: Press “:=” twice to change fan speed, press ^ or wait 10 seconds to confirm. Auto Low-speed if difference between room-temp and set-point exceed 1°C, Auto Med-speed When exceed 2°C, Auto Hi-speed When exceed 3°C. Press the key three times until a “plane” icon shows on the screen, Press or + st the holiday days. For example 5 days, and you set the setpoint to 28C under cooling mode, so the thermostat will keep 28C for 5 days Press key v' to turn off thermostat Hold and press key ;= for 7 seconds till there are two big numbers display on screen. The middle big number is the feature settings , the right-top small number is the feature number, you can press key ;= to select features and press — or + to adjust each feature settings , below table is the configuration list setting details. 1-Selectable System Type: control 2/4-pipe fan coil units or damper system Clock (Only for the model number with T): Power on thermostat, press “:=” for 4 times until the date icon flashes 1, press - + to change adjust week 2, press “;= again and use — + to change hour 3, press “:= again and use — + to change minutes 4, press ^ to confirm or wait 10 seconds 3- Power Recovery Status: when the electricity power is failure and back again, the thermostat will follow three types: 1: keep the system original status before the power failure. 3: keep system off; 2: switch the system on automatically 4- Fan Control: when the room temperature reaches setpoint, you can set the fan stop running or continuous blowing Programmable (Only for the model number with T): Power on thermostat, press “:=” 7times to entry the programmable settings 2, Press “:=” and use —+ to change the start hour 3, press again and use — + to change minutes 3, press “■= again and use — + to change temperature setpoint 5, Press “:=” to edit other date and other events value 6, Press “v'” to save and exit *Please note: when the schedule is set to be Weekday/weekend(Feature 03= 52), in the App only Monday and Saturday settings work, Monday means Weekday schedule; Saturday means Weekend schedule . Hold Function The hold function will keep the set temperature at hold temperature all the time to override the programmable function all the time. Enable the hold: hold and press the := till you see the hold text shows on the right-top corner. Disable the hold: hold and press the ■= till you see the hold text disappear from the right-top corner. 10-Sleep mode: This function is only available on “Evening(event 4) under programmable mode, means setpoint decrease 1C every hour during night, Maximum value is 4C during the night 13- DI Input type: 01: Cut off all outputs, 10-99: means when the DI is enable, the thermostat will set the setpoint to 10-99 preset temperature Hold and press key+ and —for 10s to lock/unlock th
Open the catalog to page 1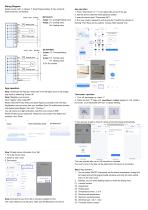
Model number with: 4: 2/4pipe; T: Timer/Programmable; D: Dry contact & External Sensor; M: Modbus Heating valve Cooling valve 2-pipe: CV: Cooling/Heating valve 4-pipe: CV: Cooling valve HV: Heating valve App operation: 1. Press "Add Device" or "+" in the upper right corner of the app 2. add the device under the small appliance section 3. select the device type "Thermostat WiFi" , 4. fill in your router’s password, and clicking the “Confirm the indicator is blinking" Then there are two options. Choose “Blink Quickly" first. Heating valve Cooling valve 4-pipe: CV: Cooling valve HV: Heating valve...
Open the catalog to page 2All Beijing Breeze Technology Co.,Ltd catalogs and technical brochures
 Breeze V1 Datasheet
2 Pages
 Breeze V7-06 Datasheet
2 Pages
 Breeze Valve Datasheet
8 Pages
 Breeze V3-W3D15 Datasheet
2 Pages
 Breeze BC204 Datasheet
3 Pages
 Breeze BC204-E Datasheet
6 Pages
 Breeze BC207-E Datasheet
3 Pages
 BC207W-T
3 Pages
 Breeze BC205W-T Datasheet
3 Pages
 BC205-E WIFI Datasheet
3 Pages
 Breeze BC205-E Datasheet
2 Pages
 Breeze BC203-E Datasheet
2 Pages
 Breeze BC203 Datasheet
2 Pages
 Breeze BC35-4 Datasheet
2 Pages
 Breeze BC105W-4D Datasheet
2 Pages
 Breeze BC105-4DM Datasheet
2 Pages
 Breeze BC107-4EDM Datasheet
3 Pages
 Breeze BC107-2A/4A Datasheet
3 Pages
 Breeze BC107-4DM Datasheet
3 Pages
 Breeze BC103-4ADM Datasheet
2 Pages
 Breeze BC103-4EDM Datasheet
2 Pages
 Breeze BC103-4DM Datasheet
2 Pages
 Breeze BC105W-4ED datasheet
3 Pages