- Catalogs
- BeanAir GmbH
- Quickstart Satevis Alpha Inc 10T - Lorawan Trix-Axis Inclinometer
- Company
- Products
- Catalogs
- News & Trends
- Exhibitions
Quickstart Satevis Alpha Inc 10T - Lorawan Trix-Axis Inclinometer
1 /12Pages
Quickstart Satevis Alpha Inc 10T - Lorawan Trix-Axis Inclinometer
1 /12Pages
Catalog excerpts

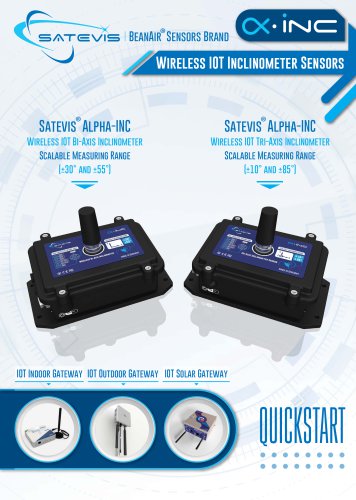
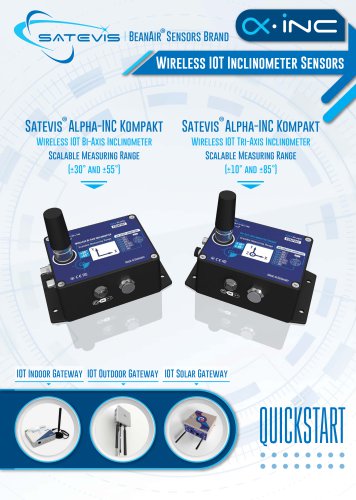
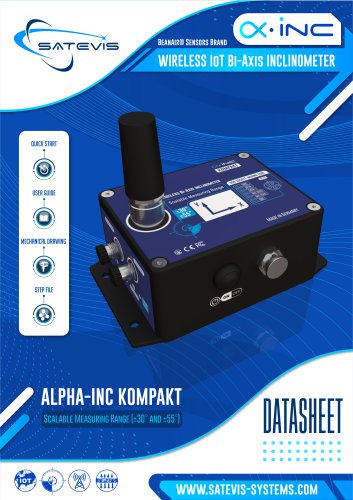
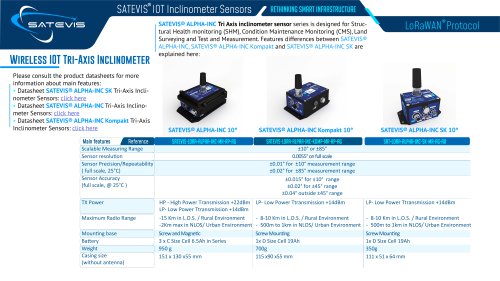
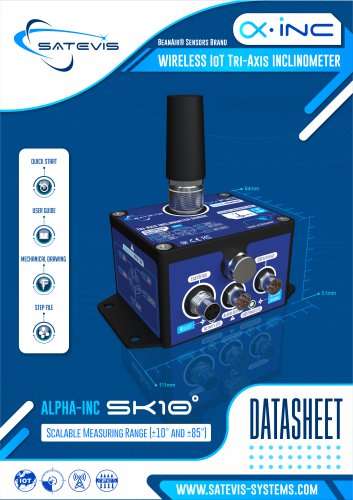
BeanAir® Sensors Brand Wireless IOT Inclinometer Sensors Satevis® Alpha-INC Satevis® Alpha-INC Wireless IOT Bi-Axis Inclinometer Wireless IOT Tri-Axis Inclinometer Scalable Measuring Range Scalable Measuring Range IOT Indoor Gateway IOT Outdoor Gateway IOT Solar
Open the catalog to page 1
2-VISUAL SYMBOLS DEFINITION 3-ACRONYMS AND ABBREVIATIONS For detailed information about where you can buy the BeanAir® equipment/software or for recommendations on accessories and components visit: www.satevis-systems.com To register for product news and announcements or for product questions contact SATEVIS® Technical Support Center (STSC). Our aim is to make this user manual as helpful as possible. Please keep us informed of your comments and suggestions for improvements. SATEVIS® appreciates feedback from the users. The information contained in this document is the proprietary information...
Open the catalog to page 2
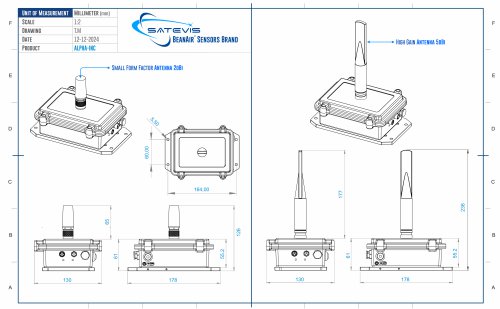
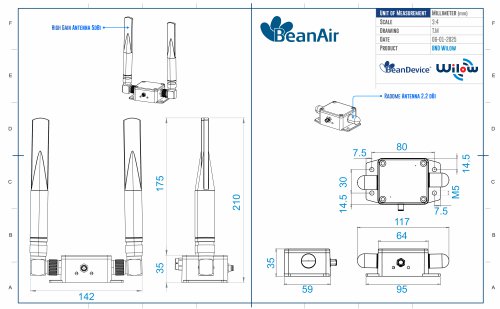
• iisici iot inclinometer sensors (X-iisid iot inclinometer sensors 4. SATEVIS® ALPHA-INC 3. ACRONYMS AND ABBREVIATIONS Caution or Warning - Alerts the user with important information about SATEVIS® wireless IOT Sensors. if this information is not followed, the equipment /software may fail or malfunction Danger - This information MUST be followed if not you may damage the equipment permanently or bodily injury may occur. Tip or Information - Provides advice and suggestions that may be useful when installing SATEVIS Wireless IOT Sensors. Open the Device box4.1.2 DrawingSmall Form Factor Antenna...
Open the catalog to page 3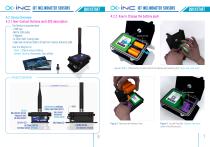
4.2.2 How to Change the battery pack 4.2 Device Overview 4.2.1 Non-Contact Buttons and LEDS description The Device is provided with : -2 M8 cap -M8 to USB cable -1 Magnet -1x 25cm Self-Fusing Tape -High Gain Antenna 5dBi or Small Form Factor Antenna 2dBi Use the Magnet to: - Hello ! :Check sensor status - Sensor Zeroing: Automatic Zero offset Figure 1 and 2 : Unscrew the Lid and detach the battery by loosening the “Hook-and-loop strap”. PRODUCT OVERVIEW LoRaWAN® Antenna Figure 3 : Remove the Battery-Pack Figure 4 : You will find the “Battery-Remover” under the battery pa
Open the catalog to page 4
CX-nvi iot inclinometer sensors Satevis® sensor can be powered from battery pack or USB power. If it's powered from USB , there is no need to keep the battery power ON . 4.2.3 Interface for External Power supply M8 6pin Socket [MALE, A-CODING)- Pin assignation ( Interface Name M8 6pin Plug (FEMALE, A-CODING)- Pin assignation PIN 5:Not Used Figure 7 :carefully lift the connector upwards, Figure 8 : Insert a new battery-pack and close and remove the battery-pack connector. the device. Battery pack should be changed at your office in a dry environment, you will avoid to bring humidity inside Satevis®...
Open the catalog to page 5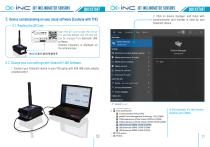
CX-hvi iot inclinometer sensors 5. Device commissioning on your cloud software (Example with TTN)5.1 Reading the QR Code - 2. Click on device manager, and check with communication port number is used by your Satevis® device. Scan the QR code to get the Device EUI and the default Join EUl.Join EUI can be changed from Satevis® LINK software. Antenna frequency is displayed on the antenna base 5.2 Change your Lora settings with Satevis® LINK Software 1. Connect your Satevis® device to your PC/Laptop with USB /M8 cable adapter provided with it All Apps Documents Web More Best match -j- Device Manager...
Open the catalog to page 6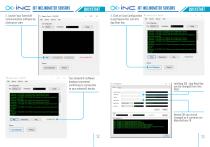
iot inclinometer sensors quickstart CX-hvi iot inclinometer sensors v4l quickstart 3. Launch your Satevis® communication software by clicking on start 4. Click on Lora Configuration to get Device EUI, Join EUI, App Root Key File Server Device Info > Message: 13.02.2024 ? Message: 13 02.2024 device not responding > Message 13.02,2024 From device 10:28:2CPing with Acquittal sent to device 10:28:27Pmg with Acquittal sent to device 10:28 27&ait Fail Timeout: Connection not established. 10:31 3$Ping with Acquittal sent to device 10:31:3€Pmg with Acquittal sent to device 10:31 ;36Pmg response with...
Open the catalog to page 7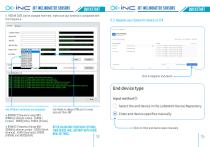
iot inclinometer sensors quickstart CX-hvi iot inclinometer sensors v4l quickstart 5.3 Register your Satevis® device on TTN Two different antennas are proposed: Join Mode is always OTAA as it's more • 868MHZ (frequency range 863-870MHz) antenna covers: EU868 ( • 915MHZ (Frequency Range 902-928MHz) antenna covers : US915 (North America) , AU915 (Australia), KR920 (KOREA) and AS923(ASIA) After validating your new settings, your device will restart with these new settings. Click on Enter end device specs manually
Open the catalog to page 8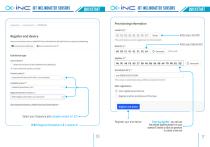
CX-nvi iot inclinometer sensors Provisioning information This end device can be registered on the network DevEUI©* Enter your Join EUI Enter your Device EUI This value is automatically prefilled using the DevEUI After registration • View registered end device Register another end device of this type Register your end device Enter your AppKey ■ you can use the default AppKey present on your satevis® device or click on generate to create a new one
Open the catalog to page 9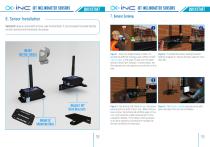
6. Sensor Installation Satevis® device comes with a three-axis inclinometer, it can be easily mounted directly on both vertical and Horizontal structures ON/OFF Button -Shield Figure 1 : Even if an angle bracket is used, it’s Figure 2 : To enable the sensor zeroing function, sometimes difficult to bring a zero-offset on both hold the magnet on ‘Sensor Zeroing” Label for more X and Y axis ( in the case if Z axis is on the same than 10s. direction than Earth Gravity).. In some cases, the field operator can not spend too much time on this task. Bracket 90° With Bullseye Figure 3 : The Activity LED...
Open the catalog to page 10
8. Checking Sensor Status on site 9. Where to find more Technical Information ? For mode technical litterature, please visit our White Paper Page: https://www.satevis-systems.com/white-paper.html ® Please refer to the SATEVIS Alpha-INC-Kompakt user manual section for more information https://www.satevis-systems.com/files/User-Manual-SATEVIS-LORA-ALPHA-INC-MR-PS.pdf Figure 1 : After installing the Alpha-Inc inclinometer, the field operator can check at any moment if the sensor is working properly Figure 2 : By Holding the magnet on the ‘Hello!’ label for more than 10s, the sensor wakes-up and...
Open the catalog to page 11All BeanAir GmbH catalogs and technical brochures
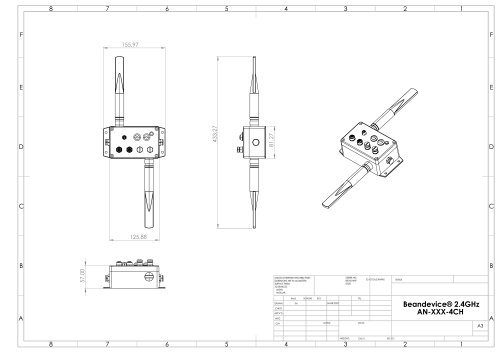
 BeanDevice® 2.4GHz AN-mV
11 Pages
 BeanDevice® 2.4GHz AN-420
12 Pages
 BeanScape 2.4GHz Version
8 Pages
 BeanDevice Wilow X-Inc
10 Pages
 BeanDevice® 2.4GHz AX-3D Xrange
12 Pages
 Beanair Product Catalog 2025
17 Pages
 BeanDevice 2.4GHz AX3DS
11 Pages
 Starterkit ONE-TH
3 Pages
 Starterkit ONE-T
3 Pages
 Starterkit AN-V ( ±10V )
3 Pages
 Starterkit AN-V ( ±5V )
3 Pages
 Starterkit AN-mV
3 Pages
 Starterkit AN-420
3 Pages
 Starterkit 2.4GHz AX-3D-SR
3 Pages
 BeanGateway® Modbus Outdoor
7 Pages
 BeanGateway Modbus Indoor
7 Pages
 BeanScape Wilow Version
6 Pages
 2.4GHz Hi-Inc
10 Pages
 BeanGateway® 4G
9 Pages
 Digital T/H Sensor B-TH-01
6 Pages
 2.4GHz ONE-T
10 Pages
 2.4GHz ONE-TH
9 Pages
 MQTT Communication Protocol
97 Pages


- Electrical cable
- Sanxing Electric temperature sensor
- Acceleration sensor
- Communication gateway
- Waterproof temperature sensor
- Humidity and temperature probe
- Relative humidity and temperature sensor
- Wireless gateway
- Triaxial acceleration sensor
- Digital inclination sensor
- IoT gateway
- Compact accelerometer
- 2-axis tilt sensor
- MEMS inclination sensor
- Waterproof humidity and temperature sensor
- Coaxial electrical cable
- Digital humidity and temperature sensor
- Data acquisition unit
- Multi-axis tilt sensor