- Catalogs
- Beagleboard.org
- BeagleY-AI
BeagleY-AI
1 /133Pages

BeagleY-AI
1 /133Pages
Catalog excerpts
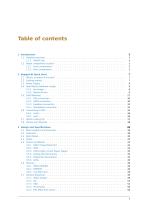
2 BeagleY-AI Quick Start 7
Open the catalog to page 2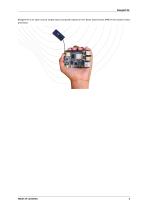
BeagleY-AI is an open-source single board computer based on the Texas Instruments AM67A Arm-based vision processor.
Open the catalog to page 6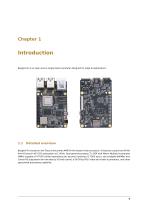
Introduction BeagleY-AI is an open-source single board computer designed for edge AI applications. 1.1 Detailed overview BeagleY-AI is based on the Texas Instruments AM67A Arm-based vision processor. It features a quad-core 64-bit Arm®Cortex®-A53 CPU subsystem at 1.4GHz, Dual general-purpose C7x DSP with Matrix Multiply Accelerator (MMA) capable of 4 TOPS (trillion-operations per second) combined (2 TOPS each), two available 800MHz Arm Cortex-R5 subsystems for low-latency I/O and control, a 50 GFlop GPU, video and vision accelerators, and other specialized processing capability.
Open the catalog to page 8
Table 1.1: BeagleY-AI features Ethernet Camera/Display Display Output Real-timeClock (RTC) Debug UART Power Power Button PCIe Interface Expansion Connector Fan connector Storage Tag Connect Texas InstrumentsAM67A, Quad 64-bitArm® Cortex®-A53 @1.4 GHz, multiple cores including Arm/GPU processors, DSP, and vision/deep learning accelerators 4GB LPDDR4 (x32) BeagleBoard.org BeagleMod BM3301, 802.11ax Wi-Fi 6, Bluetooth Low Energy (BLE) 5.4 4 x USB 3.0 TypeA ports supporting simultaneous 5Gbps operation, 1 x USB 2.0 TypeC, supports USB 2.0 device mode Gigabit Ethernet, with PoE+ support (requires...
Open the catalog to page 9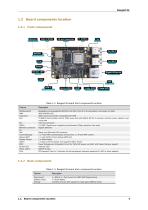
1.2 Board components location 1.2.1 Front components Table 1.2: BeagleY-AI board front components location Feature BeagleBoard.org BeagleMod BM3301 with 802.11ax Wi-Fi 6 & Bluetooth Low Energy 5.4 (BLE) 4GB LPDDR4 (x32) 40pin Expansion header compatible with HATs TI AM67A Arm®Cortex®-A53 4 TOPS vision SoC with RGB-IR ISP for 4 cameras, machine vision, robotics, and smart HMI 4-pin fan connector 4 x USB 3 TypeA ports supporting simultaneous 5Gbps operation host ports Gigabit Ethernet Fan USB-A Network Connectivity PoE Camera/Display Debug UART Display Output USB-C PMIC Bicolor LED Power button...
Open the catalog to page 10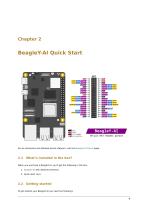
BeagleY-AI Quick Start For an interactive and detailed pinout diagram, visit the BeagleY-AI Pinout page. 2.1 What’s included in the box? When you purchase a BeagleY-AI, you’ll get the following in the box: 1. BeagleY-AI with attached antenna. 2. Quick-start card 2.2 Getting started To get started your BeagleY-AI you need the following:
Open the catalog to page 12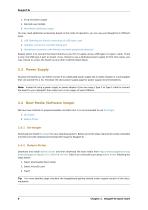
3. Boot Media (Software image) You may need additional accessories based on the mode of operation, you can use your BeagleY-AI in different ways. 1. USB Tethering by directly connecting via USB type-c port 2. Headless connection via UART debug port 3. Standalone connection with Monitor and other peripherals attached Easiest option is to connect the board directly to your PC or Laptop using a USB type-C to type-c cable. There is only one USB type-C port on board, if you choose to use a dedicated power supply for first time setup, you may choose to access the board via any other methods listed...
Open the catalog to page 13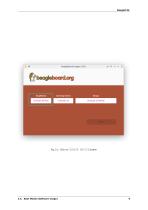
2.4. Boot Media (Software image) CHOOSE DEVICE button
Open the catalog to page 14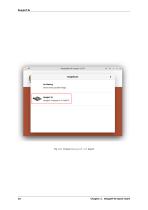
BeagleY-AI board Chapter 2. BeagleY-AI Quick Start
Open the catalog to page 15
2.4. Boot Media (Software image)
Open the catalog to page 16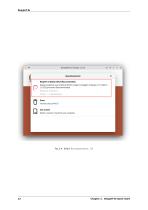
Chapter 2. BeagleY-AI Quick Start
Open the catalog to page 17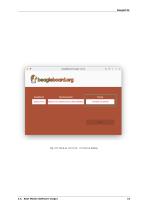
2.4. Boot Media (Software image) CHOOSE STORAGE button
Open the catalog to page 18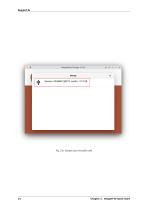
Fig. 2.6: Choose your microSD card Chapter 2. BeagleY-AI Quick Start
Open the catalog to page 19
2.4. Boot Media (Software image) Next button
Open the catalog to page 20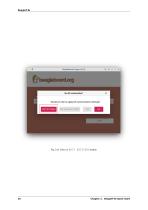
EDIT SETTINGS button Chapter 2. BeagleY-AI Quick Start
Open the catalog to page 21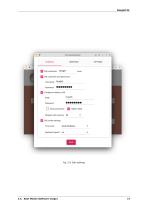
2.4. Boot Media (Software image)
Open the catalog to page 22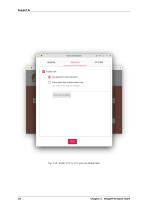
Chapter 2. BeagleY-AI Quick Start
Open the catalog to page 23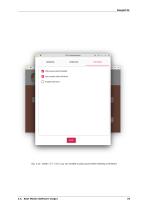
OPTIONS you can enable to play sound when flashing is finished 2.4. Boot Media (Software image)
Open the catalog to page 24
Chapter 2. BeagleY-AI Quick Start
Open the catalog to page 25
2.4. Boot Media (Software image) YES again to confirm sdCard formatting
Open the catalog to page 26
Fig. 2.14: Provide password to Authenticate the flashing process Chapter 2. BeagleY-AI Quick Start
Open the catalog to page 27
Fig. 2.15: Download image else automatically open cached image 2.4. Boot Media (Software image)
Open the catalog to page 28
Fig. 2.16: Writing data to microSD card Chapter 2. BeagleY-AI Quick Start
Open the catalog to page 29
Fig. 2.17: Verifying flashed microSD card 2.4. Boot Media (Software image)
Open the catalog to page 30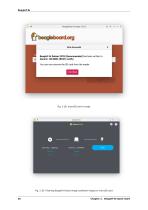
Fig. 2.19: Flashing BeagleY-AI boot image (software image) to microSD card 26 Chapter 2. BeagleY-AI Quick Start
Open the catalog to page 31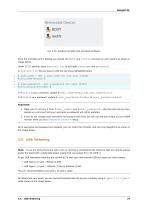
Fig. 2.20: Flashed microSD card mounted partitions Once the microSD card is flashed you should see BOOT and rootfs mounted on your system as shown in image below, Under BOOT partition open sysconf.txt to edit login username and password. In sysconf.txt file you have to edit the two lines highlighted below. # user_name - Set a user name for the user (1000) #user_name=beagle © # user_password - Set a password for user (1000) #user_password=FooBar © ® If boris is your username, update #user_name=beagle to user_name=boris © If bash is your password, update #user_password=FooBar to user_password=bash...
Open the catalog to page 32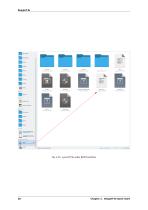
Fig. 2.21: sysconf file under BOOT partition Chapter 2. BeagleY-AI Quick Start
Open the catalog to page 33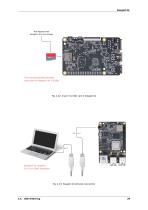
Pre-flashed with BeagleY-AI Linux image The recommended microSD card size for BeagleY-AI is 32GB Fig. 2.22: Insert microSD card in BeagleY-AI
Open the catalog to page 34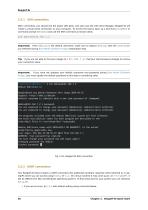
After connecting, you should see the power LED glow, and soon just like with other Beagles, BeagleY-AI will create a virtual wired connection on your computer. To access the board, open up a terminal (Linux/Mac) or command prompt (Windows) and use the SSH command as shown below. Important: Here debian is the default username, make sure to replace debian with the username you selected during Boot Media (Software image) preparation step. Tip: If you are not able to find your beagle at 192.168.7.2, checkout start-browse-to-beagle to resolve your connection issue. Important: If you have not updated...
Open the catalog to page 35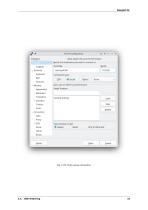
Logging v Terminal Keyboard Bell > Selection Colours Fonts ^ Connection Data Proxy > SSH Serial Telnet Rlonin PuTTY Configuration Basic options for your PuTTY session Specify the destination you want to connect to Serial line Speed _oad, save or delete a stored session Saved Sessions Default Settings Close window on exit: • Always Never Only on dean exit Fig. 2.25: Putty serial connection
Open the catalog to page 36
With this you have the access to BeagleY-AI terminal. Now, you can connect your board to WiFi, try out all the cool demos and explore all the other ways to access your BeagleY-AI listed below. If you want to run your BeagleY-AI in headless mode, you need Raspberry Pi Debug Probe or similar serial (USB to UART) adapter. Connect your UART debug probe to BeagleY-AI as shown in the image below. After making the connection you can use command line utility like tio on Linux or Putty on any operating system. Check UART connection for more information. Fig. 2.26: Connecting Raspberry Pi debug probe to...
Open the catalog to page 37All Beagleboard.org catalogs and technical brochures
 BeagleV-Fire
99 Pages
 BeagleBone Blue
27 Pages
 BeagleBone Black
109 Pages
 BeagleV-Ahead
57 Pages
 PocketBeagle
63 Pages
 BeagleBone AI-64
132 Pages
 BeagleConnect Freedom
37 Pages
- Single-board computer
- Embedded single-board computer
- Intel® Core™ single-board computer
- USB single-board computer
- Compact single-board computer
- ARM architecture single-board computer
- LPDDR4 single-board computer
- Dual-core single-board computer
- Single-board computer for IoT applications
- Robotic single-board computer