- Catalogs
- Beagleboard.org
- BeagleV-Ahead
BeagleV-Ahead
1 /57Pages

BeagleV-Ahead
1 /57Pages
Catalog excerpts
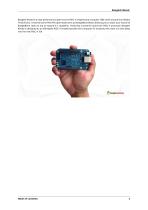
BeagleV-Ahead is a high-performance open-source RISC-V single board computer (SBC) built around the Alibaba TH1520 SoC. It has the same P8 & P9 cape header pins as BeagleBone Black allowing you to stack your favourite BeagleBone cape on top to expand it’s capability. Featuring a powerful quad-core RISC-V processor BeagleV Ahead is designed as an affordable RISC-V enabled pocket-size computer for anybody who want’s to dive deep into the new RISC-V ISA.
Open the catalog to page 4
Introduction BeagleV-Ahead is a high-performance open-source RISC-V single board computer (SBC) built around the Alibaba TH1520 SoC. It has the same P8 & P9 cape header pins as BeagleBone Black allowing you to stack your favourite BeagleBone cape on top to expand it’s capability. Featuring a powerful quad-core RISC-V processor BeagleV Ahead is designed as an affordable RISC-V enabled pocket-size computer for anybody who want’s to dive deep into the new RISC-V ISA. 1.1 Pinout Diagrams Choose the cape header to see respective pinout diagram. P8 cape header P9 cape header 1.2 Detailed overview BeagleV...
Open the catalog to page 6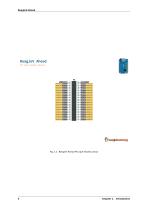
•—MamwW GPIO Fig. 1.1: BeagleV Ahead P8 cape header pinout 4 Chapter 1. Introducti
Open the catalog to page 7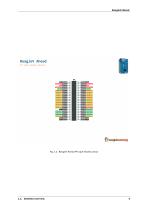
Fig. 1.2: BeagleV Ahead P9 cape header pinout
Open the catalog to page 8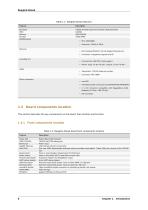
Table 1.1: BeagleV Ahead features Feature Processor PMIC Memory Storage WiFi/Bluetooth Ethernet • PHY: Realtek RTL8211F-VD-CG Gigabit Ethernet phy • Connector: integrated magnetics RJ-45 microUSB 3.0 • Connectivity: USB OTG, Flash support • Power: Input: 5V @ , Output: 5V @ HDMI • Transmitter: TH1520 Video out system • Connector: Mini HDMI Other connectors • microSD • mikroBUS shuttle connector (I2C/UART/SPI/ADC/PWM/GPIO) • 2 x CSI connector compatible with BeagleBone AI-64, Raspberry Pi Zero / CM4 (22-pin) • DSI connector 1.3 Board components location This section describes the key components...
Open the catalog to page 9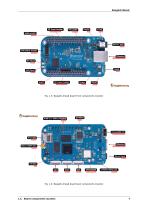
Fig. 1.3: BeagleV Ahead board front components location Fig. 1.4: BeagleV Ahead board back components location 1.3. Board components location
Open the catalog to page 10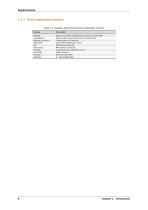
DA9063 Dialog semi Power Management Integrated Circuit (PMIC) microUSB 3.0 Power & USB connectivity as client or Host (OTG) Antenna connector 2.4GHz/5GHz uFL connector AP6203BM Ampak WiFi & BlueTooth combo DSI MIPI Display connector CSI0 & CSI1 MIPI Camera connectors TH1520 T-Head quad-core C910 RISC-V SoC Mini HDMI HDMI connector microSD Micro SD card holder
Open the catalog to page 11
When you purchase a brand new BeagleV Ahead, In the box you'll get: 1. BeagleV Ahead board 3. USB super-speed micro-A plug to type-A receptacle cable (for connecting common USB type-A peripherals) Tip: For board files, 3D model, and more, you can checkout BeagleV-Ahead repository on OpenBeagle.
Open the catalog to page 12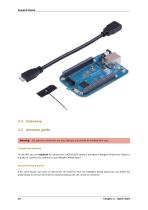
2.2 Unboxing 2.3 Antenna guide Warning: uFL antenna connectors are very delicate and should be handled with care. Connecting antenna To use WiFi you are required to connect the 2.4GHz/5GHz antenna provided in BeagleV Ahead box. Below is a guide to connect the antenna to your BeagleV Ahead board. Disconnecting antenna If for some reason you want to disconnect the antenna from your BeagleV Ahead board you can follow the guide below to remove the antenna without beaking the uFL antenna connector. Chapter 2. Quick Start
Open the catalog to page 13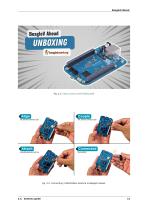
Fig. 2.2: Connecting 2.4GHz/5GHz antenna to BeagleV Ahead.
Open the catalog to page 14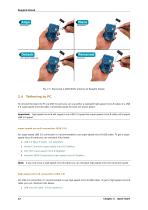
Fig. 2.3: Removing 2.4GHz/5GHz antenna to BeagleV Ahead. 2.4 Tethering to PC To connect the board to PC via USB 3.0 port you can use either a standard high-speed micro-B cable or a USB 3.0 super-speed micro-B cable. Connection guide for both are shown below: Important: high-speed micro-B will support only USB 2.0 speed but super-speed micro-B cable will support USB 3.0 speed. super-speed micro-B connection (USB 3.0) For super speed USB 3.0 connection it’s recommended to use super-speed micro-B USB cable. To get a superspeed micro-B cable you can checkout links below: 1. USB 3.0 Micro-B Cable...
Open the catalog to page 15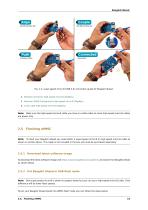
Fig. 2.4: super-speed micro-B (USB 3.0) connection guide for BeagleV Ahead. 2. Stewart Connector high-speed micro-B (DigiKey) 3. Assmann WSW Components high-speed micro-B (DigiKey) 4. Cvilux USA high-speed micro-B (DigiKey) Note: Make sure the high-speed micro-B cable you have is a data cable as some high-speed micro-B cables are power only. Note: To flash your BeagleV Ahead you need either a super-speed micro-B or high-speed micro-B cable as shown in section above. This cable is not included in the box and must be purchased separately. Download latest software image To download the latest software...
Open the catalog to page 16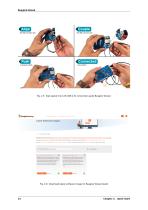
Fig. 2.5: high-speed micro-B (USB 2.0) connection guide BeagleV Ahead. Fig. 2.6: Download latest software image for BeagleV Ahead board Chapter 2. Quick Start
Open the catalog to page 17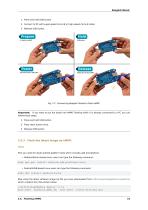
1. Press and hold USB button. 2. Connect to PC with super-speed micro-B or high-speed micro-B cable. Important: If you want to put the board into eMMC flashing while it is already connected to a PC you can follow these steps: 1. Press and hold USB button. 2. Press reset button once. First you need to install android platform tools which includes adb and fastboot. • Debian/Ubuntu-based Linux users can type the following command: sudo apt-get install android-sdk-platform-tools • Fedora/SUSE-based Linux users can type the following command: sudo dnf install android-tools Now unzip the latest software...
Open the catalog to page 18
Important: Make sure your board is in flash mode, you can follow the guide above to do that. To flash the board you just have to exexute the script fastboot_emmc.sh as root and provide your passoword: [lorforlinux@fedora deploy] $ sudo ./fastboot_emmc.sh [sudo] password for lorforlinux: 2.6 Access UART debug console Note: It has been noticed that 6pin FTDI cables like this doesn’t seem work with BeagleV Ahead debug port and there might be other cables/modules based on PL2303 which give garbage values in the serial port. It is recommended to use the below listed modules for accessing the UART...
Open the catalog to page 19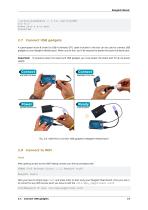
[lorforlinux@fedora ~] $ tio /dev/ttyUSB0 tio v2.5 Press ctrl-t q to quit Connected 2.7 Connect USB gadgets A super-speed micro-B (male) to USB A (female) OTG cable included in the box can be used to connect USB gadgets to your BeagleV Ahead board. When you do this, you’ll be required to power the board via Barrel jack. Important: supply. To properly power the board and USB gadgets you must power the board with 5V @ 2A power Fig. 2.9: USB OTG to connect USB gadgets to BeagleV Ahead board 2.8 Connect to WiFi Yocto After getting access to the UART debug console you will be prompted with, THEAD...
Open the catalog to page 20All Beagleboard.org catalogs and technical brochures
 BeagleY-AI
133 Pages
 BeagleV-Fire
99 Pages
 BeagleBone Blue
27 Pages
 BeagleBone Black
109 Pages
 PocketBeagle
63 Pages
 BeagleBone AI-64
132 Pages
 BeagleConnect Freedom
37 Pages
- Single-board computer
- Embedded single-board computer
- Intel® Core™ single-board computer
- USB single-board computer
- Compact single-board computer
- ARM architecture single-board computer
- LPDDR4 single-board computer
- Dual-core single-board computer
- Single-board computer for IoT applications
- Robotic single-board computer