
- Catalogs
- BEAD BAZOOKA
- Gaither’s BB6L / BB9L / 2” BB12L

Gaither’s BB6L / BB9L / 2” BB12L

Gaither’s BB6L / BB9L / 2” BB12L
Overview
This document provides comprehensive instructions and safety guidelines for the Gaither Bead Bazooka™ tire inflation tool, specifically models BB6L, BB9L, and BB12L. The tool is designed exclusively for seating tire beads onto rims using compressed air, suitable for a wide range of tires including motorcycle, passenger car, quad, industrial truck, and small agricultural machine tires.
1. Replacement Parts and Accessories
- Replacement parts include air tanks, slotted barrels, connectors, lock nuts, pressure gauges, valves, grips, and safety components.
- Accessories offered: GB-51 KD Tire Stand, GB-54 Safety Pack (goggles and ear plugs), 12919 Spiral Hose, 12913B Slotted Barrel, GB-52 Air Whip Hose, GB-56 Wide Wall Clip with screws, 12913B2 (2" BB12L) Slotted Barrel, GB-53 Tire Wedge, 12904 Super Slick’em, 12954 Gaither Slick’em, 12913B2J (2" Jet-Assisted Barrel), and BBH-01 Charging Station.
- Critical safety recommendation: replace the air tank every 5 years to maintain safety and performance.
2. Safety and Operational Recommendations
- Use only clean, filtered compressed air to prevent tool damage and ensure optimal performance.
- Operate the tool indoors only.
- Maintain a 2-3 inch (2.5-5 cm) distance between the barrel and the wheel flange during firing to avoid contact and damage.
- Always wear eye and hearing protection when using the tool.
- The Bead Bazooka™ is strictly a tire industry tool and must never be used as a toy or for any other purpose.
3. Setup and Assembly
- Install an appropriate air coupler nipple (not included) onto the small air inlet valve.
- Securely attach the dual-slotted barrel to the large release opening using the locking nut.
4. Operating Procedures
Horizontal Position (Recommended for most tires up to medium truck size)
- Position the barrel flange on top, parallel to the ground, opposite the handle and trigger.
- Place the tire with the smaller rim side down and larger rim side up; valve stem should point upward.
- Support the tire off the ground using a Gaither tire stand or wooden block; ensure the bottom bead is seated and both tire and rim are lubricated.
- Connect compressed air and fill the tank to the desired pressure (20-150 psi / 1.5-10 bar), adjusted based on tire size and condition.
- Hold the tool with both hands, aim the barrel flange opposite the valve stem, keeping 2.5-5 cm distance from the rim.
- Ensure the valve stem has no valve core installed; apply steady airflow through the valve stem using an air line or Gaither Whip Hose (GB-52) while firing the tool.
- Aim the barrel opening at the largest gap between tire bead and rim at a 50-70 degree angle.
- Gently pull the trigger to release air, maintaining steady aim until the bead seats.
- If the bead does not seat, repeat at higher pressure or try the vertical position method.
- Use tire wedges (GB-53) if large gaps exist.
Vertical Position (Recommended for truck tires)
- Position the barrel flange downward on the same side as the handle and trigger, parallel to the ground, and secure tightly.
- Lean the tire/wheel assembly against a wall with the bottom bead seated; valve stem should point outward.
- Fill the air tank to the desired pressure (20-150 psi / 1.5-10 bar).
- Hold the tool with both hands, aim the barrel flange opposite the valve stem, maintaining 2.5-5 cm distance.
- Ensure no valve core is installed; apply steady airflow through the valve stem while firing.
- Aim at the largest gap between tire bead and rim at a 50-70 degree angle.
- Gently pull the trigger to release air until the bead seats.
- If necessary, repeat at higher pressure.
5. Post-Operation Procedure
- Stop airflow to the valve stem immediately after the bead seats.
- Insert the valve core into the valve stem.
- Move the tire/wheel assembly into a safety inflation cage.
- Inflate the tire to the manufacturer’s recommended pressure.
6. Technical Parameters
- Operating pressure range: 20 to 150 psi (1.5 to 10 bar), depending on tire size and condition.
- Suitable for a variety of tire types including motorcycle, passenger car, quad, industrial truck, and small agricultural machine tires.
7. General Recommendations and Maintenance
- Always lubricate tire and rim properly to ensure correct bead seating.
- Use appropriate supports such as Gaither tire stands or wedges to stabilize the assembly during operation.
- Never use the Bead Bazooka™ for any purpose other than seating tire beads.
- Always wear eye and hearing protection.
- Replace air tanks every 5 years for safety.
- For troubleshooting, maintenance tips, and advice on problematic tires, visit www.gaithertool.com.
8. Key Safety Warnings
- Compressed air is hazardous; strict adherence to safety protocols is mandatory.
- The tool is not a firearm or toy and must be used only for its intended tire seating purpose.
- Always operate at manufacturer-recommended pressures.
- Wear appropriate personal protective equipment at all times.
Summary
The document thoroughly details the correct assembly, positioning, and operation of the Gaither Bead Bazooka™ to safely and effectively seat tire beads. It emphasizes strict safety protocols, proper use of accessories, and post-operation procedures to ensure user safety and tool longevity. The tool’s versatility covers a broad range of tire types with specific instructions for horizontal and vertical use, supported by recommended accessories and maintenance guidelines.
Catalog excerpts
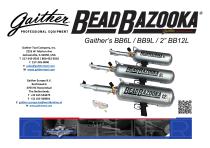
Gaither’s BB6L / BB9L / 2” BB12L Gaither Tool Company, Inc. 2255 W. Morton Ave Jacksonville, IL 62650, USA T 217-245-0545 / 800-452-5010 F 217-245-0940 E [email protected] W www.gaithertool.com Gaither Europe B.V. Rechtzaad 6 4703 RC Roosendaal The Netherlands T +31 165 554475 F +31 165 568691 E [email protected] W www.gaithertool.co
Open the catalog to page 1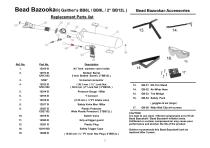
Bead Bazooka® Accessories Replacement Parts list Air Tank w/piston valve inside Slotted Barrel 2 Inch Slotted Barrel ( 2”BB12L ) Universal connector Plastic Protector Wide Plastic Protector ( 2”BB12L ) Switch Valve Grip w/trigger guard Plastic Plug Safety Trigger Caps GB-54 Safety Pack ( goggles & ear plugs ) GB-56 Wide Wall Clip w/4 screws CAUTION: It is best to use clean / filtered compressed air to fill all Bead Bazooka® / Bead Booster® inflation tools. Unfiltered or unclean compressed air may cause poor performance and shorten the life of the product. Gaither recommends this Bead Bazooka®...
Open the catalog to page 2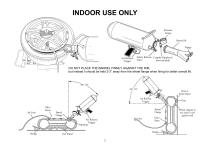
DO NOT PLACE THE BARREL FIRMLY AGAINST THE RIM, but instead it should be held 2-3” away from the wheel flange when firing for better overall lift.
Open the catalog to page 3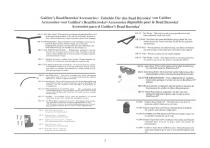
Wide Wall Clip w/4 screws Storage Clip For Bead Bazooka® Breitwand Clip w / 4 Schrauben Lagerung Klipp für Bead Bazooka® Amplia sujeciones de pared w / 4 tornillos lip de almacenamiento para el Bead Bazooka® Large Clip mur w / 4 vis Stockage clip pour Bead Bazooka® GB-56 Brede Muur Clip w / 4 schroeven Storage clip voor Bead Bazooka®
Open the catalog to page 4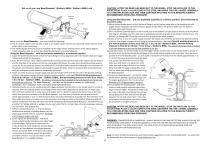
CAUTION: AFTER THE BEAD HAS BEEN SET TO THE WHEEL, STOP THE AIR FLOW TO THE VALVE STEM, PLACE A VALVE CORE IN THE STEM, AND MOVE THE TIRE / WHEEL ASSEMBLY TO A TIRE INFLATION CAGE AND THEN CONTINUE INFLATING TO THE MANUFACTURER’S RECOMMENDED OPERATING PRESSURE. Set-up of your new Bead Bazooka (Gaither’s BB6L / Gaither’s BB9L) unit Before using the Bead Bazooka™ you must install the following: 1) The air coupler nipple is not included. Install an air coupler nipple that fits your particular system into the small intake valve (a) pictured above. 2) The slotted double barrel (b) must be installed...
Open the catalog to page 5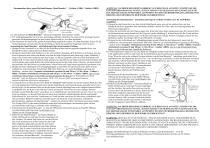
Zusammenbau ihrer neuen Reifenluftkanone „Bead Bazooka™“ (Gaither’s BB6L / Gaither’s BB9L) Vor dem Gebrauch der Bead Bazooka™ müssen die folgenden Teile montiert werden: 1) Der Luftkupplungsnippel ist nicht im Lieferumfang enthalten. Montieren Sie einen auf Ihr jeweiliges System passenden Luftkupplungsnippel an dem kleinen Einlassventil (a), wie oben abgebildet. 2) Das Hosenrohr (b) muss an der großen Auslassöffnung angebracht werden, wie oben abgebildet. Setzen Sie die Sicherungsmutter auf und ziehen Sie diese kräftig an, damit das geschlitzte Doppelrohr sicher festsitzt. Anwendung der Bead...
Open the catalog to page 6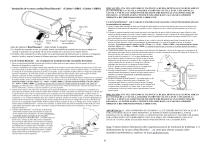
Instalación de su nueva unidad Bead Bazooka™ (Gaither’s BB6L / Gaither’s BB9L) PRECAUCIÓN: UNA VEZ AJUSTADO EL TALÓN EN LA RUEDA, DETENGA EL FLUJO DE AIRE EN EL VÁSTAGO DE LA VÁLVULA, COLOQUE UN OBÚS DE VÁLVULA EN EL VÁSTAGO DE LA VÁLVULA Y MUEVA EL CONJUNTO DE NEUMÁTICO/RUEDA HACIA UNA ESTRUCTURA DE INFLADO Y, A CONTINUACIÓN, CONTINÚE INFLANDO HASTA ALCANZAR LA PRESIÓN OPERATIVA RECOMENDADA POR EL FABRICANTE. Uso de la Bead Bazooka™ con el conjunto de neumático/rueda en posición vertical: (Recomendada solo para los neumáticos de camiones) 1) Ajuste el cañón doble ranurado de modo que la brida...
Open the catalog to page 7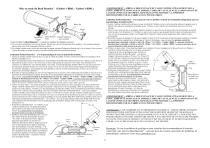
Mise en route du Bead Bazooka™ (Gaither’s BB6L / Gaither’s BB9L) AVERTISSEMENT : APRÈS LA MISE EN PLACE DU TALON CONTRE L'ÉPAULEMENT DE LA JANTE, ARRETE LE GONFLAGE ET INSÉREZ L’OBUS DE VALVE. PLACEZ LA ROUE DANS UNE CAGE DE GONFLAGE SECURISEE. GONFLEZ LE PNEUMATIQUE À LA PRESSION RECOMMANDÉE PAR LE FABRICANT DU PNEUMATIQUE. Utilisation du Bead Bazooka™ avec le pneu/la roue en position verticale (recommandée uniquement pour les pneumatiques de poids lourds) : Avant d’utiliser le Bead Bazooka™, vous devez installer les éléments suivants : 1) Ajustez l’embout à double sortie de façon à ce que le...
Open the catalog to page 8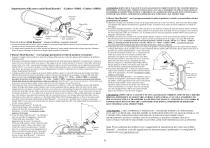
Impostazione della nuova unità Bead Bazooka™ (Gaither’s BB6L / Gaither’s BB9L) ATTENZIONE: DOPO CHE IL TALLONE È STATO ALLOGGIATO CORRETTAMENTE NEL CERCHIO BISOGNA FERMARE IL FLUSSO D’ARIA VERSO LO STELO DELLA VALVOLA, INSERIRE UNO SPILLO NELLO STELO E TRASFERIRE IL GRUPPO PNEUMATICO / CERCHIO IN UNA GABBIA DI GONFIAGGIO E POI CONTINUARE A GONFIARE SEGUENDO LA PRESSIONE DI ESERCIZIO RACCOMANDATA DAL PRODUTTORE. Utilizzare Bead Bazooka™ con il gruppo pneumatico/cerchio in posizione verticale: (raccomandato solo per gli pneumatici di camion) Prima di utilizzare Bead Bazooka™ bisogna installare...
Open the catalog to page 9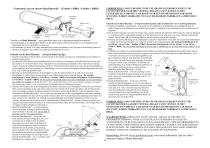
Constructie van uw nieuwe Bead Bazooka™ (Gaither’s BB6L / Gaither’s BB9L) VOORZICHTIG: NADAT DE HIEL IN DE VELGRAND IS GEKOMEN STOPT U DE LUCHTTOEVOER NAAR HET VENTIEL, DRAAIT U EEN VENTIEL IN HET VENTIELHUIS EN BRENGT U DE BAND NAAR EEN BANDENKOOI WAAR HIJ OP SPANNING WORDT GEBRACHT TOT AAN DE DOOR DE FABRIKANT AANBEVOLEN DRUK. Gebruik van de Bead Bazooka™ terwijl de band/velg staat: (alleen aanbevolen voor vrachtwagenbanden) 1) Houd het mondstuk zo dat de flens van de loop aan de onderkant is, dezelfde kant als de handgreep met de trekker, (tegenover de drukmeter), en parallel met de grond....
Open the catalog to page 10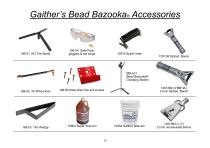
Gaither’s Bead Bazooka® Accessories GB-54 Safe Pack goggles & ear plugs BBH-01 Bead Bazooka® Charging Station 12913B2 (2”BB12L) 2 Inch Slotted Barrel GB-56 Wide Wall Clip w/4 screws
Open the catalog to page 11All BEAD BAZOOKA catalogs and technical brochures


- Mechanical protection protection gloves
- Transport trolley
- Work safety gloves
- Industrial safety gloves
- Handling cart
- Hydraulic parking jack
- Plastic glove
- Industrial cart
- Automotive jack
- Steel jack
- Tyre changer
- Jack for lifting applications
- Wheel balancer
- Car wheel balancer
- Car tire changer
- Tubular handle
- Bottle jack
- Telescopic jack
- Silicone lubricant