- Catalogs
- B9Creations
- Step 6 - Final Assembly (2 of 2)
Step 6 - Final Assembly (2 of 2)
1 /27Pages

Step 6 - Final Assembly (2 of 2)
1 /27Pages
Catalog excerpts

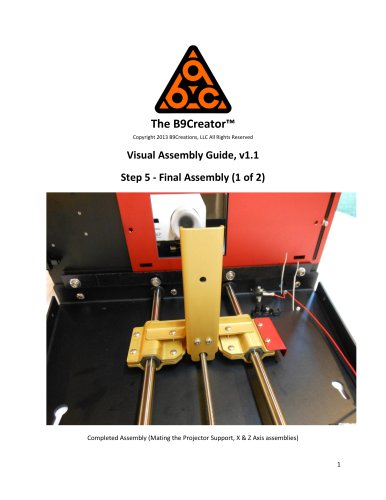
The B9Creator™ Copyright 2013 B9Creations, LLC All Rights Reserved Visual Assembly Guide, v1.1 Step 6 - Final Assembly (2 of 2)
Open the catalog to page 1
Window Assembly Windows are secured to frames with SA18 hardware. Peel the protective paper off the acrylic windows before proceeding. Windows are placed on the inside of the frames. 2
Open the catalog to page 2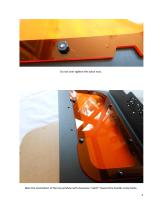
Do not over tighten the nylon nuts. Note the orientation of the top window with clearance "notch" toward the handle screw holes. 3
Open the catalog to page 3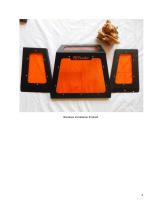
Windows installation finished.
Open the catalog to page 4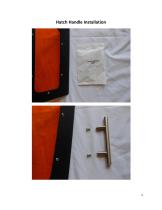
Hatch Handle Installation
Open the catalog to page 5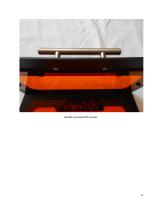
Handle secured with screws.
Open the catalog to page 6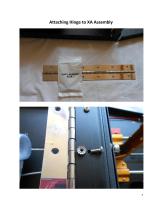
Attaching Hinge to XA Assembly
Open the catalog to page 7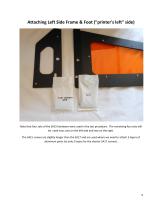
Attaching Left Side Frame & Foot ("printer's left" side) Note that four sets of the SA15 hardware were used in the last procedure. The remaining four sets will be used now, two on the left side and two on the right. The SA15 screws are slightly longer than the SA17 and are used where we need to attach 3 layers of aluminum parts (vs only 2 layers for the shorter SA17 screws).
Open the catalog to page 9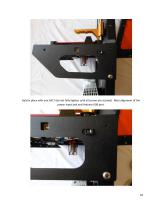
Held in place with one SA17 (do not fully tighten until all screws are started). Note alignment of the power input jack and Arduino USB port.
Open the catalog to page 10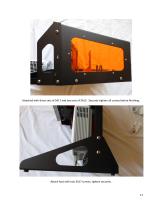
Attached with three sets of SA17 and two sets of SA15. Securely tighten all screws before finishing. Attach foot with two SA17 screws, tighten securely.
Open the catalog to page 11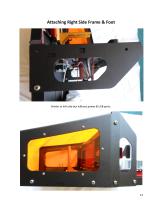
Attaching Right Side Frame & Foot Similar to left side but without power & USB ports.
Open the catalog to page 12
Both sides attached.
Open the catalog to page 13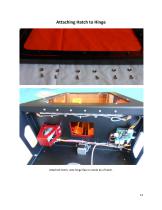
Attaching Hatch to Hinge Attached Hatch, note hinge flap on inside lip of hatch.
Open the catalog to page 14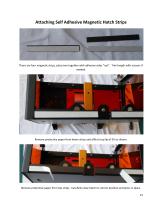
Attaching Self Adhesive Magnetic Hatch Strips There are four magnetic strips, place two together with adhesive sides "out". Trim length with scissors if needed. Remove protective paper from lower strips and affix to top lip of ZA as shown. Remove protective paper from top strips. Carefully close hatch to correct position and press in place. 15
Open the catalog to page 15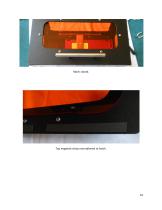
Hatch closed. Top magnetic strips now adhered to hatch.
Open the catalog to page 16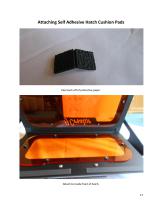
Attaching Self Adhesive Hatch Cushion Pads Peel each off of protective paper. Attach to inside front of hatch.
Open the catalog to page 17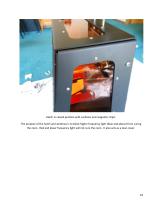
Hatch in closed position with cushions and magnetic strips. The purpose of the hatch and windows is to block higher frequency light (blue and above) from curing the resin. Red and lower frequency light will not cure the resin. It also acts as a dust cover.
Open the catalog to page 18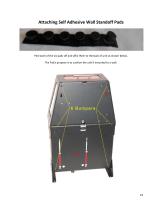
Attaching Self Adhesive Wall Standoff Pads Peel each of the six pads off and affix them to the back of unit as shown below. The Pad's purpose is to cushion the unit if mounted to a wall.
Open the catalog to page 19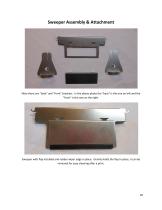
Sweeper Assembly & Attachment Note there are "back" and "front" brackets. In the above photo the "back" is the one on left and the "front" is the one on the right. Sweeper with flap installed and rubber wiper edge in place. Gravity holds the flap in place, it can be removed for easy cleaning after a print.
Open the catalog to page 20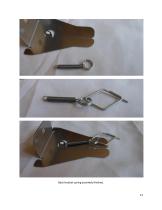
Back bracket spring assembly finished.
Open the catalog to page 21
Front and Back brackets completed. Preparing to attach the Back Bracket using the slide track screw. Note the washer (not shown) goes on top of the bracket.
Open the catalog to page 22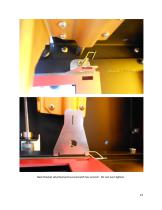
Back Bracket attached and secured with hex wrench. Do not over tighten.
Open the catalog to page 23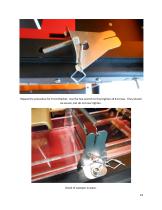
Repeat the procedure for Front Bracket. Use the hex wrench to final tighten all 8 screws. They should be secure, but do not over tighten. Detail of sweeper in place. 24
Open the catalog to page 24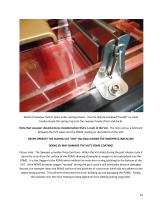
Detail of sweeper held in place under spring tension. Use the diamond shaped "handle" to easily hook/unhook the spring ring onto the sweeper hooks (front and back). Note that sweeper should only be installed when there is resin in the Vat. The resin acts as a lubricant between the PVC wiper and the PDMS coating on the bottom of the VAT. NEVER OPERATE THE SLIDING VAT "DRY" (No Resin) WHEN THE SWEEPER IS INSTALLED! DOING SO MAY DAMAGE THE VAT'S PDMS COATING! Please note: The Sweeper provides three functions. When the Vat slides during the part release cycle it clears the resin from the surface...
Open the catalog to page 25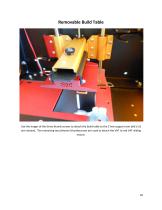
Removable Build Table Use the longer of the three thumb screws to attach the build table to the Z Axis support arm (old v1.0 arm shown). The remaining two (shorter) thumbscrews are used to attach the VAT to red VAT sliding mount.
Open the catalog to page 26
Your B9Creator™ Assembly is Complete!
Open the catalog to page 27All B9Creations catalogs and technical brochures
 B9Creator Technology
2 Pages
 Step 5 - Final Assembly (1 of 2)
10 Pages
 Step 3 - Z Axis (ZA-A) Assembly
13 Pages
 Step 2 - X Axis (XA) Assembly
31 Pages
 B9Clean
2 Pages
 B9 Core 530
1 Page
 B9 Scan 350
1 Page
 B9Creator v1.2
1 Page
 B9 Core 550
1 Page
 Black Resin
3 Pages
 Gray Resin
3 Pages


- Additive manufacturing machine
- Industrial 3D printer
- Plastic additive manufacturing machine
- 3D scanning system
- Prototyping 3D printing machine
- High-speed 3D printer
- 3D printing resin
- Curing system
- Medical 3D printing machine
- Dental additive manufacturing machine
- UV curing system
- Polymer 3D printing resin
- Resin 3D printer
- Industrial 3D printing resin
- DLP 3D printer
- Black 3D printing resin
- Cleaning station
- Red 3D printing resin
- Green 3D printing resin
- Yellow 3D printing resin