- Catalogs
- B9Creations
- Step 1 - Projector Support (PS) Assembly
Step 1 - Projector Support (PS) Assembly
1 /8Pages

Step 1 - Projector Support (PS) Assembly
1 /8Pages
Catalog excerpts

The B9Creator™ Copyright 2013 B9Creations, LLC All Rights Reserved Visual Assembly Guide, v1.1 Step 1 - Projector Support (PS) Assembly Completed Projector Support (PS) Assembly (Feet not shown)
Open the catalog to page 1
Feet Assembly
Open the catalog to page 2
Completed Feet Assembly After completing the feet, set them aside for use during the final assembly.
Open the catalog to page 3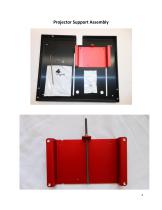
Projector Support Assembly
Open the catalog to page 4
Front View Back View NOTE: Do not tighten these four screws. They will be secured after calibration. 5
Open the catalog to page 5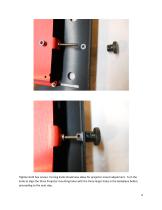
Tighten both hex screws. Turning knob should now allow for projector mount adjustment. Turn the knob to align the three Projector mounting holes with the three larger holes in the backplane before proceeding to the next step. 6
Open the catalog to page 6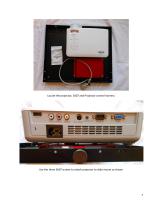
Locate the projector, SA07 and Projector control harness Use the three SA07 screws to attach projector to slide mount as shown
Open the catalog to page 7
Attach the Projector control harness to the Projector's RS-232 port, feed the cord under the mount. After completing the PS Assembly, set it aside for use during the final assembly. 8
Open the catalog to page 8All B9Creations catalogs and technical brochures
 B9Creator Technology
2 Pages
 Step 6 - Final Assembly (2 of 2)
27 Pages
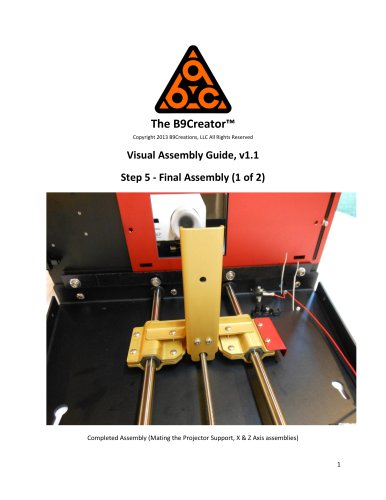 Step 5 - Final Assembly (1 of 2)
10 Pages
 Step 3 - Z Axis (ZA-A) Assembly
13 Pages
 Step 2 - X Axis (XA) Assembly
31 Pages
 B9Clean
2 Pages
 B9 Core 530
1 Page
 B9 Scan 350
1 Page
 B9Creator v1.2
1 Page
 B9 Core 550
1 Page
 Black Resin
3 Pages
 Gray Resin
3 Pages


- Additive manufacturing machine
- Industrial 3D printer
- Plastic additive manufacturing machine
- 3D scanning system
- Prototyping 3D printing machine
- High-speed 3D printer
- 3D printing resin
- Curing system
- Medical 3D printing machine
- Dental additive manufacturing machine
- UV curing system
- Polymer 3D printing resin
- Resin 3D printer
- Industrial 3D printing resin
- DLP 3D printer
- Black 3D printing resin
- Cleaning station
- Red 3D printing resin
- Green 3D printing resin
- Yellow 3D printing resin