Easier mental ray Rendering for Design Workflows
1 /44Pages

Easier mental ray Rendering for Design Workflows
1 /44Pages
Catalog excerpts
Easier mental ray Rendering for Design Workflows
Open the catalog to page 1
Easier mental ray Rendering for Design Workflows
Open the catalog to page 2
Easier mental ray Rendering for Design Workflows Objectives This white paper is intended for users of Autodesk® 3ds Max® Design* software (version 2010 or higher). The objective is to demystify mental ray® renderer rendering and present it in a simple way. The paper reviews common scenarios that architects, designers or engineers face when rendering with mental ray. It is targeted at users who have a good understanding of the 3ds Max Design interface and basic notions of rendering and photorealistic rendering workflows. *If you are working with Autodesk® 3ds Max® software (version 2010 or higher),...
Open the catalog to page 3
Easier mental ray Rendering for Design Workflows Section 1: Abstract and Background In the real world, energy is emitted by light sources, bounces around, and is absorbed by surfaces until everything stabilizes. Substantially the same principles apply in global illumination rendering, and especially in Architectural Visualization. Users rendering for AEC usually need to create images which enable the design to be presented and evaluated as closely to the real space as possible; besides structure and surfaces, light is the one element that can significantly change the appearance of a room. This...
Open the catalog to page 4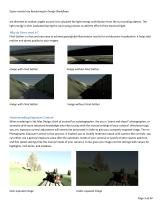
Easier mental ray Rendering for Design Workflows are diverted at random angles around it to calculate the light energy contribution from the surrounding objects. The light energy is then evaluated during the ray tracing process to add the effect of the bounced light. Why do Users need it? Final Gather is a fast and easy way to achieve good global illumination results for architecture visualization. It helps add realism and photo quality to your images. Image with Final Gather Image without Final Gather Image with Final Gather Image without Final Gather Understanding Exposure Control When rendering...
Open the catalog to page 5
Easier mental ray Rendering for Design Workflows The recommended Exposure Control plug-in to use with the mental ray rendering engine is the mr Photographic Exposure Control. It is designed to mimic real-world camera settings and assumes that the scene environment is physically based as well (Sun, Sky, Photometric lights, and proper scale). For ease of use, select a preset (similar to "point-and-shoot" camera settings). Create a preview and adjust the exposure value to your needs. If you are more familiar with the concepts of photography, you can specify the Shutter Speed, Aperture, and Film...
Open the catalog to page 6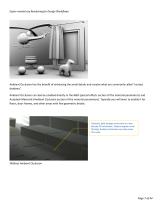
Easier mental ray Rendering for Design Workflows Ambient Occlusion has the benefit of enhancing the small details and creates what are commonly called “contact shadows”. Ambient Occlusion can also be enabled directly in the A&D (special effects section of the material parameters) and Autodesk Materials (Ambient Occlusion section of the material parameters). Typically you will want to enable it for floors, door frames, and other areas with fine geometric details. Typically, light leakage arises due to a low density FG calculation. Objects appear to be floating. Ambient Occlusion can help solve...
Open the catalog to page 7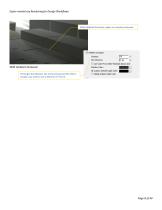
Easier mental ray Rendering for Design Workflows With Ambient Occlusion, edges are visually enhanced. With Ambient Occlusion The larger the distance, the more pronounced the effect. Usually, you want to use a distance of ~10 cm.
Open the catalog to page 8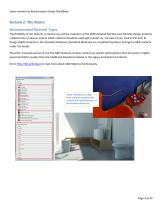
Easier mental ray Rendering for Design Workflows Recommended Material Types The flexibility of the features in mental ray and the evolution of the differentiated 3ds Max and 3ds Max Design products created some confusion around which material should be used with mental ray. For ease of use, stick to the Arch & Design (A&D) material or the Autodesk Materials (Autodesk Materials are simplified interfaces driving the A&D material The other materials will work, but the A&D material contains mental ray specific optimizations that will result in higher speed and better quality than the traditional...
Open the catalog to page 9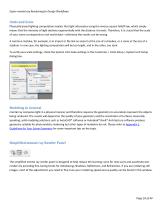
Easier mental ray Rendering for Design Workflows Physically based lighting computation implies that light attenuates using the inverse square falloff law, which simply means that the intensity of light declines exponentially with the distance it travels. Therefore, it is crucial that the scale of your scene corresponds to real-world data—otherwise the results can be wrong. A common mistake, for example, is to import or file link an airport at the size of a shoebox, or a room at the size of a stadium. In one case, the lighting computation will be too bright, and in the other, too dark. To verify...
Open the catalog to page 10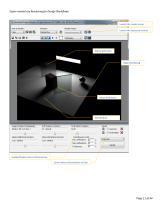
Easier mental ray Rendering for Design Workflows Rendered Frame Window, Display Gamma: 2.2, RGB A Color 32 Bits/Channel (1:1) Render Preset: Image Precision (Antialiasing): Soft Shadows Precision: Final Gather Precision: Launch the render setup Launch the Exposure Control Glossy Reflections Precision: Glossy Refractions Precision: Final Gather Trace/Bounces Limits Enable/Disable Indirect Illumination Cache Indirect Illumination to Disk
Open the catalog to page 11
Easier mental ray Rendering for Design Workflows Section 3: Selecting a Lighting Scenario These are the four main lighting scenarios most users will be required to render with mental ray: A. B. C. D. Exterior scene during daytime Exterior scene at dawn or dusk Interior scene with sunlight entering through windows or doors Interior scene using artificial light only
Open the catalog to page 12
Easier mental ray Rendering for Design Workflows Lighting Scenario A: Exterior Scene During Daytime This rendering scenario will require the use of Daylight System. The 3ds Max Design Daylight System regroups two light sources in the same user interface: mr Sun and mr Sky. Their intensity and colors are determined by their orientation in 3D space, which is affected by the settings for date/time and geographical location. The blue gradient background is handled by a special shader (mr Physical Sky) that can be added automatically upon creation of the daylight system. Although the user has the...
Open the catalog to page 13All AUTODESK catalogs and technical brochures
 Autodesk ® Flame®
2576 Pages
 Autodesk® In Games
7 Pages
 Autodesk® DirectConnect
80 Pages
 AUTODESK ® 3DS MAX
1358 Pages
 CEIT-KE
2 Pages
 Novax DMA
2 Pages
 autocad_civil3d
6 Pages
 building_design_suite_2013
4 Pages
 autocad_design_suite_2013
2 Pages
 autocad_mep_brochure
4 Pages
 acade_jic_overview_broch_us
4 Pages
 alias_2013_
10 Pages
 Autodesk Utility Design
2 Pages
 Autodesk Toxik
4 Pages
 Autodesk Subcontractor
4 Pages
 Autodesk Smoke
2 Pages
 Autodesk Mudbox
4 Pages
 Autodesk MotionBuilder
4 Pages
 Autodesk Moldflow Adviser
4 Pages
 Autodesk Maya
4 Pages
 Autodesk Lustre
6 Pages
 Autodesk LandXplorer
4 Pages
 Autodesk Inferno
1 Page
 Autodesk Flare
1 Page
 Autodesk Flint
1 Page
 Autodesk Cleaner XL
2 Pages
 Autodesk Cleaner
2 Pages
 Autodesk Buzzsaw
4 Pages
 Autodesk Backdraft Conform
6 Pages
 AutoCAD Revit MEP Suite
4 Pages
 AutoCAD P&ID
4 Pages
 AutoCAD Inventor Suites
32 Pages
 AutoCAD Electrical
4 Pages
 Autodesk Quantity Takeoff
4 Pages
 Autodesk Revit Structure
8 Pages
 AutoCAD Civil
6 Pages


Archived catalogs
 AutoCAD Raster Design
2 Pages
 AutoCAD MEP
6 Pages
 Autodesk Navisworks Review
4 Pages
 AutoCAD Civil 3D
2 Pages
 factory_design_suite_2013
4 Pages
 Autodesk 3ds Max Design
4 Pages
 AutoCAD Map 3D
4 Pages
 AutoCAD Mechanical
4 Pages
 AutoCAD Structural Detailing
6 Pages
 Autodesk Alias Design
4 Pages
 Autodesk Alias Surface
4 Pages
 Autodesk Revit Structure
8 Pages
 AutoCAD LT
2 Pages
 Autodesk MapGuide Enterprise
4 Pages
 Autodesk Topobase
2 Pages
 Autodesk Ecotect Analysis
4 Pages
 AutoCAD Architecture
4 Pages
 acade_jic
4 Pages
 autocad_lt_2013
2 Pages
 3DS
3DS8 Pages
 map3D_2013
2 Pages
 BIM and Visualization
11 Pages


- SARRALLE management software
- SARRALLE automation software
- SARRALLE analysis software
- SARRALLE process software
- SARRALLE Windows software
- SARRALLE real-time software
- SARRALLE CAD software
- SARRALLE cloud software
- SARRALLE control software
- SARRALLE design software
- SARRALLE 3D software
- SARRALLE industrial software
- SARRALLE interface software
- Measurement software
- SARRALLE quality software
- SARRALLE visualization software
- SARRALLE simulation software
- SARRALLE automated software
- SARRALLE programming software
- SARRALLE development software