


- Products
- Catalogs
- News & Trends
- Exhibitions
Autodesk® Revit® Getting Started Guide
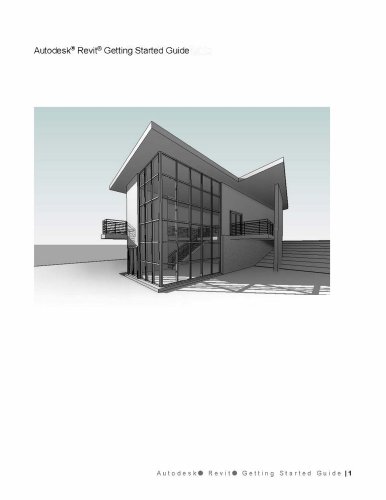
Autodesk® Revit® Getting Started Guide
This guide introduces Autodesk Revit 2015, a building information modeling (BIM) software, explaining fundamental concepts, terminology, and the parametric change engine that coordinates project changes.
The Revit interface is user-friendly, featuring a ribbon with task tools, a project browser, and a properties palette. Users can customize the interface to fit their workflow.
The guide details steps for creating a project, including setting up walls, terrain, roofs, floors, and other architectural elements, with instructions on using Revit's tools for desired designs.
- Parametric Modeling: Revit uses parametric relationships to maintain consistency and coordination across the model, automatically updating related elements when changes occur.
- Element Types: Revit elements are categorized into model elements (e.g., walls, doors), datum elements (e.g., grids, levels), and view-specific elements (e.g., dimensions, tags).
- Families and Types: Elements are organized into families and types, allowing flexibility and customization in design.
The guide includes steps for documenting the project, such as creating sheets, exporting data, and conducting solar studies, emphasizing the importance of accurate and up-to-date documentation.
An appendix provides additional resources, including mouse interface and keyboard shortcuts, to enhance user efficiency.
The guide is a comprehensive resource for beginners to get started with Autodesk Revit, offering a structured approach to learning the software's capabilities and applying them to real-world projects.
- Getting Started: Introduces the Revit interface, including ribbons, toolbars, and navigation tools like the ViewCube and Steering Wheel, emphasizing the importance of using correct template files and saving projects in designated folders.
- Creating Levels: Details the process of creating and renaming levels within a building project, including instructions on using the zoom tool and organizing plans by hierarchy.
- Creating Walls: Guides users through adding foundation and exterior walls, explaining how to select wall types, set wall heights, and accurately place walls.
- Creating Terrain: Describes creating a 3D view and adding a toposurface to the building site, including steps for setting elevation points and creating a graded building site using the Toposurface tool.
- Adding Exterior Walls: Provides instructions for building upon foundation walls to create exterior walls that extend to the roof level, highlighting the use of the Draw option and setting wall heights relative to the roof.
- ViewCube and Steering Wheel: Tools for navigating and reorienting views within the model.
- Project Browser: A tool for managing views, levels, and other project elements.
- Toposurface Tool: Used for creating terrain models by selecting elevation points.
- Wall Tools: Options for selecting wall types, setting heights, and drawing walls in the project space.
- Always save project files in designated folders to avoid data loss.
- Use descriptive names for levels and views to maintain organization.
- Regularly check and adjust wall heights to ensure they align with roof levels.
- Utilize 3D views to verify the accuracy of terrain and building models.
The guide begins with instructions on tracing the interior of foundation walls by selecting endpoints, advising users to adjust view range settings if the foundation is not visible.
Users are guided to create a roof using the footprint of exterior walls, specifying an offset for overhang, drawing roof lines, creating offset roof lines, and using tools like Trim/Extend to close the roof sketch, with adjustments to the roof slope made in the properties palette.
The guide explains how to create floors using both the Pick and Draw methods, emphasizing the importance of creating a closed sketch to ensure validity, and instructing users to modify view settings to visualize the floors properly.
Instructions are provided for adding and modifying walls on different levels to create rooms, including steps for splitting and trimming walls to form corridors.
The document details how to load door types from the Revit Library and place them in the model, covering both exterior and interior door placement, including tips for adjusting door swing direction.
Users are instructed to add windows in elevation and plan views, using alignment and dimension tools for precise placement, with steps for modifying window types and aligning them with architectural features like retaining walls.
The guide emphasizes the importance of saving the project file regularly, adjusting view settings for better visualization, and ensuring sketches are closed loops to avoid errors.
- Ensure 'Tag on Placement' is cleared in the Options Bar.
- In the Properties palette, select 'Casement 3x3 with Trim: 36" x 72"' and place three windows on the west wall.
- Reposition windows to be equidistant using the Annotate tab and Dimension panel.
- Adjust walls to maintain design intent and redistribute windows equally.
- Use the Undo function to restore original dimensions if needed.
- Delete dimension lines while maintaining constraints.
- Explore various views to check model results and save the project file.
- Open the '01 Lower Level' floor plan.
- Create a curtain wall at the northeast corner by splitting the East wall and selecting the upper portions of the East and North walls.
- Change the element type to 'Curtain Wall: Storefront' in the Properties palette.
- Ensure curtain walls are attached to the roof.
- If the program crashes, proceed to the next section on modifying the roof.
- Skip tagging windows if already done and proceed to page 64 for creating a solar study.
- Omit Mark 5 (room schedule) and proceed to page 73 to conclude Lab 1.
Catalog excerpts
Autodesk® Revit® Getting Started Guide Autodesk® Revit® Getting Started Guide 1
Open the catalog to page 1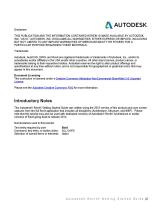
THIS PUBLICATION AND THE INFORMATION CONTAINED HEREIN IS MADE AVAILABLE BY AUTODESK, INC. "AS IS." AUTODESK, INC. DISCLAIMS ALL WARRANTIES, EITHER EXPRESS OR IMPLIED, INCLUDING BUT NOT LIMITED TO ANY IMPLIED WARRANTIES OF MERCHANTABILITY OR FITNESS FOR A PARTICULAR PURPOSE REGARDING THESE MATERIALS. Trademarks Autodesk, AutoCAD, DWG, and Revit are registered trademarks or trademarks of Autodesk, Inc., and/or its subsidiaries and/or affiliates in the USA and/or other countries. All other brand names, product names, or trademarks belong to their respective holders. Autodesk reserves the right to...
Open the catalog to page 2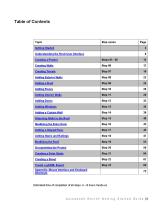
Step series Getting Started Understanding the Revit User Interface Creating Walls Creating Terrain Adding Exterior Walls Adding Floors Adding Interior Walls Adding Doors Adding Windows Adding a Curtain Wall Attaching Walls to the Roof Adding a Slo(!ed Floor Adding Stairs and Railings Creating a Solar Studl£ Create a gbXML EX(!Ort A1rnendix: Mouse Interface and Shortcuts Estimated time of completion of all steps: 4 - 8 hours hands-on Autodesk® Revit® Getting Started Guide
Open the catalog to page 3
Getting Started Understanding the Basics In this lesson, you learn what Autodesk Revit is and how its parametric change engine benefits you and your work. You begin \J\lith the fundamental concepts on which Revit is built. You learn the terminology, the hierarchy of elements, and how to perform some common tasks in the product. Understanding the Concepts What is Autodesk® Revit® 2015? The Revit platform for building information modeling is a design and documentation system that supports the design, drawings, and schedules required for a building project. Building information modeling (BIM) delivers...
Open the catalog to page 4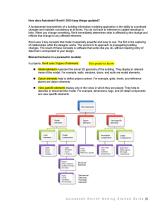
How does Autodesk® Revit® 2015 keep things updated? A fundamental characteristic of a building information modeling application is the ability to coordinate changes and maintain consistency at all times. You do not have to intervene to update drawings or links. When you change something, Revit immediately determines \J\lhat is affected by the change and reflects that change to any affected elements. Revit uses 2 key concepts that make it especially powerful and easy to use. The first is the capturing of relationships \J\lhile the designer works. The second is its approach to propagating building...
Open the catalog to page 5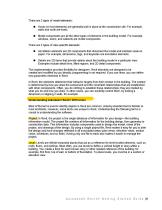
There are 2 types of model elements: • Hosts (or host elements) are generally built in place at the construction site. For example, walls and roofs are hosts. Model components are all the other types of elements in the building model. For example, windows, doors, and cabinets are model components. There are 2 types of view-specific elements: • Annotation elements are 20 components that document the model and maintain scale on paper. For example, dimensions, tags, and keynotes are annotation elements. Details are 20 items that provide details about the building model in a particular view. Examples...
Open the catalog to page 6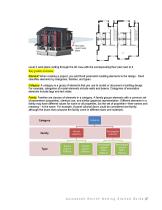
Level 2 work plane cutting through the 30 view with the corresponding floor plan next to it Key points to know Element: When creating a project, you add Revit parametric building elements to the design. Revit classifies elements by categories, families, and types. Category: A category is a group of elements that you use to model or document a building design. For example, categories of model elements include walls and beams. Categories of annotation elements include tags and text notes. Family: Families are classes of elements in a category. A family groups elements with a common set of parameters...
Open the catalog to page 7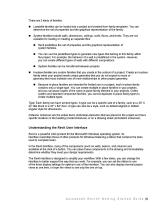
There are 3 kinds of families: • Loadable families can be loaded into a project and created from family templates. You can determine the set of properties and the graphical representation of the family. System families include walls, dimensions, ceilings, roofs, floors, and levels. They are not available for loading or creating as separate files. Revit predefines the set of properties and the graphical representation of system families. You can use the predefined types to generate new types that belong to this family within the project. For example, the behavior of a wall is predefined in the...
Open the catalog to page 8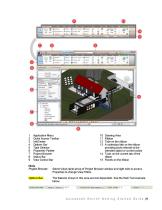
lQC.C:IOnllM (W.i•Gtnttrllnc: 8Me (onJCtWlt l~tl l fromVttd ICit(heft
Open the catalog to page 9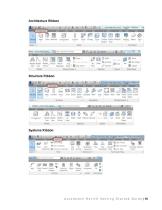
Architecture Ribbon Door Window Curtain Curtain Mullion System Grid Model Model Text Line Model Group Room & Area • Room Separator Vertical Dormer Work Plane Autodesk Revit 2015 • STUDENT VERSION Truss Brace Beam Isolated Wall System Path Fabric Fabric Cover Area Sheet Reinforcement • Model Model Text line Rebar Area Model Group Wall Vertical Dormer Work Plane Autodesk Revit 2015 · STUDENT VERSION · D Duct Accessory uct Placeholder ] ) Conven to Flex Duct Flex Air Duct Terminal Mechanical Equipment Placeholder Pipes ClJ Pi pe Fining .'lit Pipe Accessory '110 Flex Pipe Plumbing & Piping Projectl...
Open the catalog to page 10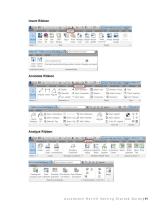
Autodesk Revit 2015 - STUDENT ! ! ~~Decal Revit Point Manage Import Import Cloud links CAO gbXML Project! - floor Plan: Level 1 Insert • Image Manage from file Images Modi Storch Autodt!sk St!tk Load Load as Family Group Find and download building product models, drawings, and specs Load from Library Autodesk Seek Autodesk Revit 2015 · STUDENT VERSION - Al igned Linear Angular Arc Length .,..., Spot Slope Type a ktyword or phrost CJ Revision Cloud A Text tl Region Project! - floor Plan: Level 1 d-lns ""' Beam Annotations Tread Number Space Tag ~ Multi - Rebar • Duct Legend Color Fill : :: Color...
Open the catalog to page 11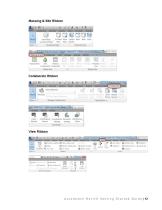
Massing & Site Ribbon 0 Show Mass by View Settings (JJ ~ ~(J~ ~ In-Place Place Mass Mass Curtain Roof System Conceptual Mass Site Parking Component Component Property Line Model Site Modify Site Active Worlcset: Manage Collaboration Copy/ Monitor Autodesk Revit 2015 - STUO Projectl - Floor Plan: Level 1 Coordination Coordination Reconcile Review Settings Hosting Interference Check View Ribbon Arcllitectur View Templates .. ~ Show Hidden Lines lb] Remove Hidden lines [!9 Cut Profile g Rende< in Cloud ii Rende< Gallery
Open the catalog to page 12All AUTODESK catalogs and technical brochures
 Autodesk ® Flame®
2576 Pages
 Autodesk® In Games
7 Pages
 Autodesk® DirectConnect
80 Pages
 AUTODESK ® 3DS MAX
1358 Pages
 CEIT-KE
2 Pages
 Novax DMA
2 Pages
 autocad_civil3d
6 Pages
 building_design_suite_2013
4 Pages
 autocad_design_suite_2013
2 Pages
 autocad_mep_brochure
4 Pages
 acade_jic_overview_broch_us
4 Pages
 alias_2013_
10 Pages
 Autodesk Utility Design
2 Pages
 Autodesk Toxik
4 Pages
 Autodesk Subcontractor
4 Pages
 Autodesk Smoke
2 Pages
 Autodesk Mudbox
4 Pages
 Autodesk MotionBuilder
4 Pages
 Autodesk Moldflow Adviser
4 Pages
 Autodesk Maya
4 Pages
 Autodesk Lustre
6 Pages
 Autodesk LandXplorer
4 Pages
 Autodesk Inferno
1 Page
 Autodesk Flare
1 Page
 Autodesk Flint
1 Page
 Autodesk Cleaner XL
2 Pages
 Autodesk Cleaner
2 Pages
 Autodesk Buzzsaw
4 Pages
 Autodesk Backdraft Conform
6 Pages
 AutoCAD Revit MEP Suite
4 Pages
 AutoCAD P&ID
4 Pages
 AutoCAD Inventor Suites
32 Pages
 AutoCAD Electrical
4 Pages
 Autodesk Quantity Takeoff
4 Pages
 Autodesk Revit Structure
8 Pages
 AutoCAD Civil
6 Pages


Archived catalogs
 AutoCAD Raster Design
2 Pages
 AutoCAD MEP
6 Pages
 Autodesk Navisworks Review
4 Pages
 AutoCAD Civil 3D
2 Pages
 factory_design_suite_2013
4 Pages
 Autodesk 3ds Max Design
4 Pages
 AutoCAD Map 3D
4 Pages
 AutoCAD Mechanical
4 Pages
 AutoCAD Structural Detailing
6 Pages
 Autodesk Alias Design
4 Pages
 Autodesk Alias Surface
4 Pages
 Autodesk Revit Structure
8 Pages
 AutoCAD LT
2 Pages
 Autodesk MapGuide Enterprise
4 Pages
 Autodesk Topobase
2 Pages
 Autodesk Ecotect Analysis
4 Pages
 AutoCAD Architecture
4 Pages
 acade_jic
4 Pages
 autocad_lt_2013
2 Pages
 3DS
3DS8 Pages
 map3D_2013
2 Pages
 BIM and Visualization
11 Pages


- AUTODESK automation software
- AUTODESK management software
- AUTODESK analysis software
- AUTODESK process software
- Real-time software
- Windows software
- AUTODESK CAD software
- AUTODESK cloud software
- AUTODESK control software
- AUTODESK design software
- AUTODESK 3D software
- Industrial software
- Measurement software
- Interface software
- AUTODESK visualization software
- AUTODESK quality software
- AUTODESK simulation software
- AUTODESK programming software
- AUTODESK automated software
- AUTODESK development software