

- Products
- Catalogs
- News & Trends
- Exhibitions
Multi-turn actuators

Multi-turn actuators
- Products adhere to recognized standards and directives, certified by a Declaration of Incorporation and an EU Declaration of Conformity.
- Personnel must be familiar with safety instructions and warning signs to prevent injury or damage.
- Qualified personnel should handle assembly, electrical connection, commissioning, operation, and maintenance.
- Special regulations apply for work in potentially explosive atmospheres.
- Correct transport, storage, mounting, installation, and commissioning are essential for safe operation.
- Protective measures such as enclosures and personal protective equipment are the responsibility of the end user or contractor.
- Designed for operating industrial valves like globe, gate, butterfly, and ball valves.
- Approved for use in potentially explosive atmospheres of zones 1, 2, 21, and 22.
- Not suitable for applications like industrial trucks, lifting appliances, passenger lifts, and continuous submersion.
- Warnings indicate hazardous situations with varying levels of risk, marked by signal words like DANGER, WARNING, CAUTION, and NOTICE.
- Warnings are structured to indicate the type of hazard, potential consequences, and measures to avoid danger.
- Name plates provide essential information such as manufacturer details, type designation, order number, serial number, and technical specifications.
- Different plates are used for actuators, motors, and actuator controls, each containing specific data relevant to their function.
This section outlines protection measures for electrical and non-electrical dust explosion scenarios, including specifications for threads used in line bushings at electrical connections.
Details the types and sizes of actuators covered, including SAEx multi-turn actuators for open-close duty and SAREx for modulating duty, along with AUMA MATIC actuator controls.
Describes protection types for multi-turn actuators and actuator controls, including flameproof enclosures (Ex d), increased safety (Ex e), constructional safety (c), and intrinsic safety (Ex i).
Products can be identified using order numbers and serial numbers, crucial for inquiries and accessing technical data online.
Provides control examples, detailing input signals and control voltages for actuator operations, and defines multi-turn actuators per EN 15714-2/EN ISO 5210 standards.
Guidelines for safe transport, storage, and packaging are provided to prevent damage and corrosion, with specific instructions for lifting and securing loads.
Includes detailed assembly instructions for mounting actuators to valves or gearboxes, fitting handwheels, and securing components, emphasizing correct assembly to prevent damage and ensure safety.
Information on accessories such as stem protection tubes is provided, including assembly instructions and material specifications.
1. Mechanical Assembly
Ensure the protective cap for the stem protection tube is in perfect condition and securely attached. For protection tubes exceeding 2 meters, secure them with appropriate support to prevent bending or oscillation.
2. Electrical Connection
2.1 Basic Information
Electrical connections must be performed by qualified personnel. Ensure that the current type, mains voltage, and frequency match the actuator controls and motor name plates. Short-circuit protection and disconnect switches must be provided by the customer.
2.2 Wiring and Protection
Refer to the wiring diagram attached to the device. Use fuses and disconnect switches for short-circuit protection. Adapt switchgear sizing to the maximum current and select overcurrent protection devices accordingly.
2.3 Cable Installation
Use cables according to rated current and ensure they are voltage-proof. For outdoor installations, use UV-resistant cables. Lay cables susceptible to interference away from interference sources.
2.4 Wall Bracket and Control Box Installation
When actuator controls are mounted separately, ensure the cable length does not exceed 100 meters. Use screened cables for position transmitters and ensure proper earthing.
3. Motor Connection
Disconnect the device from the mains before opening the motor connection compartment. Use cable glands suitable for the type of protection and ensure proper enclosure protection. Connect all protective earth conductors before starting the device.
4. Terminal Compartment
Open the terminal compartment by removing the cover and insert suitable cable glands. Seal unused cable entries with approved plugs. Ensure all protective earth conductors are connected to prevent electric shock.
5. Actuator Controls Connection
For KP/KPH connections, use screw-type terminals for power and control contacts. Ensure the terminal compartment is designed for increased safety and that the flameproof interior remains sealed when connecting cables.
Tightening torques for terminal cross sections are specified for different types of connections. For power contacts (U1, V1, W1) and protective earth (PE), the torque is 0.9 – 1.1 Nm with small clamp washers for 1.5 – 4.0 mm² cables, and 2.5 – 6 mm² with large clamp washers. Control contacts require 0.5 – 0.7 Nm for 0.75 – 1.5 mm² cables.
1. Remove cable sheathing (120 – 140 mm).
2. Insert wires into cable glands and fasten with specified torque.
3. Strip wires (controls max. 8 mm, motor 12 mm).
4. Use wire end sleeves for flexible cables.
5. Connect cables as per wiring diagram.
6. Ensure protective earth conductors are connected before device operation.
Ensure all protective earth conductors are connected to avoid electric shock. Use appropriate cable glands and plugs to maintain enclosure protection. For flameproof enclosures, handle with care to avoid damage.
For shielded cables, link the cable shield end to the housing for earthing. Use non-acidic grease on O-rings and ensure they are in good condition.
For KES electrical connections, use terminal blocks for power and control contacts. Ensure the correct type of protection (Ex e or Ex d) is used for cable glands.
Manual operation is possible for setting and commissioning. Engage manual operation only during motor standstill. Local operation is performed using push buttons, and remote operation is possible via control commands or setpoints.
Indication lights show end positions and fault signals. Optional mechanical position indication is available.
Feedback signals via output contacts indicate actuator operation modes. Analogue position feedback is available if equipped with a position transmitter.
Set the selector switch to 0 (OFF) before switching on the power supply. Consider heat-up time for low temperature versions.
- For –40 °C: 5 minutes
- For –60 °C: 40 minutes
- Loosen screws and remove cover.
- If present, remove indicator disc using a spanner with a soft object to avoid paint damage.
- Set torque switches to prevent valve damage.
- Adjust torque dials to required settings (e.g., 250 Nm for CLOSE, 200 Nm for OPEN).
- Maximum tightening torque for lock screws: 0.3 – 0.4 Nm.
- Engage manual operation and adjust setting spindles for CLOSED and OPEN positions.
- Ensure pointers align with marks after adjustments.
- Check direction of rotation and limit switching.
- Correct any incorrect settings before proceeding.
- Ensure all optional equipment is set before closing.
- Clean sealing faces and check O-ring condition.
- Potentiometer: Set for travel sensor and valve position.
- RWG Electronic Position Transmitter: Set for 4 – 20 mA current signal.
- Intermediate Positions: Set using DUO limit switching.
- Mechanical Position Indicator: Align symbols with marks on cover.
- Factory settings may need adjustment for different applications.
- Ensure correct type of seating and other settings as per valve manufacturer’s consent.
The document outlines the specifications for multi-turn actuators and their components. It includes details on switches, galvanically isolated with gold-plated contacts recommended for low voltage actuator controls. Options for position feedback include potentiometer or electronic position transmitter. The actuators feature a self-regulating PTC heater and are suitable for various voltage ranges.
The actuators are designed for both indoor and outdoor use, with permissible mounting positions at altitudes up to 2,000 meters, extendable upon request. They operate within a temperature range of -30°C to +60°C, with options for lower temperatures. The enclosure protection is rated IP68, suitable for immersion in water up to 8 meters for 96 hours.
The document provides detailed technical data for limit and torque switches, blinker transmitters, and actuator controls. It specifies mechanical lifetimes, rated voltages, and current capacities for various components. The actuator controls are designed for specific power classes and include features like reversing contactors and thyristor units.
Control inputs are available in 24 V DC and 115 V AC options, with status signals provided through potential-free contacts. Local controls include a selector switch and push buttons with indication lights. Motor protection features include overload protection and phase failure monitoring.
The actuators are protected against corrosion with options suitable for high salinity and pollution environments. They feature a double-layer powder coating in AUMA silver-grey, with other colors available upon request.
The actuators comply with various EU directives, including ATEX, EMC, Low Voltage, and Machinery Directives. Certificates and standards are attached to the devices, indicating compliance with specific conditions of use.
The document lists spare parts for multi-turn actuators and actuator controls, emphasizing the use of original AUMA parts to maintain warranty and liability coverage.
Catalog excerpts

Multi-turn actuators SAEx 25.1 – SAEx 40.1 SAREx 25.1 – SAREx 30.1 with actuator controls AMExC 01.1 on wall bracket Operation instructions Assembly, operation, commissionin
Open the catalog to page 1
SAEx 25.1 – SAEx 40.1 / SAREx 25.1 – SAREx 30.1 AMExC 01.1 Read operation instructions first. ● Observe safety instructions. These operation instructions are part of the product. Retain operation instructions during product life. Pass on instructions to any subsequent user or owner of the product. Purpose of the document: This document contains information for installation, commissioning, operation and maintenance staff. It is intended to support device installation and commissioning. Reference documents: Reference documents can be downloaded from the Internet (www.auma.com) or ordered directly...
Open the catalog to page 2
SAEx 25.1 – SAEx 40.1 / SAREx 25.1 – SAREx 30.1 AMExC 01.1 Terminal compartment: open Cable connection Terminal compartment: close Electrical connection of actuator controls KP/KPH electrical connection Terminal compartment: open Cable connection Terminal compartment: close KES electrical connection Terminal compartment: open Cable connection Terminal compartment: close External earth connection Accessories for electrical connection Parking frame
Open the catalog to page 3
SAEx 25.1 – SAEx 40.1 / SAREx 25.1 – SAREx 30.1 AMExC 01.1 Mechanical position indicator: set
Open the catalog to page 4
SAEx 25.1 – SAEx 40.1 / SAREx 25.1 – SAREx 30.1 AMExC 01.1 Safety instructions Safety instructions Basic information on safety Our products are designed and manufactured in compliance with recognised standards and directives. This is certified in a Declaration of Incorporation and an EU Declaration of Conformity. The end user or the contractor must ensure that all legal requirements, directives, guidelines, national regulations and recommendations with respect to assembly, electrical connection, commissioning and operation are met at the place of installation. They include among others standards...
Open the catalog to page 5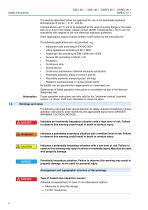
SAEx 25.1 – SAEx 40.1 / SAREx 25.1 – SAREx 30.1 AMExC 01.1 Safety instructions The devices described below are approved for use in the potentially explosive atmospheres of zones 1, 2, 21, and 22. If temperatures >40 °C are to be expected at the valve mounting flange or the valve stem (e.g. due to hot media), please consult AUMA. Temperatures > 40 °C are not considered with regards to the non-electrical explosion protection. Other applications require explicit (written) confirmation by the manufacturer. The following applications are not permitted, e.g.: Industrial trucks according to EN ISO 3691...
Open the catalog to page 6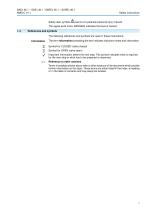
SAEx 25.1 – SAEx 40.1 / SAREx 25.1 – SAREx 30.1 AMExC 01.1 Safety alert symbol Safety instructions warns of a potential personal injury hazard. The signal word (here: DANGER) indicates the level of hazard. 1.4. References and symbols The following references and symbols are used in these instructions: Information The term Information preceding the text indicates important notes and information. Symbol for CLOSED (valve closed) Symbol for OPEN (valve open) Important information before the next step. This symbol indicates what is required for the next step or what has to be prepared or observed....
Open the catalog to page 7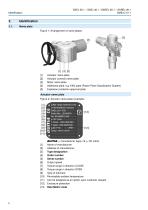
SAEx 25.1 – SAEx 40.1 / SAREx 25.1 – SAREx 30.1 AMExC 01.1 Name plate Figure 1: Arrangement of name plates Actuator name plate Actuator controls name plate Motor name plate Additional plate, e.g. KKS plate (Power Plant Classification System) Explosion protection approval plate Actuator name plate Figure 2: Actuator name plate (example) (= manufacturer logo); (= CE mark) Name of manufacturer Address of manufacturer Type designation Order number Serial number Output speed Torque range in direction CLOSE Torque range in direction OPEN Type of lubricant Permissible ambient temperature Can be assigned...
Open the catalog to page 8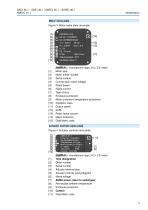
SAEx 25.1 – SAEx 40.1 / SAREx 25.1 – SAREx 30.1 AMExC 01.1 Motor name plate Figure 3: Motor name plate (example) (= manufacturer logo); (= CE mark) Motor type Motor article number Serial number Current type, mains voltage Rated power Rated current Type of duty Enclosure protection Motor protection (temperature protection) Insulation class Output speed IA/IN Power factor cos phi Mains frequency Data Matrix code Actuator controls name plate Figure 4: Actuator controls name plate (= manufacturer logo); (= CE mark) Type designation Order number Serial number Actuator terminal plan Actuator controls...
Open the catalog to page 9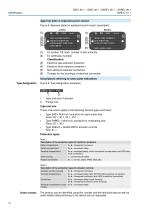
SAEx 25.1 – SAEx 40.1 / SAREx 25.1 – SAREx 30.1 AMExC 01.1 Approval plate in explosion-proof version Figure 5: Approval plates in explosion-proof version (examples) Ex symbol, CE mark, number of test authority Ex certificate (number) Classification: Electrical gas explosion protection Electrical dust explosion protection Non-electrical explosion protection Threads for line bushings at electrical connection Descriptions referring to name plate indications Type designation Figure 6: Type designation (example) Type and size of actuator Flange size Type and size These instructions apply to the following...
Open the catalog to page 10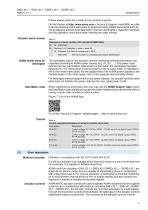
SAEx 25.1 – SAEx 40.1 / SAREx 25.1 – SAREx 30.1 AMExC 01.1 Please always state this number for any product inquiries. On the Internet at http://www.auma.com > Service & Support >myAUMA, we offer a service allowing authorised users to download order-related documents such as wiring diagrams and technical data (both in German and English), inspection certificate and the operation instructions when entering the order number. Actuator serial number Table 3: Description of serial number (with example 0516MD12345) 05 Positions 1+2: Assembly in week = week 05 16 MD12345 Positions 3+4: Year of manufacture...
Open the catalog to page 11
SAEx 25.1 – SAEx 40.1 / SAREx 25.1 – SAREx 30.1 AMExC 01.1 standard valve control in OPEN - CLOSE duty, position indications and different signals right through to position control (option). Local controls Operation (via push-buttons), setting and indication can be performed directly at the actuator controls (contents of these instructions)
Open the catalog to page 12All AUMA catalogs and technical brochures
 ELECTRIC ACTUATORS
6 Pages
 Electric multi-turn actuators
40 Pages
 SAEx 07.2
1 Page
 AUMA Cloud + AUMA Assistant App
14 Pages
 FUNCTIONAL SAFETY – SIL
28 Pages
 Service Worldwide
8 Pages
 SIMA² Master Station
6 Pages
 AUMA Support App
4 Pages
 electric actuators
56 Pages
 FUNCTIONAL SAFETY SIL
28 Pages
 Service world wide
12 Pages
 Explosions proof actuators
24 Pages
 The Actuator Specialist
32 Pages







Archived catalogs
 Electric multi-turn actuators
24 Pages
 Electric multi-turn actuators
28 Pages
 Master station SIMA
4 Pages
 Multi-turn gearbox GHT 360.1
4 Pages
 Electric part-turn actuators
4 Pages
 Service device PV 788 B
4 Pages
 Test bench PV 1405
24 Pages





- Planetary gearbox
- Coaxial gearhead
- Right angle gearhead
- Compact gearhead
- AUMA hollow-shaft gear reducer
- Gear train gear reducer
- AUMA valve actuator
- AUMA rotary valve actuator
- Shaft gearhead
- Low-noise gearhead
- High-torque gearhead
- Bevel gearhead
- AUMA electric valve actuator
- Parallel-shaft gearhead
- Drive gear reducer
- Compact valve actuator
- Linear valve actuator
- Aluminum valve actuator
- Spur gearhead
- AUMA modulating valve actuator