
- Catalogs
- ATI Industrial Automation
- Compensator Installation and Operation Manual


Compensator Installation and Operation Manual

Compensator Installation and Operation Manual
- Ensure the Compensator is rated for maximum loads expected during operation. Verify specifications or contact ATI for assistance.
- Understand the function of the Compensator and implement proper hardware/software for safe operation.
- Disconnect electrical power and pneumatics during servicing.
- The Compensator enhances flexibility and reliability in robotic or assembly machine applications, providing compliance for misalignment during assembly.
- Available in 9116 Series 000, 100, 200, and 400, it offers compliance in lateral, cocking, axial, and torsional directions.
- Features a projected compliance center, aligning the insertion part axis with the location axis during assembly.
- The 9116 Series includes anodized aluminum top and bottom plates, hardened steel overload pins, and shear pads.
- Lock-up and lock sensing are optional features, with lock-up available on all sizes and lock sensing on sizes 100, 200, and 400.
- Intended for "peg-in-hole" operations in vertical orientation, such as dowel pin insertion and mold alignment.
- Horizontal use may cause shear pad sag over time; lock-up option is recommended to prevent this.
- Selection involves comparing assembly misalignment with Compensator's allowable misalignment.
- Details on robot side and tool side interfaces, and units with lock-up and lock sensing are provided.
- Includes compliance, lock-up, and lock sensing operations.
- Instructions for lock-up, lock sensing, and assembly of spare parts.
- Guidance on addressing common issues.
- Detailed specifications for each series and configuration.
- Customer and assembly drawings for various series and configurations.
- Standard terms and conditions applicable to the sale of the Compensator.
The compensator's vertical positional repeatability is +/- 0.002 inches. Assembly misalignment is calculated by summing various factors, and the compensator is necessary when this misalignment exceeds part clearance. Total clearance is determined by chamfer sizes and worst-case part clearance. If total clearance is less than assembly misalignment, chamfer sizes should be increased. The compensator should allow for greater misalignment than the assembly misalignment.
Calculate the distance from the tool side plate to the initial contact point. Select a model with a C-of-C within 30% of this distance, or 60% if the fit is loose. A lower C-of-C is preferable.
Consider the weight of the tool and part for tension load capacity. Use HCL-13A shear pads for high-impact loads and lock-up devices to reduce inertia loads. For tight tolerance applications, a high compression load capacity is needed. Shear pads can be increased to double load capacity.
Calculate maximum insertion force by multiplying assembly misalignment by lateral stiffness. Ensure the assembly device can handle this force. Minimize compensator stiffness for lightweight parts.
Shear pad performance can be affected by temperature and oil.
Compensators can be mounted using tapped holes or bolting through the robot side plate. Units with lock-up require a clean, dry air supply. Lock sensing uses a proximity sensor.
Compliance is limited by overload pins. Lock-up is operated by air supply, with specific pressure recommendations. Lock sensing monitors the lock-up screw or bearing plate position.
Regular inspection and lubrication of the lock-up mechanism and sensors are required. Overload pins and lock-up screws should be lubricated periodically.
Common issues include air supply problems, incorrect sensor wiring, and air leaks. Ensure proper connection and lubrication.
A list of recommended spare parts is provided, including overload pins, lock-up screws, air fittings, and shear pads.
Detailed specifications for different series are provided, including dimensions, weight, and allowable misalignment.
Catalog excerpts
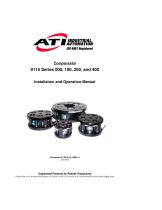
Compensator 9116 Series 000, 100, 200, and 400 Installation and Operation Manual Engineered Products for Robotic Productivity Pinnacle Park • 1031 Goodworth Drive • Apex, NC 27539 • Tel: 919.772.0115 • Fax: 919.772.8259 • www.ati-ia.com • Email: [email protected]
Open the catalog to page 1
Compensator Installation and Operation Manual Document #9610-15-1000-14 CAUTION: This manual describes the function, application, and safety considerations of this product. This manual must be read and understood before any attempt is made to install or operate the product, otherwise damage to the product or unsafe conditions may occur. Information contained in this document is the property of ATI Industrial Automation, Inc. (ATI) and shall not be reproduced in whole or in part without prior written approval of ATI. The information herein is subject to change without notice. This manual is periodically...
Open the catalog to page 2
Compensator Installation and Operation Manual Document #9610-15-1000-14 Pinnacle Park • 1031 Goodworth Drive • Apex, NC 27539 • Tel: 919.772.0115 • Fax: 919.772.8259 • www.ati-ia.com • Email: [email protected]
Open the catalog to page 3
Compensator Installation and Operation Manual Document #9610-15-1000-14 Glossary of Terms Term Plate that interfaces Compensator to robot or assembly machine. Bottom Plate Plate that interfaces customer tooling to Compensator. Component that limits amount of compliance to prevent damage to compensator when overloaded. Component that provides compliance in the lateral, cocking, axial, and torsional directions. Pneumatically-powered locking mechanism that locks compensator rigid for accelerated movements to reduce wear on shear pads. Lock-up Screw Locking mechanism component that is pulled into...
Open the catalog to page 4
Compensator Installation and Operation Manual Document #9610-15-1000-14 1. Safety 1.1 General Prior to purchase and installation, the customer should verify that the Compensator selected is rated for the maximum loads expected during operation (refer to Section 10—Specifications in this manual or contact ATI for assistance). The customer is responsible for understanding the function of the Compensator and implementing the proper hardware and/or software to operate the Compensator safely. All pneumatic fittings and tubing must be capable of withstanding the repetitive motions of the application...
Open the catalog to page 5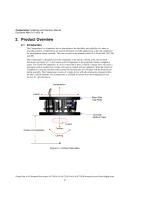
Compensator Installation and Operation Manual Document #9610-15-1000-14 2. Product Overview 2.1 Introduction The Compensator is a compliance device that enhances the flexibility and reliability of a robot or assembly machine. Compensators are used in automated assembly applications to provide compliance for misalignment during assembly. The sizes covered in this manual include 9116 Series 000, 100, 200, and 400. The Compensator is designed to provide compliance in the lateral, cocking, axial, and torsional directions (see Figure 2.1). A key feature to the Compensator is the projected (remote)...
Open the catalog to page 6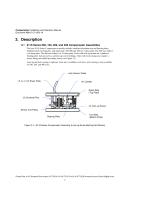
Compensator Installation and Operation Manual Document #9610-15-1000-14 3. Description 3.1 9116 Series 000, 100, 200, and 400 Compensator Assemblies The base 9116 Series Compensator assembly includes anodized aluminum top and bottom plates, hardened steel overload pins, and shear pads. The 000 and 100 use 3 shear pads. The 200 uses either 3 or 6 shear pads. The 400 uses either 6 or 12 shear pads. Units with lock-up include air cylinder(s), bearing plate, lock-up screws, and lock-up screw bushings. Units with lock sensing also require a sensor fitting and cabled proximity sensor (see Figure 3.1)....
Open the catalog to page 7
Compensator Installation and Operation Manual Document #9610-15-1000-14 4. Application 4.1 Intended Use The Compensator is intended to be used in “peg-in-hole” type operations in the vertical orientation. The peg-in-hole example is an application involving the insertion of one part into another. There are a variety of peg-in-hole type applications that include: dowel pin insertion, mold alignment, washer insertion, bearings into housings, and shafts into bearings. If the Compensator is used in the horizontal orientation, over time the shear pads will develop sag. Rubber and most rubber-like materials...
Open the catalog to page 8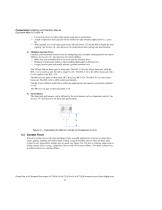
Compensator Installation and Operation Manual Document #9610-15-1000-14 • • • Use lock-up device to reduce high inertia loads due to acceleration. A high compression load capacity will be needed for tight tolerance applications (i.e.; press fit). When needed, use six (6) shear pads on the 200 and twelve (12) on the 400 to double the load capacity. See Section 10—Specifications for model lateral and cocking load specifications. 4.) Minimize insertion force: Calculate your maximum insertion force by multiplying your assembly misalignment by the lateral stiffness. See Section 10—Specifications for...
Open the catalog to page 9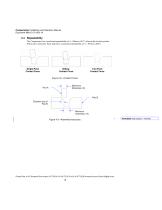
Compensator Installation and Operation Manual Document #9610-15-1000-14 4.4 Repeatability The Compensator has a positional repeatability of +/-.026mm (.001”) when in the locked position. When unit is unlocked, shear pads have a positional repeatability of +/- .051mm (.002”). Single-Point Contact Force Sliding Contact Force Two-Point Contact Force Part B Chamfer size of Part B Minimum Dimension (Y) Figure 4.3—Assembly Inaccuracy Pinnacle Park • 1031 Goodworth Drive • Apex, NC 27539 • Tel: 919.772.0115 • Fax: 919.772.8259 • www.ati-ia.com • Email: [email protected] Formatted: Style Caption + Not...
Open the catalog to page 10
Compensator Installation and Operation Manual Document #9610-15-1000-14 5. Installation 5.1 Robot Side Interface The 000, 100, 200, and 400 have two options for interfacing to a robot or assembly machine. Units can be mounted by using the tapped holes on the robot side (top) plate or by bolting through robot side (top) plate to robot or assembly machine. All sizes have (2) dowel holes for location. Robot or assembly machine interface must accommodate sensor cable if unit is equipped with lock sensing. For size and location of mounting features and lock sensor cable exit, see Section 11—Drawings....
Open the catalog to page 11All ATI Industrial Automation catalogs and technical brochures
 Manual tool changers
2 Pages
 Robotic & CNC Deburring Tools
12 Pages
 Collision Sensor catalog
8 Pages
 Utility coupler
2 Pages
 Corporate overview
8 Pages


- Coupler
- Tool changer
- Deburring tool
- Robotic tool changer
- Automatic tool changer
- Pneumatic tool changer
- Metal deburring tool
- Mechanical coupler
- Electronic coupler
- Steel deburring tool
- Pneumatically-actuated tool changer
- Coupler for industrial applications
- Force and torque sensor
- Automatic deburring tool
- Compact coupler
- Manual tool changer
- 6-axis force and torque sensor
- I/O coupler
- Analog force and torque sensor
- Pneumatic deburring tool