DG 25
1 /16Pages
DG 25
1 /16Pages
Catalog excerpts

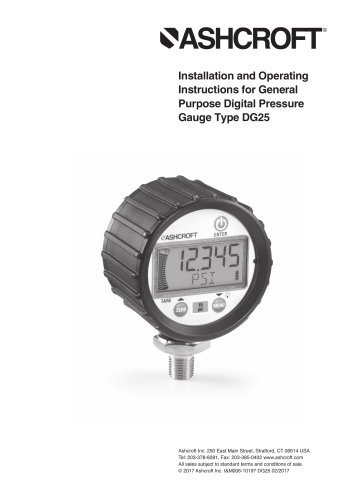
Installation and Operating Instructions for General Purpose Digital Pressure Gauge Type DG25 Ashcroft Inc. 250 East Main Street, Stratford, CT 06614 USA Tel: 203-378-8281, Fax: 203-385-0402 www.ashcroft.com All sales subject to standard terms and conditions of sale. © 2017 Ashcroft Inc. I&M006-10197 DG25 02/2017
Open the catalog to page 1
WARNING! READ BEFORE INSTALLATION 1. GENERAL: A failure resulting in injury or damage may be caused by excessive overpressure, excessive vibration or pressure pulsation, excessive instrument temperature, corrosion of the pressure containing parts, or other misuse. Consult Ashcroft Inc. Stratford, Connecticut, USA before installing if there are any questions or concerns. (if possible), pumps should be brought up to power slowly, and valves opened slowly. To avoid damage from both fluid hammer and surges, a surge chamber should be installed. Symptoms of fluid hammer and surge’s damaging effects:...
Open the catalog to page 3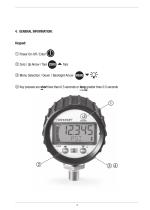
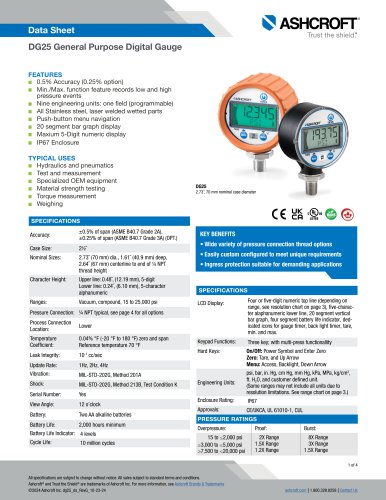
4. GENERAL INFORMATION: Keypad: Power On-Off / Enter Zero / Up Arrow / Tare ZERO Menu Selection / Down / Backlight Arrow MENU Key presses are short less than 0.5 seconds or long greater than 0.5 seconds
Open the catalog to page 4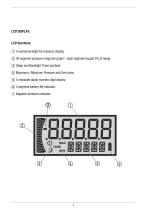
5 numerical digits for pressure display. 20 segment pressure range bar graph – each segment equals 5% of range. Sleep and Backlight Timer symbols. Maximum / Minimum Pressure and Tare icons. 5 character alpha-numeric digit display. 4 segment battery life indicator. Negative pressure indicator.
Open the catalog to page 5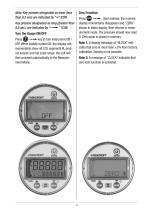
Note: Key presses designated as short (less than 0.5 sec) are indicated by “➟” ICON ZERO Press ➟. Upon release, the numeric display momentarily disappears and “ZERO” shows in alpha display, then returns to measurement mode. The pressure should now read 0. Zero value is stored in memory. Zero Function: Key presses designated as long (greater than 0.5 sec.) are indicated by “➟” ICON | ➟key to turn instrument ON / Press OFF. When initially turned ON, the display will momentarily show all LCD segments lit, product version and full scale range; the unit will then proceed automatically to the Measurement...
Open the catalog to page 6
Tare Function: Subtracts current pressure value from value displayed in Measurement mode. In Measurement mode, apply desired pressure press "■* to enable the tare function. The display will quickly flash “TARE”, then the “TARE” icon will be displayed and the pressure reading will blink. The unit should now read 0. Press "■* the TARE key ICON again to dis able the function. The display will quickly flash “T OFF”, then the “TARE” icon will disappear and the pressure reading will no longer be blinking. The unit will now return to measurement mode. To enter menu mode 1. Press "-^and release to proceed...
Open the catalog to page 7
Custom Units of Measure Allows a user to define a custom unit of measure, user must enter the full scale value of the desired reading, which can be done as follows. 1) In Menu Mode press ©■ © "■* select 2) Select decimal point location: The alphanumeric display shall show “SELDP” The first screen to appear will show all digits lit up as “5” and the rightmost decimal point will blink (5 5 5 5.5) unless the custom units feature had been used previously. If it had been used, the digits and decimal point position shall correspond to the last values set. Use the ©■ © "■* keys to move the decimal point...
Open the catalog to page 8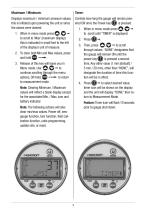
Displays maximum / minimum pressure values; this is initiated upon powering the unit or since the values were cleared. 1. When in menu mode press ©■ © -to scroll to ‘Max' (maximum display); this is indicated in small font to the left of the display's unit of measure. 2. To clear both Min and Max values, press 3. Release of this key will leave you in Menu mode. Use ©■ © — to continue scrolling through the menu options, OR hold, ©I to return Note: Clearing Minimum / Maximum values will reflect a blank display except for the associated Min. / Max. icon and battery indicator. Note: The following...
Open the catalog to page 9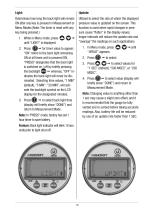
Determines how long the back light will remain ON after any key is pressed in Measurement or Menu Modes (Note: The timer is reset with any key being pressed.) 1. While in Menu mode, press ©■ © -until “LIGHT” is displayed. 2. Press — for timer value to appear; “ON” refers to the back light remaining ON at all times unit is powered ON, “PRESS” designates that the back light is switched on / off by briefly pressing the backlight ©I — whereas, “OFF” indicates the back light will never be illuminated. Selecting time values, “1 MIN” (default), “5 MIN”, “20 MIN”, will activate the backlight symbol on...
Open the catalog to page 10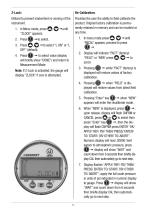
Utilized to prevent inadvertent re-zeroing of the instrument. 1. In Menu mode, press ©■ © -until “ZLOCK” appears. 3. Press © © —to select “L ON” or “L OFF” (default). 4. Press — to select value (display will briefly show “DONE”) and return to Measurement Mode. Note: If Z-Lock is activated, the gauge will display “ZLOCK” if zero is attempted. Provides the user the ability to field calibrate the product. Original factory calibration is permanently retained in memory and can be recalled at any time. 1. In menu mode press © © —until “RECAL” appears; proceed to press 2. Display will indicate “FACT”...
Open the catalog to page 11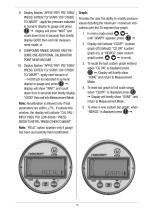
8. Display flashes “APPLY/ REF/ PSI/ THEN/ PRESS/ ENTER/ TO/ START/ OR/ OTHER/ TO/ ABORT”; apply the pressure indicated in numeric display to gauge and press "■* display will show “WAIT” and count down from 6 seconds then briefly display GOOD then exit into measurement mode, or 9. COMPOUND RANGE GAUGES ONLY REQUIRE ONE ADDITIONAL CALIBRATION POINT NEAR VACUUM 10. Display flashes “APPLY/ REF/ PSI/ THEN/ PRESS/ ENTER/ TO/ START/ OR/ OTHER/ TO/ ABORT”; apply near vacuum of -14.000 psi as indicated in numeric display to gauge and press ", display will show “WAIT” and count down from 6 seconds then...
Open the catalog to page 12All ASHCROFT catalogs and technical brochures
 1008S
1008S4 Pages
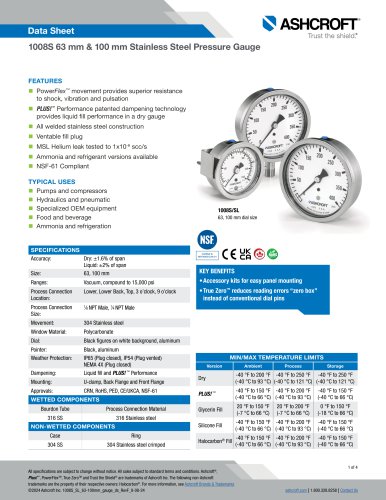
 1008A/AL Pressure Gauge
5 Pages
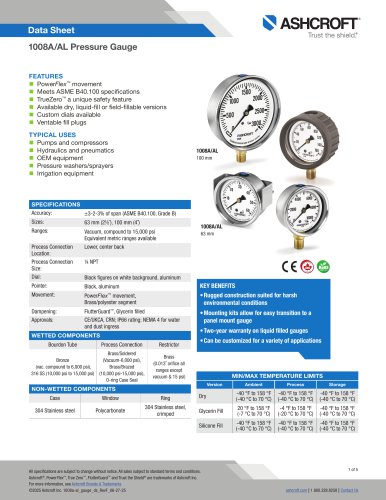
 1010 Pressure Gauge
4 Pages
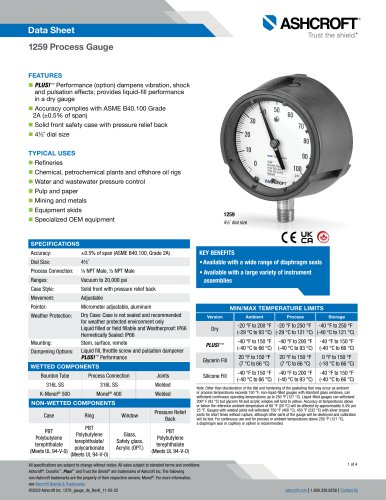 1259 Process Gauge
4 Pages
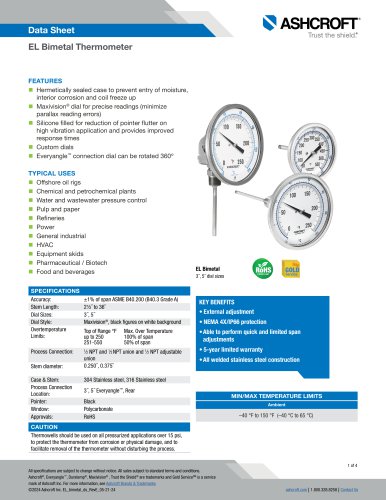 EL Bimetal Thermometer
4 Pages
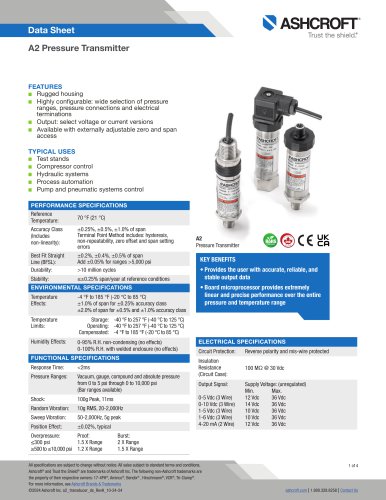 A2 Pressure Transmitter
4 Pages
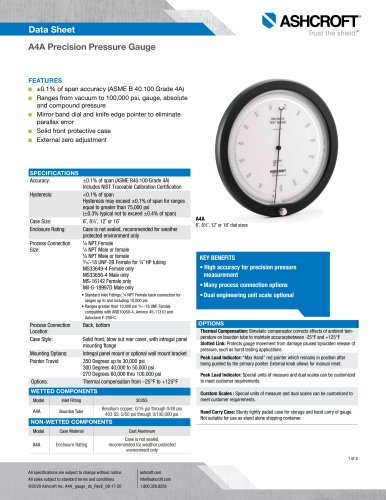
 A4A Precision Pressure Gauge
4 Pages
 1084 Test Gauge
2 Pages
 1001T Panel Mount Gauge
4 Pages
 1000 Commercial Gauge
2 Pages
 Type 1339 Duplex Gauge
2 Pages
 1038A Duplex Pressure Gauge
2 Pages
 1220 Pressure Gauge
3 Pages
 2008 Panel Pressure Gauge
4 Pages
 1198 Finned Siphon
2 Pages
 2198 MicroTube™ Siphon
3 Pages
 1098 and 1100 Siphons
5 Pages
 CI Bimetal Thermometer
2 Pages
 EI Bimetal Thermometer
2 Pages
 T6500 Pressure Gauge
5 Pages
 T5500 Pressure Gauge
5 Pages
 1109 Pressure Gauge
2 Pages
 Acid Leak Detection (ALD)
4 Pages
 5503
55032 Pages
 1209
12093 Pages
 1290
12902 Pages
 2462
24622 Pages
 Type 1133
2 Pages
 Type 1127/1128
2 Pages
 Model C-600A-03
2 Pages
 Industry sanitary-pharm
4 Pages
 302-303
4 Pages
 T5500E
2 Pages
 IXLDP
IXLDP2 Pages
 k1
k12 Pages
 K2
K22 Pages
 K8
K82 Pages
 km15
km152 Pages
 KS Sanitary
2 Pages
 KX Transducers
2 Pages
 RXLDP
RXLDP2 Pages
 SL17-TTS
1 Page
 SL 17 Submersible
2 Pages
 T2 Transducers
2 Pages
 600-01
2 Pages
 600-02
2 Pages
 600-03
2 Pages
 600-04
2 Pages
 600B
600B2 Pages
 600H
600H2 Pages
 ar10
ar104 Pages
 ar20
ar204 Pages
 at30 skin type thermocouple.
4 Pages
 Type ST-2A Digital Indicator
2 Pages
 Type 1305D Deadweight Tester
2 Pages
 Model PT-1 Pressure Tester
2 Pages
 ATE-2 Handheld Calibrator
12 Pages
 SWGL
SWGL7 Pages
 sw10
sw109 Pages
 A N4
A N44 Pages
 A series
8 Pages
 600A
600A2 Pages
 DT 600A
2 Pages
 ash A4
2 Pages
 A4
A42 Pages
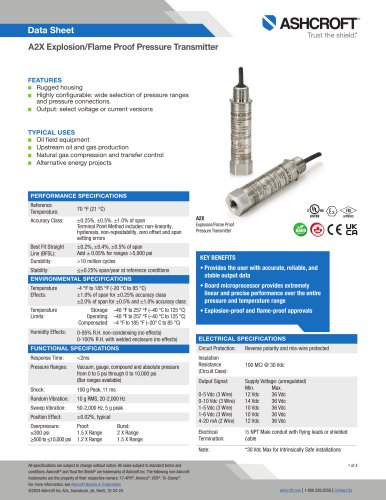
 A2X
A2X2 Pages
 ASH DIG
3 Pages


Archived catalogs
 Ash DG
2 Pages
 Ash BM
2 Pages
 Bimetal Thermometers - Series CI
8 Pages
 Sanitary Gauges - Type 1032
4 Pages
 Industrial Gauges Type 1017
24 Pages
 Process Gauges Type 1279
16 Pages
 Test Gauges Type 1082
12 Pages


- Pressure transmitter
- Calibration system
- Analog pressure transmitter
- Digital indicator
- Pressure switch
- Analog pressure gauge
- Plastic seal
- Waterproof pressure transmitter
- Membrane pressure transmitter
- Stainless steel pressure transmitter
- Industrial thermometer
- Panel panel meter
- Relative pressure transmitter
- °C thermometer
- Mechanical pressure switch
- Stainless steel pressure gauge
- Digital pressure transmitter
- Dial pressure gauge
- Threaded pressure gauge