
- Catalogs
- Anlidar Industrial - MyTorq
- MY-SIRIUS User Manual


MY-SIRIUS User Manual
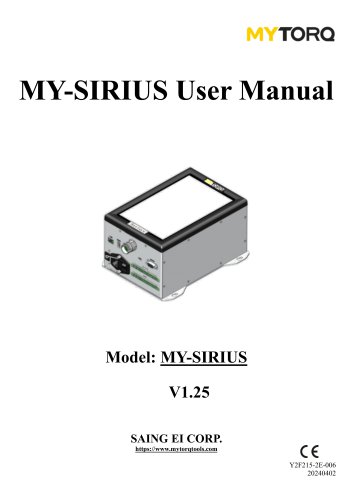
MY-SIRIUS User Manual
The MY-SIRIUS model operates with an AC voltage of 115V/230V and a frequency of 50-60Hz. It supports a DC import voltage of 40V, a maximum export current of 9A, and a power output of 360W. The device dimensions are 266x180x145.1 mm, weighing 4080g. It is compatible with various screwdriver models including MY-SIRIUS3, 5, 7 series.
Appearance
The device includes a tool connection seat, power cord socket, LED indicators, and ports for wired communication. The upper cover features a DC fuse seat and grounding terminal.
Main Page Styles
Two styles display job and sequence information, torque and angle settings, fastening status, and system messages. Style 1 includes lock mode and system time.
Settings
Login: Default password is 0000. Normal Settings: Manage job parameters like job ID, name, reverse RPM, and force.
Data Management
Historic data can be viewed/exported. Configuration files and graph data can be imported/exported.
Chart and Barcode
Displays locking results and manages barcode settings.
Information and Control Descriptions
Describes external export/import controls and system status codes.
Modbus Instruction
Details on Modbus communication protocol for system interfacing.
Specifications and Settings
Focuses on torque and sequence parameters. Default torque is 0.0 N-m. Users can save settings.
Sequence Settings
Users can edit job names, add/delete sequences, and set torque or angle parameters. Up to 99 sequences can be added.
Torque and Angle Parameters
Includes maximum and target torque settings, joint offset, and high/low limits. Similar settings for angles.
Advanced Settings
Allows editing jobs and sequences, with parameters for job ID, name, and completion signals.
Overview
Instructions and specifications for configuring a torque screwdriver system, including sequence settings, tool settings, controller settings, and system permissions.
Tool and Controller Settings
Tool can be started via various methods. Controller settings include ID, language, network configurations, and more.
Input/Output Configurations
Manage job selection, event management, and signal configurations.
System Permissions
Focus on administrator permissions and password settings.
Password and Function Permissions
Passwords must be 4-10 characters. Function permissions require password entry.
System Management
Includes factory reset, data management, and firmware updates.
Error Codes and Descriptions
List of error codes for troubleshooting.
User Definitions and System Messages
Definitions for sequence and job completion, and system status messages.
Fasten Status
Includes tool status and operation success/error indicators.
Modbus Data Transmission
Details on data transmission using MODBUS TCP/RTU protocol.
Note
The company reserves the right to modify the product without prior notice.
Catalog excerpts
MY-SIRIUS User Manual Model: MY-SIRIUS V1.25 SAING EI CORP. https://www.mytorqtools.com
Open the catalog to page 1
10. Description of external export control ------------------------------------------------------------------------ 44 11. Description of external import control ------------------------------------------------------------------------ 44 12. Description of display status code----------------------------------------------------------------------------- 45 12.1 Abnormal messages from controller/screwdriver/lock information---------------------------------- 45
Open the catalog to page 3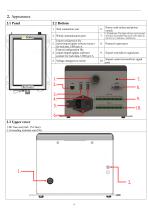
2.2 Bottom 1. Tool connection seat Power cord socket and power switch 2. Wired communication port LED Indicator: The lights will turn on for normal operation and standby/sleep mode. If the lights do not turn on, it indicates a malfunction. Protocol export port Export/configuration file 4. export/import/update software/ scanner for lock data, USB type A Export screwdriver signal port 5. Voltage changeover switch Import control screwdriver signal port Export/configuration file 3. export/import/update software/scanner for lock data, USB type-A 6. 2.3 Upper cover 1.DC fuse seat (incl. 15A fuse) 2....
Open the catalog to page 5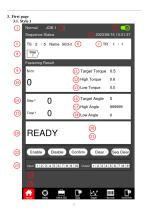
3. First page 3.1. Style 1 Normal JOB-1 Sequence Status Fastening Result Target Torque 0.5 (l2> High Torque 0,6 ©Target Angle 0 (17) High Angle 999999 ®IREADY Enable W Disable W Confirm W Clear WSeq Clean Setup JOa&SEQ Graph Barcode Device nfo
Open the catalog to page 6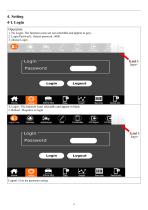
Operation 1. No Login: The function icons are not selectable and appear in grey. 2. Login Password : Default password : 0000 LoginPassword Logout Setup JOB&SCQ Data login/ouc Normal Advanced 1. Login : The function icons selectable and appear in black. 2. Reboot : Requires re-login E^aiidL. keys^ Logout : Exit the parameter setting.
Open the catalog to page 10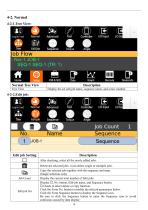
4-2-1.Tree View: Log in/out Normal Advanced Controller I/O Input l/OOu Edit job Sequence Torque Barcode Device info Normal Tree View Description Tree View Display the set edit job name, sequence name, and screw number. Controller I/O Input l/OOu Editjob Sequence Torque Sequence Sequence
Open the catalog to page 11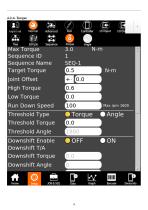
Max Torque Sequence ID Sequence Name Target Torque Joint Offset High Torque Threshold Type Threshold Torque Threshold Angle Downshift Enable Downshift T/A Downshift Torque Downshift Angle Barcode Device info
Open the catalog to page 15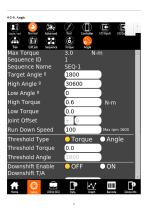
Max Torque Sequence ID Sequence Name Target Angle 9 High Angle 9 Low Angle e High Torque Low Torque Joint Offset Run Down Speed Threshold Type Threshold Torque Threshold Angle Downshift Enable Downshift T/A Barcode Device info
Open the catalog to page 18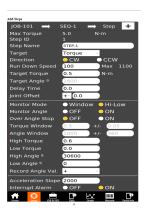
Monitor Mode Monitor Ang le Over Angle Stop Torque Window Angle Window High Torque Low Torque High Angle Q Low Angle Q Record Angle Val
Open the catalog to page 25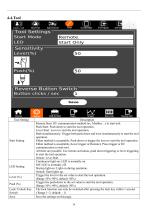
Log in/out Normal Advanced Tool Start Mode Reverse Button Switch Button clicks / sec Home Setup
Open the catalog to page 27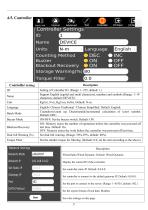
Controller Setting Network Settings'Network Mode Network IP Set Static IP Gateway IP DATA Protocol ModBus Wired-Static/Wired-Dynamic. Default: Wired-Dynamic. Set controller to connect to the default gateway IP. Default: 0.0.0.0. Set the port to connect to the server. (Range: 1~65535, default: 502.) Set the export format of lock data: Modbus Save the settings on this page.
Open the catalog to page 28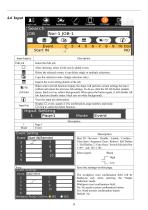
Input Inquiry Edit job Description Select the Edit job. After checking, select all the newly added events Delete the selected events; it can delete single or multiple selections. Copy the selected events. (Single selection only) Inquire the event setting details of the job. When select All Job function (Input), the Input will perform current settings but leave without activation the previous Job settings. To do so, click the All Job button (enable status: black text on yellow background). When press the button again, it will disable All Job function (disable status: black text on white background)....
Open the catalog to page 29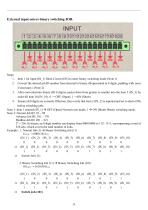
1. Item 1 for input (IN_1) Short Circuit (ON) to enter binary switching mode (Note 1) 2. Convert the desired job ID number from decimal to binary. (Represented in 8 digits, padding with zeros if necessary.) (Note 2) 3. After converted into binary (ID 8 digits), pastes them from greater to smaller into the item 3 (IN_3) by order till item 10 (IN_10). 0 ^ OFF (Open); 1 ^-ON (Short) 4. Ensure all 8 digits are correctly filled out, then verify that item 2 (IN_2) is inputted and set to short (ON) before switching jobs. Note 1: Item 1 entered (IN_1) -> OFF (Open) Normal even mode, 1 ^ ON (Short) Binary...
Open the catalog to page 30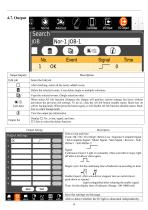
4-7. Output Output Inquiry Output Setting Select event and time. Event: OK / NG / Over High / Below Low / Sequence Complete Signal / Job Complete Signal / Motor Signal / Start Signal / Reverse / Self-Define 1 / Self-Define 2. Continuous Export: Light on constantly when screwdriver stops; light off after screwdriver starts again. Single cycle: Set the continuing time of indicator on according to time. Enable Export: After screwdriver stopped, turn on switch (lever, push-down or remote) Light extinguished after releasing the enable signal. Time: Set the display time of indicator. (Range: 100-10000...
Open the catalog to page 31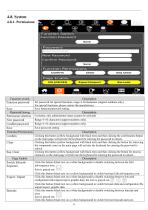
4-8. System4-8-1. Permissions: Function switch
Open the catalog to page 32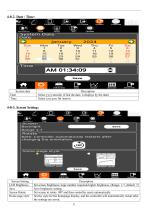
ced Tool Controller I/O Input I/O Output System Calibrate Permissions Time ^rttTngs rlrtm Update System Date Date 7 Device info 4-8-3. Screen Setting: Screen Setting
Open the catalog to page 33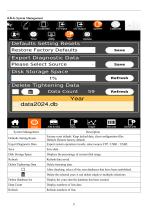
System Management
Open the catalog to page 34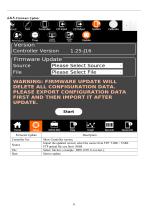
J (£> (Q) © © D> need Tool Controller I/O Input I/O Output System Permissions Time sitings Controller Version Update 1.25-J16 'Firmware Update Please Select Please Select SourceFile WARNING: FIRMWARE UPDATE WILL DELETE ALL CONFIGURATION DATA. PLEASE EXPORT CONFIGURATION DATA FIRST AND THEN IMPORT IT AFTER UPDATE. Barcode Device info Firmware Update Controller Ver Show Controller version. Import the updated version; select the source from FTP / USB1 / USB2. FTP upload file size limit: 500M Select. file hex ( example : BF01-0701-0-xxx.hex ).
Open the catalog to page 35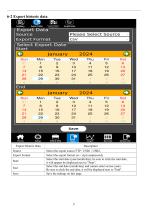
6-2 Export historic data Barcode Device info Export Historic Data Select the export source FTP / USB1 / USB2. Export Format Select the export format csv / zip (compressed). Select the start date (year/month/day), be sure to click the start date, it will appear be displayed next to "Start". Select the end date (month/day) and cannot select across years. Be sure to click the end date, it will be displayed next to "End". Save the settings on this page.
Open the catalog to page 38All Anlidar Industrial - MyTorq catalogs and technical brochures
 BSP-C32HL
16 Pages
 MYCS-ID120
10 Pages
 MYBT-IM50 MYBT-IM100
10 Pages
 OPERATION AND MAINTENANCE MANUAL
14 Pages
 MYP40-500N
7 Pages
 MYP40-500
10 Pages
 MYP32-300
8 Pages
 MYP32-60
8 Pages
 Torque Display User Manual
18 Pages
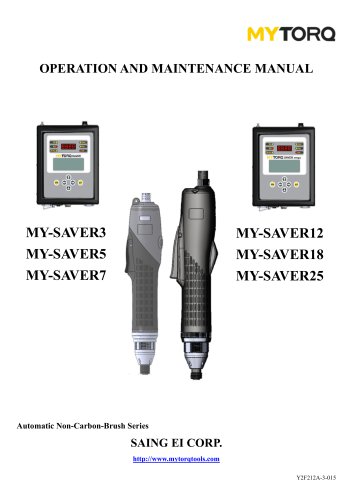 OPERATION AND MAINTENANCE MANUAL
11 Pages
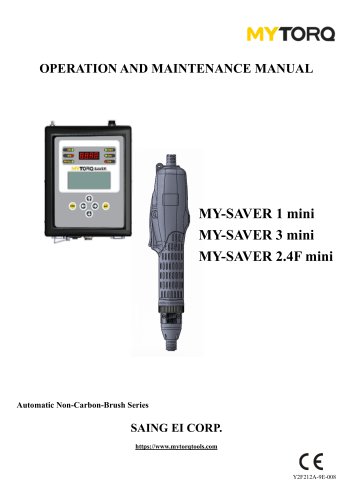 OPERATION AND MAINTENANCE MANUAL
10 Pages
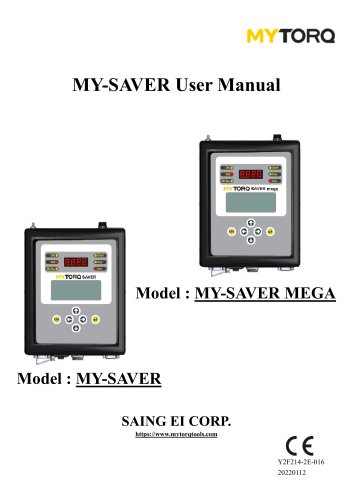 MY-SAVER User Manual
21 Pages
 MY-EVO-mini User Manual
29 Pages
 Smart tools
8 Pages


Archived catalogs
 ACCESSORIES
2 Pages
 Power Shark
18 Pages
 MYTORQ High Torque
35 Pages
 MYTORQ Low Torque
32 Pages

- Electrical cable
- Feeder
- Battery charger
- Electric screwdriver
- Impact wrench
- Lithium battery
- 12 V battery
- Brushless electric screwdriver
- Corded electric screwdriver
- Straight electric screwdriver
- Automated feeder
- CE battery
- Pistol impact wrench
- Signal conditioner
- Charging post
- DC electric screwdriver
- Lithium battery charger
- Torque meter
- Pistol electric screwdriver
- Cordless electric screwdriver