- Catalogs
- ANDILOG Technologies
- BAT1000
- Company
- Products
- Catalogs
- News & Trends
- Exhibitions
BAT1000
1 /1Page

BAT1000
1 /1Page
Catalog excerpts
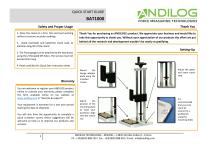
QUICK START GUIDE BAT1000 Safety and Proper Usage 1. Place the stand on a firm, flat and level working surface to ensure accurate readings. Thank You for purchasing an ANDILOG’s product. We appreciate your business and would like to take this opportunity to thank you. Without your appreciation of our products the effort we put behind all the research and development wouldn’t be nearly as gratifying. 2. Avoid overloads and repetitive shock load, to maintain long life of the stand Setting-Up 3. The Force gauge can be attached to the test stand, using the 2 threaded M5 holes. The screws must not exceed 3mm long. 4. Read carefully this Quick Star instruction sheet. Mount the Gauge adapter plate using the included screws You are welcome to register your ANDILOG product online to activate your warranty, please complete the form available online on our website at www.andilog.com in “Services & support”. Your equipment is warranty for a one year period starting the date of shipment. You will also have the opportunity to complete a quick customer survey where suggestions will be welcome to help us to improve our products and services. Adjust the position of the mounting plate to have your accessory align with the sensor rod ANDILOG TECHNOLOGIE – BP62001 – 13845 Vitrolles Cedex 9 – France Ph : +33(0)820 888 202 / Fax : +33(0)820 888 902 / Email : [email protected] Adjust the upper and lower travel stop It is recommended that your test stand be secured to a workbench using the mou
Open the catalog to page 1All ANDILOG Technologies catalogs and technical brochures
 Torque gauges Centor Touch
6 Pages
 Torque gauges Centor Easy
4 Pages


Archived catalogs


- Display module
- Test machine
- Force sensor
- Data logger
- Industrial display panel
- Test stand
- Tension/compression force transducer
- Clamping device
- Windows software
- Real-time software
- Strain gauge force sensor
- Material test machine
- Automated testing machine
- Computer-controlled test machine
- Compression testing machine
- Measurement software
- USB datalogger
- Beam type force sensor
- Industrial testing machine
- Data-logger with screen