- Catalogs
- Ametek Calibration
- nVision Reference Recorder Manual
- Products
- Catalogs
- News & Trends
- Exhibitions
nVision Reference Recorder Manual
1 /51Pages

nVision Reference Recorder Manual
1 /51Pages
Catalog excerpts
nVision Operation Manua for Reference Recorder AMETEK* SENSORS, TEST & CALIBRATION
Open the catalog to page 1
Contents Overview . . . . . . . . . . . . . . . . . . . . . . . . . . . . . . . . . . . . . . . . . . . . . . . . . . . . . . . . . . . . . . Absolute Pressure Specifications . . . . . . . . . . . . . . . . . . . . . . . . . . . . . . . . . . . . . . . . . . . 24 Current, Voltage, and Switch Test (MA20) Module Instructions. . . . . . . . . . . . . . . . . . 25 Current, Voltage, and Switch Test (MA20) Module Specifications . . . . . . . . . . . . . . . . 27 On/Off. . . . . . . . . . . . . . . . . . . . . . . . . . . . . . . . . . . . . . . . . . . . . . . . . . . . . . . . . . . . . . . . . ....
Open the catalog to page 2
Overview INTRODUCTION Thank you for choosing the nVision Reference Recorder from Crystal Engineering Corporation. The philosophy behind nVision: nVision lets you visualize measurements graphically, with or without a pc, in real time as it is being recorded. It is much easier to identify trends or anomalies visually, than in tables of data or spreadsheets. nVision is tremendously flexible and can be configured to measure and record a variety of combinations of measurements. In addition to pressure, modules for temperature, voltage and current can be used. Because all of these inputs can be displayed...
Open the catalog to page 3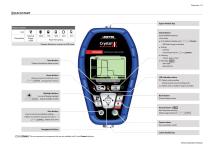
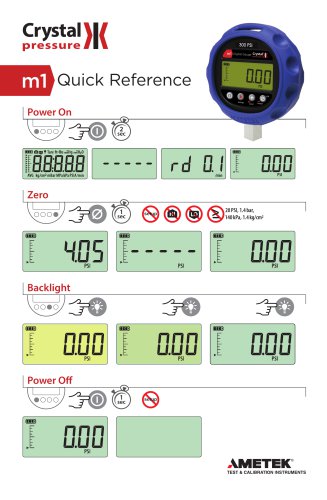
IQUICKSTART Power Icon Key Navigation & Select Setup Button: Locate additional features: • Clear Peaks ▼ Units (Adjust Available units) CONTROL • PM Mode: Gauge or Absolute • Lock/Unlock Chassis OONTROL • Chassis, Upper, Lower : Flashes while recording (Flashes quickly when recording ends) A: Flashes when a module's range is exceeded Back button: Previous Display Screen Record button: EreS Start/Stop data recording (Adjust Logging Interval) CONTROL Power button: Turn your nVision on/off CKYSTCILGONTROL This icon represents a component that can be modified with CrystalControl software nVision...
Open the catalog to page 4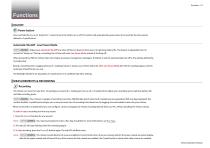
Functions ON/OFF Power button Press and hold the ( power) button for 1 second to turn the nVision on or off. The nVision will automatically power down if not used for the time period defined in CrystalControl. Automatic Shutoff - Low Power Mode Adjust your Automatic Shutoff time (shut off time in absence of key press) to optimize battery life. This feature is adjustable from 30 seconds to “always on.” During a recording, the nVision will enter Low Power Mode instead of shutting off. When powered by USB, the nVision does not employ any power management strategies. Therefore, it will not automatically...
Open the catalog to page 5
Zero To zero the nVision: Press the (zero) button for at least 1 second while vented to atmosphere until the dashed lines (- - - - -) appear. To clear the zero value: Hold the (zero) button for 5 seconds until the display changes from (- - - - -) to the zeroed value, then to (- - -). You can adjust the Zero Limit at which the (zero) button will display “- -HI- -” in CrystalControl. You can also disable the (zero) button entirely, by setting the zero value to a negative number less than -15 psi. Note: If you attempt to zero the gauge with more pressure applied than the Zero Limit set in with CrystalControl,...
Open the catalog to page 6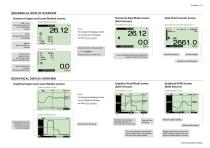
| NUMERICAL DISPLAY OVERVIEW Numerical Upper and Lower Module screens High / Low: Peak always measured at 10 readings per second Average of most recent 20 readings Wmin: Rate of change per minute Upper Module Screen Numerical Dual Mode Screen (Both Sensors)Dual Module Screen El To change the displayed units on any Numerical Display, see the Units section. Data Point Counter ScreenData Point Screen (Single Sensor) JtstS- 12—Jul-11 / 14:46:50 Lower Module Screen [GRAPHICAL DISPLAY OVERVIEW Lower Module Screen Selectable Units (via Setup button) (Enable, disable, or create units) To change the displayed...
Open the catalog to page 7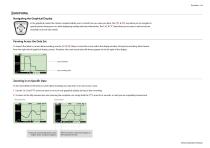
GRAPHING Navigating the Graphical Display In the graphical modes the nVision navipad enables you to control how you view your data. The ( ) & () keys allow you to navigate to specific points along your run, while displaying reading and time information. The () & () keys allow you to zoom in and out of your recorded run to suit your needs. Panning Across the Data Set To inspect the latest or current data recording, use the ( ) & () keys to move the cursor within the display window. During live recording, data streams from the right side of graphical display screens. Therefore, the most...
Open the catalog to page 8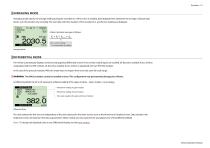
M AVERAGING MODE Averaging mode reports the average reading during the recorded run. If this screen is enabled, data displayed here represents the average of all past data points, over the duration of a recording. The start date and time, duration of the recorded run, and the live reading are displayed. nVision calculates averages as follows: fn = current reading n = total number of readings Averaging Mode The nVision automatically displays numerical and graphical differential screens if two similar module types are installed. AP becomes available if your nVision is populated with two PM modules....
Open the catalog to page 9
Tare Using the Tare function improves your differential measurement uncertainty significantly if used properly. The Tare function equalizes (normalizes) the nVision’s two modules at a non-ambient datum. The Tare reading displays the same units as the main ΔP or ΔT reading. If you apply the same static line pressure, temperature, or resistance signal to both sensors simultaneously, you should have a differential reading of zero. Due to the allowable error tolerance for each module, the reading may not be zero. The Tare function allows you to normalize both readings so that the differential reading...
Open the catalog to page 10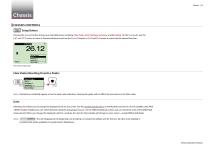
Chassis| CHASSIS CONTROLS Setup Button use the Pressing the (setup) button brings up a selectable menu including Clear Peaks, Units, Settings, Summary, and Recording. On the (navipad) (a) and (t) arrows to move to the desired feature and use the (select) button or (^) and (►) arrows to move into the desired function. The nVision Setup menu Clear Peaks (Resetting Hi and Lo Peaks) Clear Peaks Units. > Settings > Sunnary > Note: Dashed lines will briefly appear across the peak value indicators. Clearing the peaks will not affect the zero values or the Filter value. Units Selecting Units allows you...
Open the catalog to page 11All Ametek Calibration catalogs and technical brochures
 Type T Deadweight Tester
8 Pages
 ATMi Temperature Module
7 Pages
 XP2i Data Recorder
6 Pages
 Temperature Pressure Process
12 Pages
 AMETEK Calibration Brochure
12 Pages
 Maritime Brochure
8 Pages
 CPF Brochure (D)
4 Pages
 APM Advanced Pressure Module
6 Pages
 Product Overview Brochure
8 Pages
 GaugeCalHP Manual
20 Pages
 24 VDC Power Supply Manual
7 Pages
 24 VDC Power Supply
4 Pages
 FastCalXP
9 Pages


- AMETEK temperature sensor
- Management software solution
- Automation software solution
- Data logger
- AMETEK resistance temperature sensor
- Process software
- AMETEK pressure gauge
- AMETEK Windows software
- Real-time software
- Cloud-based software
- AMETEK calibrator
- Control software
- Digital indicator
- Analog pressure gauge
- Industrial software
- Interface software
- AMETEK measurement software
- Pt100 temperature transducer
- AMETEK thermocouple
- Data-logger with screen