 Website:
Alpha Moisture Systems Ltd
Group: HALMA
Catalog excerpts
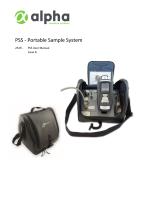
PSS - Portable Sample System 2529 - PSS User Manual Issue 6.
Open the catalog to page 1
PSS - Portable Sample System - User Manual Contact Information Head Office Alpha Moisture Systems Alpha House 96 City Road Bradford West Yorkshire BD8 8ES United Kingdom Tel: +44 (0) 1274 733100 Email: info@amsystems.co.uk Websites: www.amsystems.co.uk www.sadpmini2.com www.dew-point.com Office Opening Hours: GMT (London Time) Monday - Thursday 8.30am - 5.30pm Friday 8.30am - 5.00pm Saturday and Sunday - Closed Authorised Distributor Contact Information © Alpha Moisture Systems 2023 - 25292PSS User Manual – Issue 6 - 06/10/2023
Open the catalog to page 2
PSS - Portable Sample System - User Manual Warranty Alpha Moisture Systems Ltd. (AMS) warrants the products it manufactures, or distributes, to be free of defects in material and workmanship under normal use and service when operated within the specified design limitations for a period of 12 months from date of initial shipment. Under this Warranty, AMS will, at its discretion, repair or replace any component that upon examination by AMS or its duly authorized representatives proves to be defective during the warranty period, provided the system is returned to the factory for inspection and...
Open the catalog to page 3
PSS - Portable Sample System - User Manual
Open the catalog to page 4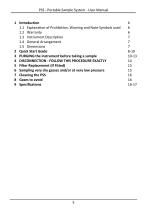
PSS - Portable Sample System - User Manual 1 Introduction 1.1 Explanation of Prohibition, Warning and Note Symbols used 1.2 Warranty 1.3 Instrument Description 1.4 General Arrangement 1.5 Dimensions 2 Quick Start Guide 3 PURGING the instrument before taking a sample 4 DISCONNECTION - FOLLOW THIS PROCEDURE EXACTLY 5 Filter Replacement (If Fitted) 6 Sampling very dry gasses and/or at very low pressure 7 Cleaning the PSS 8 Gases to avoid 9 Specifications
Open the catalog to page 5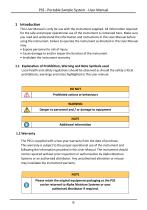
PSS - Portable Sample System - User Manual 1 Introduction This User Manual is only for use with the instrument supplied. All information required for the safe and proper operational use of the instrument is contained here. Make sure you read and understand the information and instructions in this User Manual before using the instrument. Failure to operate the instrument as directed in this User Manual may: • Expose personnel to risk of injury • Cause damage to and/or impair the function of the instrument • Invalidate the instrument warranty 1.1 Explanation of Prohibition, Warning and Note...
Open the catalog to page 6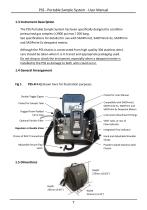
PSS - Portable Sample System - User Manual 1.3 Instrument Description The PSS Portable Sample System has been specifically designed to condition pressurised gas samples (>2900 psi max / 200 barg. See specifications for details) for use with SADPmini2, SADPmini2-Ex, SADPmini and SADPmini-Ex dewpoint meters. Although the PSS chassis is constructed from high quality 304 stainless steel, care should be taken when it is in transit and appropriate packaging used. Do not drop or shock the instrument, especially when a dewpoint meter is installed to the PSS as damage to both units could occur....
Open the catalog to page 7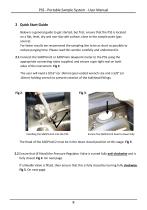
PSS - Portable Sample System - User Manual 2 Quick Start Guide Below is a general guide to get started, but first, ensure that the PSS is located on a flat, level, dry and non-slip safe surface, close to the sample point (gas source). For faster results we recommend the sampling line to be as short as possible to reduce purging time. Please read this section carefully and understand it. 2.1 Connect the SADPmini2 or SADPmini dewpoint meter to the PSS using the appropriate connecting tubes supplied, and ensure a gas tight seal on both sides of the instrument. Fig 2. The user will need a 9/16”...
Open the catalog to page 8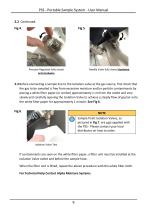
PSS - Portable Sample System - User Manual 2.2 Continued. Fig 5. Pressure Regulator fully closed anti-clockwise Needle Valve fully closed clockwise 2.3 Before connecting a sample line to the Isolation valve at the gas source, first check that the gas to be sampled is free from excessive moisture and/or particle contaminants by placing a white filter paper (or similar) approximately 1 cm from the outlet and very slowly and carefully opening the Isolation Valve to achieve a steady flow of gas/air onto the white filter paper for approximately 1 minute. See Fig 6. NOTE Sample Point Isolation...
Open the catalog to page 9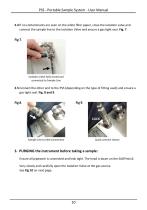
PSS - Portable Sample System - User Manual 2.4 If no contaminants are seen on the white filter paper, close the isolation valve and connect the sample line to the Isolation Valve and ensure a gas tight seal. Fig. 7. Isolation Valve fully closed and connected to Sample Line 2.5 Connect the other end to the PSS (depending on the type of fitting used) and ensure a gas tight seal. Fig. 8 and 9. Sample Line to Inlet Connection Quick connect shown 3. PURGING the instrument before taking a sample: Ensure all pipework is connected and leak tight. The head is down on the SADPmini2. Very slowly and...
Open the catalog to page 10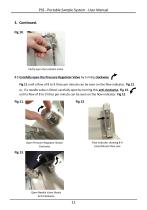
PSS - Portable Sample System - User Manual 3. Continued. Fig 10. Partly open the Isolation Valve 3.1 Carefully open the Pressure Regulator Valve by turning clockwise Fig 11 until a flow of 8 to 9 litres per minute can be seen on the flow indicator. Fig 12. or, if a needle valve is fitted, carefully open by turning this anti-clockwise. Fig 13. until a flow of 8 to 9 litres per minute can be seen on the flow indicator. Fig 12. Flow Indicator showing 8-9 Litres/Minute flow rate Open Pressure Regulator Slowly Clockwise Open Needle Valve Slowly Anti-Clockwise
Open the catalog to page 11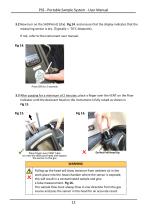
PSS - Portable Sample System - User Manual 3.2 Now turn on the SADPmini2 (/Ex). Fig 14. and ensure that the display indicates that the measuring sensor is dry. (Typically < -70°C dewpoint). If not, refer to the instrument user manual. 3.3 After purging for a minimum of 2 minutes, place a finger over the VENT on the Flow Indicator until the desiccant head on the instrument is fully raised as shown in Fig 15. Place finger over VENT tube to raise the desiccant head and expose the sensor to the gas Pulling up the head will draw moisture from ambient air in the work place into the head chamber...
Open the catalog to page 12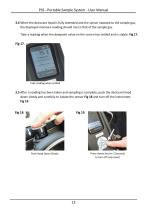
PSS - Portable Sample System - User Manual 3.4 When the desiccant head is fully extended and the sensor exposed to the sample gas, the displayed moisture reading should rise to that of the sample gas. Take a reading when the dewpoint value on the screen has settled and is stable. Fig 17. Take reading when settled 3.5 After a reading has been taken and sampling is complete, push the desiccant head down slowly and carefully to isolate the sensor Fig 18 and turn off the instrument. Fig 19. Press Home Key for 2 Seconds to turn off instrument Push Head Down Slowly
Open the catalog to page 13All Alpha Moisture Systems Ltd catalogs and technical brochures
-
Model 6020 User Manual
41 Pages
-
SADPmini2 User Manual
57 Pages
-
AMT User Manual
14 Pages
-
AMT-Ex User Manual
15 Pages
-
SADPmini2-Ex User Manual
86 Pages
-
DS1200-Exd-AMT-Ex
3 Pages
-
DS1500-Exd
2 Pages
-
DS4000-Exd-AMT-Ex
3 Pages
-
DSP-FCI Portable Hygrometer
3 Pages
-
Model 6020 Exd
4 Pages
-
Model 6020
3 Pages
-
DS1500
3 Pages
-
SADPmini2 Comparison Chart
1 Pages


