

ALIGNMENT CLAMP CLAMP63

ALIGNMENT CLAMP CLAMP63
- Safety Notes and Hints: Symbols indicate potential dangers and provide application tips.
- Designated Use: The FRIATOP clamping unit is designed for securing FRIALEN XL and FRIAFIT saddle fittings for electrofusion welding on PE-HD pipes.
- Functional Safety: Complies with DIN EN ISO 9001:2008 standards. Ensure equipment is in proper condition and air connections function correctly.
- Operator Obligations: Operators must be qualified and follow instructions. The manual should be accessible at the equipment's location.
- Structural Changes: Modifications are not allowed without FRIATEC AG's approval.
- Includes pneumatic clamping unit, adapters, air pump, manual, and transport case.
- Follow FRIALEN XL or FRIAFIT instructions. Ensure the pipe surface is clean and round, and remove the oxidation layer before welding.
- Select the appropriate adapter and attach it to the saddle fitting. Secure the unit with the tensioning belt and ensure proper alignment.
- Use the air pump to apply pressure, ensuring the saddle fitting is flush with the pipe.
- Follow FRIAMAT welding device instructions. Maintain a safe distance during welding and adhere to cooling times.
- Release air pressure and secure the unit during removal. Store the device in a clean, dry transport case.
- Conduct a pressure test before tapping the main line. Adhere to cooling times to ensure a secure weld.
- Protect the unit from dirt and store it properly. Regular annual checks are recommended.
- One-year warranty, excluding wear and tear from frequent use or external influences.
- Instructions are regularly updated. Latest versions are available online.
Catalog excerpts

FRIATOOLS ® Bedienungsanleitung FRIATOP Aufspannvorrichtung Operating instructions FRIATOP clamping unit
Open the catalog to page 1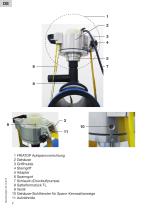
FRIATOP Aufspannvorrichtung Gehäuse Griffmulde Sterngriff Adapter Spanngurt Schlauch (Druckluftpumpe) Sattelformstück TL Ventil Gehäuse-Sichtfenster für Spann-Kennzahlanzeige Aufziehrolle
Open the catalog to page 2
2.3 Bauliche Veranderungen am Gerat 5 5. Montage der Aufspannvorrichtung FRIATOP 7 7. Demontage der Aufspannvorrichtung FRIATOP 13 11. Aktualisierung dieser Bedienungsanleitung 14
Open the catalog to page 3
1. Vorbemerkungen 1.1 Sicherheitshinweise und Tipps Diese Bedienungsanleitung verwendet folgende Symbole mit Warnhinweisen: 1.2 BestimmungsgemaBe Verwendung Die FRIATOP Aufspannvorrichtung eignet sich zum Aufspannen von FRIALEN XL- und FRIAFIT-Sattelformstucken in Top-Loading-Ausfuhrung (TL) auf PE-HD-Rohren fur die HeizwendelschweiBverbindung. Diese Bedienungsanleitung gilt erganzend zu den Vorgaben der Montageanlei-tungen FRIALEN XL fur die Verarbeitung und Vorbereitung der Heizwendel-schweiBung und des FRIAFIT Abwassersystems. 2. Sicherheit 2.1 Funktionssicherheit Die FRIATOP Aufspannvorrichtung...
Open the catalog to page 4
Alle Personen, die mit der Inbetriebnahme, Bedienung, Wartung und Instandhaltung der FRIATOP Aufspannvorrichtung zu tun haben, müssen: • entsprechend qualifiziert sein und • diese Bedienungsanleitung genau beachten. Die Bedienungsanleitung ist stets am Einsatzort des Gerätes aufzubewahren, am besten in der Transportbox. Sie muss jederzeit für den Bediener einsehbar sein. Beachten Sie bei der bestimmungsgemäßen Verwendung die gültigen Unfallverhütungsvorschriften, Umweltvorschriften und gesetzlichen Regeln, ebenso die einschlägigen Sicherheitsbestimmungen sowie alle länderspezifischen Normen, Gesetze...
Open the catalog to page 5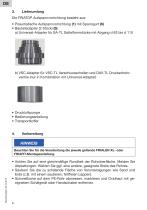
Die FRIATOP Aufspannvorrichtung besteht aus: • Pneumatische Aufspannvorrichtung (1) mit Spanngurt (6) • Bauteiladapter (2 Stück) (5): a) Universal-Adapter für SA-TL Sattelformstücke mit Abgang d 63 bis d 110 b) VSC-Adapter für VSC-TL Verschlussschellen und DAV-TL Druckanbohrventile (nur in Kombination mit Universal-Adapter) • Druckluftpumpe • Bedienungsanleitung • Transportkoffer Beachten Sie für die Verarbeitung die jeweils geltende FRIALEN XL- oder FRIAFIT-Montageanleitung. • Achten Sie auf eine gleichmäßige Rundheit der Rohroberfläche. Meiden Sie Abplattungen. Wählen Sie ggf. eine andere, geeignete...
Open the catalog to page 6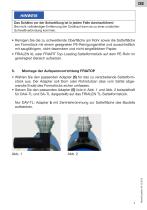
Das Schälen vor der Schweißung ist in jedem Falle durchzuführen! Bei nicht vollständiger Entfernung der Oxidhaut kann es zu einer undichten Schweißverbindung kommen. • Reinigen Sie die zu schweißende Oberfläche am Rohr sowie die Sattelfläche am Formstück mit einem geeigneten PE-Reinigungsmittel und ausschließlich mit saugfähigem, nicht faserndem und nicht eingefärbtem Papier. • FRIALEN XL oder FRIAFIT Top-Loading Sattelformstück auf dem PE-Rohr im gereinigten Bereich aufsetzen. Montage der Aufspannvorrichtung FRIATOP • Wählen Sie den passenden Adapter (5) für das zu verarbeitende Sattelformstück...
Open the catalog to page 7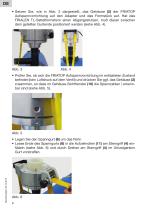
DE • Setzen Sie, wie in Abb. 3 dargestellt, das Gehäuse (2) der FRIATOP Aufspannvorrichtung auf den Adapter und das Formstück auf. Hat das FRIALEN TL-Sattelformstück einen Abgangsstutzen, muß dieser zwischen dem geteilten Gurtende positioniert werden (siehe Abb. 4). • Prüfen Sie, ob sich die FRIATOP Aufspannvorrichtung im entlasteten Zustand befindet (kein Luftdruck auf dem Ventil) und drücken Sie ggf. das Gehäuse (2) 1 zusammen, so dass im Gehäuse-Sichtfenster (10) die Spannzahlen _ erkenn2 bar sind (siehe Abb. 5). • Legen Sie den Spanngurt (6) um das Rohr. • Loses Ende des Spanngurts (6) in...
Open the catalog to page 8
• Richten Sie nach Abb. 7 das FRIALEN TL-Sattelformstuck (8) mit dem FRIATOP Aufspanngerat an der zur SchweiBung vorbereiteten Stelle am Rohr aus. • Durch Drehen am Sterngriff (4) (siehe Abb. 8) im Uhrzeigersinn Gurt straff anziehen (siehe Abb. 9). • SchlieBen Sie die Druckluftpumpe am Ventil (9) an und klemmen Sie das Anschlussstuck der Druckluftpumpe mittels Spannhebel fest (siehe Abb. 10).
Open the catalog to page 9
Beachten Sie fur die Verarbeitung die jeweils geltende FRIALEN oder FRIAFIT-Montageanleitung oder ggf. Informationen auf dem Beipackzettel am Produkt. • Durch das Auseinanderdrucken des Gehauses (2) (siehe Abb. 11) wird die Sattelflache an das Rohr angeglichen. Abb. 11 • Die Sattelflache soll passgenau ohne Spalt am Rohr anliegen (siehe Abb. 13). Bei tiefen Temperaturen oder groBen Rohrdimensionen das Sattelformstuck ggf. einige Minuten auf dem Rohr vorspannen, losen und erneut aufspannen, bis die Sattelflache spaltfrei am Rohr liegt.
Open the catalog to page 10
Druckverlust! Ventilanschluss der Druckluftpumpe nach erfolgtem Druckaufbau und vor dem Schweißen zwingend vom Ventil der Aufspannvorrichtung FRIATOP lösen! • Achten Sie auf einen ausreichend verbleibenden Spannweg an der Aufspannvorrichtung, vor Erreichen des Hub-Anschlags. Wenn das FRIALEN TL-Sattelformstück spaltfrei aufgespannt ist, muss im Gehäuse-Sichtfenster (10) eine Spannzahl max. 9 (von 10) sichtbar sein (siehe Abb. 12). Gegebenenfalls unterbrechen Sie den Prozess und spannen Sie mit dem Sterngriff (4) nach. • Entriegeln Sie den Spannhebel am Luftschlauch (7) der Druckluftpumpe und...
Open the catalog to page 11
• Notieren Sie die am Gehause-Sichtfenster (10) angezeigte Spannzahl auf dem Rohr und kontrollieren Sie die Anzeige vor und wahrend der SchweiBung. Die Anzeige darf sich hochstens um einen Teilstrich andern. Bei groBe-rer Abweichung SchweiBung abbrechen und Druckverlust am Gerat abstellen. Wenden Sie sich in diesem Fall an unsere Anwendungstechnik Tel.: +49 621 486 1486. 6. SchweiBung durchfuhren • SchweiBung starten. Beachten Sie die Bedienungsanleitung des FRIAMAT SchweiBgerats. • Nach Ablauf der SchweiBzeit kann das SchweiBgerat ausgeschaltet und das SchweiBkabel entfernt werden. • Nach Ablauf...
Open the catalog to page 12All Aliaxis catalogs and technical brochures
 KHP
KHP3 Pages
 FRIASTOPP
2 Pages
 Flange T-Pieces
2 Pages
 FRIATOOLS VACUUM PUMP
28 Pages
 ALIGNMENT CLAMP CLAMP63
12 Pages
 RN, RNSi
12 Pages
 CHEMICAL CENTRIFUGAL PUMP
10 Pages
 Product Range Pumps
12 Pages
 Safety Fittings
12 Pages
 frialen Safety f ittings
48 Pages
 FRIAMAT XL
2 Pages
 FRIALEN XL Brochure
14 Pages
 FWSG XL
1 Page
 Brochure FNC
8 Pages
 FRIDURIT neutralisation unit
12 Pages
 FRIDURIT fume scrubber
8 Pages
 FRIDURIT laboratory sinks
20 Pages
 FRIDURIT modular
20 Pages
 FRIDURIT direct
12 Pages
 FRIDURIT premium
24 Pages
 FRIALIT-DEGUSSIT Oxide Ceramics
24 Pages
 FRIAMAT brochure
6 Pages
 FRIATOOLS brochure
4 Pages
 FRIATOOLS:product range
20 Pages
 FRIAFIT Product Range
16 Pages
 FRIALEN XL Product Range
20 Pages
 FRIALEN product
48 Pages


Archived catalogs
 RSKu
RSKu4 Pages
 Ceramic product
42 Pages
 GVRN
GVRN4 Pages
 FRIALOC brochure
4 Pages
 FRIALEN brochure
6 Pages
 Wastewater Management
4 Pages
