NetLink quick start
1 /2Pages

NetLink quick start
1 /2Pages
Catalog excerpts
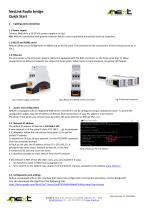
NetLink Radio bridge Quick Start 1 1.1 Power supply Connect NetLink to a 10-28 Vdc power supply as in Fig.1. N.B. NetLink is protected with polarity inversion but for correct operation the polarity must be respected. 1.2 RS232 and RS485 serial NetLink allows you to bridge both an RS485 and an RS232 serial. The terminals for the connections of the serial ports are as in Fig. 2. 1.3 Ethernet For connection to the Ethernet network, NetLink is equipped with the RJ45 connector on the front panel (Fig. 3). When connected to an Ethernet network, the status LED turns green. When there is communication, the green LED flashes. Fig.1 Power supply connection 2 Access and configuration NetLink is equipped with an integrated WEB server, therefore it can be configured using a standard browser. To access the configuration pages, type the IP address of NetLink from the browser of your PC, tablet or smart phone. The device from which you connect must be within the same network as NetLink (Par. 2.1). 2.1 Network IP address The default IP address of NetLink is 192.168.1.101 If your network is of the same IP class: 192.168.1 ..., go to paragraph 2.3, otherwise follow the instructions from point 2.2 to set the correct IP address. To identify the IP class of your network, run the IPCONFIG command from the command prompt. In Fig.4 on the side, the IP address of the PC is 192.168.1.5. It belongs to the same class / network as NetLink, as the first Fig.4 Check your PC's IP address 3 numbers (192, 168 and 1) are the same. It is therefore possible to reach netLink from the PC browser. If the network is NOT of the 192.168.1 class, you can proceed in 2 ways: 1. Set NetLink to work in DHCP (see paragraph 2.2); 2. Set a valid IP on the NetLink (see chapter 5 of the NetLink manual, available on the website www.4next.eu 2.2 Configuration and settings NetLink is equipped with an NFC interface that allows the configuration of all system parameters via the iBridge APP. You can download the App from the following link: https://drive.google.com/file/d/1yvT_IAocvs2hn8F2HOKWHNAwMFVjH0sy/view?usp=sharing
Open the catalog to page 1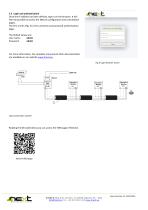
2.3 Login and authentication Once the IP address has been defined, type it on the browser. It will then be possible to access the NetLink configuration and consultation pages. The first screen (Fig. 5) is the username and password authentication page. The default values are: User name: admin Password: admin For more information, the complete manual and other documentation are available on our website www.4next.eu . Fig.5 Login browser screen Reading the QR code below you can access the WEB page of NetLink.
Open the catalog to page 2All 4neXt catalogs and technical brochures
 aMBition manual
10 Pages
 EasyNET quick start
2 Pages
 EasyNET manual
23 Pages
 MDB-W manual
12 Pages
 MDB-W quick start
2 Pages
 MDB-E quick start
2 Pages
 MDB-E manual
15 Pages
 NetLink manual
15 Pages
 EasyLog quick start
2 Pages
 EasyLog manual
24 Pages
 NetLink
1 Page
 MQTT
MQTT2 Pages
 MDB-E
MDB-E1 Page
 aMBition brochure
1 Page
 MDB-W
MDB-W1 Page
 EasyNET
2 Pages
 owa450
2 Pages
 owa4Xplatform
2 Pages
 EasyLog XL quick start
2 Pages
 EasyLog XL manual
24 Pages
 EasyLog XL brochure
2 Pages
 I/O Acquisition Modules
1 Page
 owa3Xplatform
2 Pages
 zigbee smart building
47 Pages
 ModBridge
1 Page
- Automation software solution
- Management software solution
- Data logger
- Digital I/O
- Cloud-based software
- IO module
- Temperature datalogger
- Analog I/O
- Digital IO module
- Industrial software
- Communication gateway
- Interface software
- Industrial gateway
- Visualization software solution
- Ethernet gateway
- Fieldbus gateway
- Wireless datalogger
- Fieldbus I/O module
- Datalogger without display
- Development software