EasyNET manual
1 /23Pages

EasyNET manual
1 /23Pages
Catalog excerpts

USER MANUAL EasyNET UNIVERSAL MODBUS DATALOGGER
Open the catalog to page 1
OWNERSHIP AND CONDITIONS The information in this document is subject to change without notice. Unless otherwise specified, all references to companies, organizations, products, domain names, email addresses, logos, people, places and events mentioned in this document are purely coincidental. No association with companies, organizations, products, domain names, email addresses, logos, people, places or real events can therefore be inferred from it. Compliance with all applicable copyright laws is the sole responsibility of the user. Without prejudice to all the rights covered by copyright, no...
Open the catalog to page 2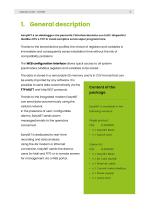
1. General description EasyNET è un datalogger che permette l’interfacciamento con tutti i dispositivi ModBus RTU e TCP in modo semplice senza saper programmare. Thanks to the stored device profiles, the choice of registers and variables is immediate and consequently saves installation time without the risk of compatibility problems. The WEB configuration interface allows quick access to all system parameters, ModBus registers and variables to be stored. The data is stored in a removable SD memory and is in CSV format that can be easily imported by any software. It is possible to send data automatically...
Open the catalog to page 3
2. Technical features CPU 32b Arm® Cortex®-M4 MCU+FPU N. 1 galvanically isolated RS485 serial port (on terminal) Internal buffered RTC MECHANICAL Plastic case IP21 for DIN rail Relative humidity: from 0 to 80% without SD card insert connector POWER SUPPLY AND CONSUMPTION LTE Cat M1/NB1 (2G, 4G and NB-IoT) Fallback GSM/GPRS Integrated SIM card module Emails and Telegram messages of alerts SOFTWARE Modem RTU/TCP Master/Slave Data mirroring to remote Modbus servers Configurable data logger SAFETY INFORMATION The use of radio devices may be inappropriate near electronic equipment. Do not install...
Open the catalog to page 4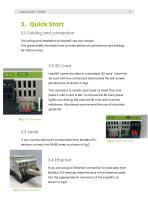
3. Quick Start 3.1 Cabling and connection The wiring and installation of EasyNET are very simple. This guide briefly illustrates how to make electrical connections and settings for initial access. 3.2 SD Card EasyNET stores the data in a standard "SD card". Insert the SD card with the connectors face toward the silk-screen printed part, as shown in Fig.1. The connector is a push-push type: to insert the card, press it until a click is felt. To remove the SD card, press lightly; by clicking, the card will lift a bit and it can be withdrawn. We always recommend the use of industrialgrade SD. Fig....
Open the catalog to page 5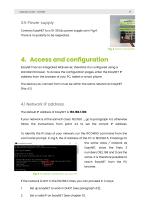
3.5 Power supply Connect EasyNET to a 10-32Vdc power supply as in Fig.4. There is no polarity to be respected. 4. Access and configuration EasyNET has an integrated WEB server, therefore it is configured using a standard browser. To access the configuration pages, enter the EasyNET IP address from the browser of your PC, tablet or smart phone. The device you connect from must be within the same network as EasyNET (Par 4.1). 4.1 Network IP address The default IP address of EasyNET is 192.168.1.100. If your network is of the same IP class: 192.168.1 ..., go to paragraph 4.3, otherwise follow the...
Open the catalog to page 6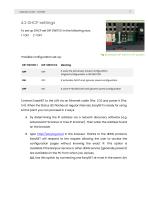
4.2 DHCP settings To set up DHCP set DIP SWITCH in the following way: 1 =ON Fig. 6 Example DIP-SWITCH OFF position It uses the previously saved configuration. It activates DHCP and ignores saved configuration It uses IP 192.168.1.100 and ignores saved configuration Connect EasyNET to the LAN via an Ethernet cable (Par. 3.3) and power it (Par. 3.4). When the Status LED flashes at regular intervals, EasyNET is ready for using. At this point you can proceed in 2 ways: A. by determining the IP address via a network discovery software (e.g. Advanced IP Scanner or Free IP Scanner). Then enter the address...
Open the catalog to page 7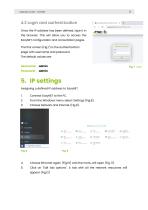
4.3 Login and authentication Once the IP address has been defined, type it in the browser. This will allow you to access the EasyNET configuration and consultation pages. The first screen (Fig.7) is the authentication page with username and password. The default values are: Username: admin Password: 5. IP settings Assigning a defined IP address to EasyNET 1. From the Windows menu select Settings (Fig.8). Choose Network and Internet (Fig.9). Choose Ethernet again (Fig.10) and the menu will open (Fig. 11). Click on "Edit tab options". A tab with all the network resources will appear (Fig.12)
Open the catalog to page 8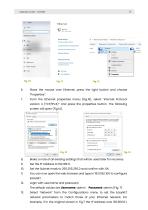
Place the mouse over Ethernet, press the right button and choose "Properties”. From the Ethernet properties menu (Fig.13), select "Internet Protocol version 4 (TCP/IPv4)” and press the properties button. The following screen will open (Fig.14). Make a note of all existing settings that will be used later for recovery. Set the Subnet mask to 255.255.255.0 and confirm with OK. You can now open the web browser and type in 192.158.1.100 to configure EasyNET. Login with username and password. The default values are Username: admin Select "Network" from the Configurations menu to set the EasyNET network...
Open the catalog to page 9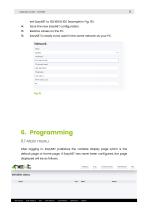
Save the new EasyNET configuration. EasyNET is ready to be used in the same network as your PC. 6. Programming 6.1 Main menu After logging in, EasyNET publishes the variable display page which is the default page or Home page. If EasyNET has never been configured, the page displayed will be as follows.
Open the catalog to page 10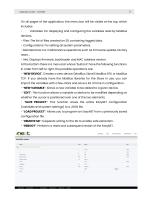
On all pages of the application, the menu bar will be visible at the top, which includes: - Variables: For displaying and configuring the variables read by ModBus devices. - Files: The list of files created on SD containing logged data. - Configurations: For setting all system parameters. - Maintenance: For maintenance operations such as Firmware update, factory reset … - Info: Displays firmware, bootloader and MAC address version. At the bottom there is a menu bar whose "buttons" have the following functions. In order from left to right, the possible operations are: - “NEW DEVICE": Creates a...
Open the catalog to page 11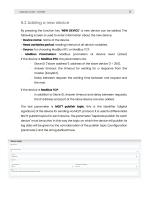
6.2 Adding a new device By pressing the function key "NEW DEVICE": a new device can be added. The following screen is used to enter information about the new device. - Device name: name of the device - Read variables period: reading interval of all device variables. - Source: for choosing ModBus RTU or ModBus TCP. - Modbus Parameters: If the device is ModBus RTU, the parameters are: - Slave ID (“slave address”): address of the slave device (1 ÷ 255). Answer timeout: the timeout for waiting for a response from the master (EasyNET). Delay between request: the waiting time between one request and...
Open the catalog to page 12All 4neXt catalogs and technical brochures
 aMBition manual
10 Pages
 EasyNET quick start
2 Pages
 MDB-W manual
12 Pages
 MDB-W quick start
2 Pages
 MDB-E quick start
2 Pages
 MDB-E manual
15 Pages
 NetLink quick start
2 Pages
 NetLink manual
15 Pages
 EasyLog quick start
2 Pages
 EasyLog manual
24 Pages
 NetLink
1 Page
 MQTT
MQTT2 Pages
 MDB-E
MDB-E1 Page
 aMBition brochure
1 Page
 MDB-W
MDB-W1 Page
 EasyNET
2 Pages
 owa450
2 Pages
 owa4Xplatform
2 Pages
 EasyLog XL quick start
2 Pages
 EasyLog XL manual
24 Pages
 EasyLog XL brochure
2 Pages
 I/O Acquisition Modules
1 Page
 owa3Xplatform
2 Pages
 zigbee smart building
47 Pages
 ModBridge
1 Page
- Management software solution
- Challenge Power Transmission automation software
- Challenge Power Transmission data-logger
- Digital I/O
- Cloud-based software
- IO module
- Challenge Power Transmission temperature data-logger
- Analog I/O
- Digital IO module
- Industrial software
- Communication gateway
- Challenge Power Transmission interface software
- Industrial gateway
- Visualization software solution
- Ethernet gateway
- Fieldbus gateway
- Challenge Power Transmission wireless data-logger
- Fieldbus I/O module
- Challenge Power Transmission data-logger without display
- Development software