

EasyLog XL quick start

EasyLog XL quick start
This document provides a quick start guide for the EasyLogXL device, detailing the cabling, connection, and initial configuration procedures.
- SD Card: Insert the SD card with connectors facing the silk-screen printed part. Use industrial-grade SD cards for reliability.
- Serial Connection: Connect RS485 wires as shown in the provided figure for ModBus RTU devices.
- Ethernet Connection: Insert the Ethernet cable jack into the RJ connector for ModBus TCP devices.
- Power Supply: Connect to a 10-32Vdc power supply, ensuring correct polarity.
EasyLogXL is configured via a web server accessible through a standard browser. Ensure the device is on the same network.
- Network IP Address: Default IP is 192.168.1.100. If your network matches this class, proceed to configuration. Otherwise, adjust settings as needed.
- DHCP Settings: Set DIP SWITCH to 1=ON, 2=OFF for DHCP. Use network discovery software or type http://easylog.local to find the IP address.
- Login and Authentication: Access configuration pages using the default username and password (admin/admin).
Further documentation and support are available on the 4neXt website. A QR code is provided for direct access to the EasyLogXL web page.
Catalog excerpts
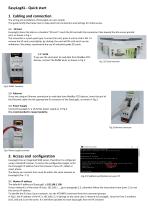
EasyLogXL - Quick start 1 Cabling and connection The wiring and installation of EasyLogXL are very simple. This guide briefly illustrates how to make electrical connections and settings for initial access. 1.1 SD Card EasyLogXL stores the data in a standard "SD card". Insert the SD card with the connectors face toward the silk-screen printed part, as shown in Fig.1. The connector is a push-push type: to insert the card, press it until a click is felt. To remove the SD card, press lightly; by clicking, the card will lift a bit and it can be withdrawn. We always recommend the use of industrial-grade SD cards. 1.2 Serial If you use the serial port to read data from ModBus RTU devices, connect the RS485 wires as shown in Fig.2. 1.3 Ethernet If you are using an Ethernet connection to read data from ModBus TCP devices, insert the jack of the Ethernet cable into the appropriate RJ connector of the EasyLogXL, as shown in Fig.3. 1.4 Power Supply Connect EasyLogXL to a 10-32Vdc power supply as in Fig.4. It is recommended to respect polarity. Fig.4 Power supply terminal 2. Access and configuration EasyLogXL has an integrated WEB server, therefore it is configured using a standard browser. To access the configuration pages, enter the EasyLogXL IP address from the browser of your PC, tablet or smart phone. The device you connect from must be within the same network as EasyLogXL (Par. 2.1). Fig.5 IP address verification on your PC 2.1 Networ IP address The default IP address of EasyLogXL is 192.168.1.100. If your network is of the same IP class: 192.168.1 ..., go to paragraph 2.3, otherwise follow the instructions from point 2.2 to set the correct IP address. To identify the IP class of your network, run the IPCONFIG command from the command prompt. In Fig.5, the IP address of the PC is 192.168.1.5. It belongs to the same class / network as EasyLogXL, since the firsts 3 numbers (192, 168 and 1) are the same. It is therefore possible to reach EasyLogXL from the PC browser.
Open the catalog to page 1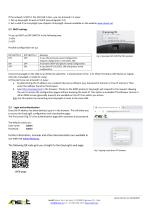
If the network is NOT in the 192.168.1 class, you can proceed in 2 ways: 1. Set up EasyLogXL to work in DHCP (see paragraph 2.2); 2. Set a valid IP on EasyLogXL (see chapter 5 EasyLogXL manual available on the website www.4next.eu) 2.2 DHCP settings To set up DHCP set DIP SWITCH in the following way: 1 =ON 2 =OFF Possible configuration set up: DIP-SWITCH 1 OFF Meaning It uses the previously saved configuration. Original configuration is 192.168.1.100. It activates DHCP and ignores saved configuration. It uses fixed IP 192.168.1.100 and ignores saved configuration. Fig. 6 Example DIP-SWITCH OFF...
Open the catalog to page 2All 4neXt catalogs and technical brochures
 aMBition manual
10 Pages
 EasyNET quick start
2 Pages
 EasyNET manual
23 Pages
 MDB-W manual
12 Pages
 MDB-W quick start
2 Pages
 MDB-E quick start
2 Pages
 MDB-E manual
15 Pages
 NetLink quick start
2 Pages
 NetLink manual
15 Pages
 EasyLog quick start
2 Pages
 EasyLog manual
24 Pages
 NetLink
1 Page
 MQTT
MQTT2 Pages
 MDB-E
MDB-E1 Page
 aMBition brochure
1 Page
 MDB-W
MDB-W1 Page
 EasyNET
2 Pages
 owa450
2 Pages
 owa4Xplatform
2 Pages
 EasyLog XL manual
24 Pages
 EasyLog XL brochure
2 Pages
 I/O Acquisition Modules
1 Page
 owa3Xplatform
2 Pages
 zigbee smart building
47 Pages
 ModBridge
1 Page
- Management software solution
- Automation software solution
- Data logger
- Digital I/O
- IO module
- Cloud-based software
- Temperature datalogger
- Analog I/O
- Digital IO module
- Communication gateway
- Industrial software
- Interface software
- Visualization software solution
- Industrial gateway
- Fieldbus gateway
- Ethernet gateway
- Wireless datalogger
- Fieldbus I/O module
- Datalogger without display
- Serial gateway
- VirtualExpo Group
- Our Partners
- Recruitment
- Testimonials