
カタログの抜粋

WHEEL DIAMETER MEASURING GAUGE IDK Series User's manual www.riftek.com info@riftek.com
カタログの1ページ目を開く
Wheel Diameter Measuring Gauge. IDK Series
カタログの2ページ目を開く
Wheel Diameter Measuring Gauge. IDK Series Safety precautions and measurement conditions · The metering accuracy depends greatly on the wheel surface quality. · · · Therefore it is necessary to carry out the check and presorting of the wheel surface roughness and flaws before measuring the diameter. Prior to place the gauge onto the wheel there is a need to clean the wheel parts that contact with gauge ball bearings, side supports and measuring tip, of the mud. At arranging the gauge, do not allow hitting its supports on the wheel and any measuring tip side hitting. At arranging the gauge,...
カタログの3ページ目を開く
Wheel Diameter Measuring Gauge. IDK Series Example of item designation when ordering Description Measurement position, mm. Base, mm. Lower limit of the measurement range, mm. Upper limit of the measurement range, mm. Indication position. А - Indication is on the side of side supports (Figure А), В – Indication is on the opposite side (Figure В). Example: IDK-70/250-850/1260-А. Measurement position – 70 mm; base – 250 mm; lower limit of the measurement range – 850 mm; upper limit of the measurement range – 1260 mm; indication position – А. Name Wheel diameter measuring gauge IDK series...
カタログの4ページ目を開く
Wheel Diameter Measuring Gauge. IDK Series Operation principle The measurement method is based on the diameter calculation from a known length of the segment chord (the distance between the ball bearings centers), which is obtained at placing the gauge onto the wheel and measured by means of the displacement converter. Video demonstration: https://youtu.be/pMienHfBizg. Working with the gauge Turning on the gauge Press the Red button to turn on the power. The display shows "ErrP" message if the battery voltage became lower than the control level. In this case, the short-term work is possible...
カタログの5ページ目を開く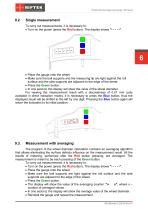
Wheel Diameter Measuring Gauge. IDK Series Single measurement To carry out measurements, it is necessary to: · Turn on the power (press the Red button). The display shows "- - - - -". 6 · Place the gauge onto the wheel. · Make sure the ball supports and the measuring tip are tight against the roll surface and the side supports are adjacent to the edge of the wheel. · Press the Green button. · In one second, the display will show the value of the wheel diameter. For viewing the measurement result with a discreteness of 0.01 mm (only available in direct indication mode), it is necessary to...
カタログの6ページ目を開く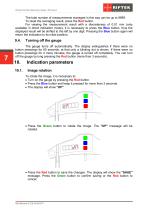
Wheel Diameter Measuring Gauge. IDK Series The total number of measurements averaged in this way can be up to 9999. To reset the averaging result, press the Red button. For viewing the measurement result with a discreteness of 0.01 mm (only available in direct indication mode), it is necessary to press the Blue button, thus the displayed result will be shifted to the left by one digit. Pressing the Blue button again will return the indication to its initial position. The gauge turns off automatically. The display extinguishes if there were no button pressings for 60 seconds, at that only a...
カタログの7ページ目を開く
Wheel Diameter Measuring Gauge. IDK Series The image rotation function allows the operator to view the result regardless of the direction of installation of the gauge. NOTES: - Indication discreteness of 0.01 mm is only available in direct indication mode. - In inches, the diameter is indicated with two decimal places. When the image is rotated, the dot is displayed at the top. Image brightness To change the display brightness, it is necessary to: · Turn on the gauge by pressing the Red button. · Press the Blue button and keep it pressed for more than 3 seconds. · The display will show...
カタログの8ページ目を開く
Wheel Diameter Measuring Gauge. IDK Series Millimeters-Inches display To change the mode, it is necessary to: · Turn on the gauge by pressing the Red button. · Press the Blue button and keep it pressed for more than 3 seconds. · The display will show "UP". · Press the Blue button again until "SI" or "Inch" appears on the display. "SI" – indication in millimeters, "Inch" – indication in inches, "tape" – indication in tapes. · Press the Green button to change the parameter. · To save the parameter, press the Red button. The display will show the "SAUE" message. Press the Green button to...
カタログの9ページ目を開く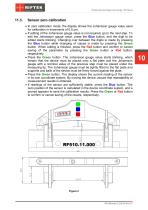
Wheel Diameter Measuring Gauge. IDK Series Sensor zero calibration · In zero calibration mode, the display shows the Johansson gauge value used · for calibration in increments of 0.5 µm. If editing of the Johansson gauge value is not required, go to the next step. To edit the Johansson gauge value, press the Blue button, and the digit to be edited starts blinking. Changing over between the digits is made by pressing the Blue button while changing of values is made by pressing the Green button. When editing is finished, press the Red button and confirm or cancel saving of the parameter by...
カタログの10ページ目を開く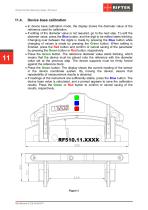
Wheel Diameter Measuring Gauge. IDK Series Device base calibration · In device base calibration mode, the display shows the diameter value of the · reference used for calibration. If editing of the diameter value is not required, go to the next step. To edit the diameter value, press the Blue button, and the digit to be edited starts blinking. Changing over between the digits is made by pressing the Blue button while changing of values is made by pressing the Green button. When editing is finished, press the Red button and confirm or cancel saving of the parameter by pressing the Green...
カタログの11ページ目を開く
Wheel Diameter Measuring Gauge. IDK Series Charging accumulator batteries To charge the accumulator batteries, it is necessary to connect the charging device to the mains 220 V and to the battery compartment on the top panel of the gauge. The time of charging is 15 hours. Warranty policy Warranty assurance for the Wheel Diameter Measuring Gauge IDK Series – 18 months from the date of putting in operation; warranty shelf-life – 12 months. Applied Measurement Australia Pty Ltd Althen Sensors & Controls BV RAILWAY INSTRUMENTS ONLY Thornton Plaza, Unit 5, 27 Thornton Crescent, Mitcham VIC 3132,...
カタログの12ページ目を開くRIFTEK EUROPEのすべてのカタログと技術パンフレット
-
 PRODUCT CATALOG 2025
44 ページ
-
 RF603 Series Manual
49 ページ
-
 RF602 Series Manual
33 ページ
-
 RF603HS Series Manual
36 ページ
-
 RF600 Series Manual
46 ページ
-
 RF605 Series Manual
29 ページ
-
 RF60i Series Manual
46 ページ
-
 RF62x Manual
174 ページ
-
 RF25x Series Manual
34 ページ
-
 RF651 Series Manual
32 ページ
-
 RF656 Series Manual
32 ページ
-
 RF656XY Series Manual
33 ページ
-
 Laser probes Manual
14 ページ
-
 RF627Smart-Weld manual
103 ページ
-
 PRODUCT CATALOG 2024
40 ページ


