
Catalog excerpts

LX 500 COLOR LABEL PRINTER LX500C COLOR LABEL PRINTER User's Manual
Open the catalog to page 1
Notices: The information in this document is subject to change without notice. NO WARRANTY OF ANY KIND IS MADE WITH REGARD TO THIS MATERIAL, INCLUDING, BUT NOT LIMITED TO, THE IMPLIED WARRANTIES OF MERCHANTABILITY AND FITNESS FOR A PARTICULAR PURPOSE. No liability is assumed for errors contained herein or for incidental or consequential damages in connection with the furnishing, performance, or use of this material. This document contains proprietary information that is protected by copyright. All rights are reserved. No part of this document may be photocopied, reproduced, or translated...
Open the catalog to page 2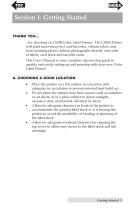
Section 1: Getting Started THANK YOU... ...for choosing an LX500 Color Label Printer. The LX500 Printer will print razor-sharp text and barcodes, vibrant colors, and even stunning photo-realistic photographs directly onto rolls of labels, card stock and fan-fold stock. This User's Manual is your complete step-by-step guide to quickly and easily setting up and printing with your new Color Label Printer! A. CHOOSING A GOOD LOCATION • Place the printer on a flat surface in a location with adequate air circulation to prevent internal heat build up. • Do not place the printer near heat sources...
Open the catalog to page 5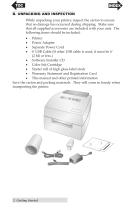
B. UNPACKING AND INSPECTION While unpacking your printer, inspect the carton to ensure that no damage has occurred during shipping. Make sure that all supplied accessories are included with your unit. The following items should be included: • Printer • Power Adapter • Separate Power Cord • 6' USB Cable (If other USB cable is used, it must be 6' (2 M) or less.) • Software Installer CD • Color Ink Cartridge • Starter roll of high gloss label stock • Warranty Statement and Registration Card • This manual and other printed information Save the carton and packing materials. They will come in...
Open the catalog to page 6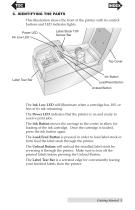
C. IDENTIFYING THE PARTS This illustration shows the front of the printer with its control buttons and LED indicator lights. Power LED Ink Low LED Label Stock TOF Sensor Bar Load/Feed Button Unload Button The Ink Low LED will illuminate when a cartridge has 10% or less of its ink remaining. The Power LED indicates that the printer is on and ready to receive print jobs. The Ink Button moves the carriage to the center to allow for loading of the ink cartridge. Once the cartridge is loaded, press the ink button again. The Load/Feed Button is pressed in order to load label stock or form feed...
Open the catalog to page 7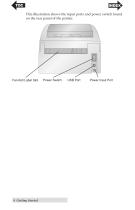
This illustration shows the input ports and power switch found on the rear panel of the printer. Fan-fold Label Slot Power Switch Power Input Port
Open the catalog to page 8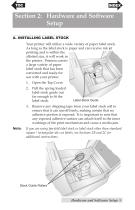
Section 2: Hardware and Software Setup A. INSTALLING LABEL STOCK Your printer will utilize a wide variety of paper label stock. As long as the label stock is paper and can receive ink jet printing and is within the allotted size, it will work in the printer. Primera carries a large variety of paper label stock that has been converted and ready for use with your printer. 1. Pull the spring loaded label stock guide out far enough to fit the label stock. Label Stock Guide Remove any shipping tape from your label stock roll to ensure that it can unroll freely, making certain that no adhesive...
Open the catalog to page 9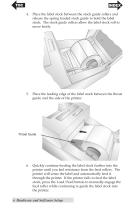
Place the label stock between the stock guide rollers and release the spring loaded stock guide to hold the label stock. The stock guide rollers allow the label stock roll to move freely. Place the leading edge of the label stock between the throat guide and the side of the printer. Throat Guide Quickly continue feeding the label stock further into the printer until you feel resistance from the feed rollers. The printer will sense the label and automatically feed it through the printer. If the printer fails to feed the label stock, press the Load/Feed button to manually engage the feed...
Open the catalog to page 10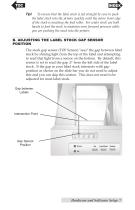
Tip! To ensure that the label stock is fed straight be sure to push the label stock into the printer quickly until the entire front edge of the stock is touching the feed roller. For wider stock use both hands to feed the stock to maintain even forward pressure while you are pushing the stock into the printer. B. ADJUSTING THE LABEL STOCK GAP SENSOR POSITION The stock gap sensor (TOF Sensor) "sees" the gap between label stock by shining light from the top of the label and attempting to read that light from a sensor on the bottom. By default, this sensor is set to read the gap .5" from the...
Open the catalog to page 11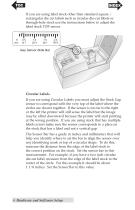
If you are using label stock other than standard square / rectangular die cut labels such as circular die-cut labels or through-hole stock use the instructions below to adjust the label stock TOF sensor. Circular Labels If you are using Circular Labels you must adjust the Stock Gap sensor to correspond with the very top of the label where the circles are closest together. If the sensor is too far to the right or the left the printer will still sense the label but the image may be offset downward because the printer will start printing at the wrong position. If you are using stock that has...
Open the catalog to page 12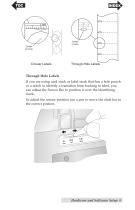
Circular Labels Through-Hole Labels Through Hole Labels If you are using card stock or label stock that has a hole punch or a notch to identify a transition from backing to label, you can adjust the Sensor Bar to position it over the identifying mark. To adjust the sensor position use a pen to move the slide bar to the correct postion. Hardware and Software Setup
Open the catalog to page 13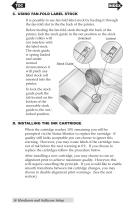
C. USING FAN-FOLD LABEL STOCK It is possible to use fan-fold label stock by feeding it through the fan-fold slot in the the back of the printer. Before feeding the fan-fold stock through the back of the printer, lock the stock guide in the out position so the stock guide rollers will not interfere with the label stock. The stock guide is spring loaded and under normal circumstances it will pinch any label stock roll inserted into the printer. To lock the stock guide push the tab located on the bottom of the moveable stock guide to the out/ locked position. D. INSTALLING THE INK CARTRIDGE...
Open the catalog to page 14All Primera Technology catalogs and technical brochures
-
 Impression IP60
2 Pages
-
 EddieBrochure
4 Pages
-
 Bravo 4200 Series
56 Pages
-
 Bravo SE-3
56 Pages
-
 RW-7
RW-716 Pages
-
 AP550
AP55032 Pages
-
 AP360/362
20 Pages
-
 LX1000/LX2000
90 Pages
-
 Bravo series
1 Pages
-
 LX series
1 Pages
-
 CX1000
4 Pages
-
 LP130 Laser Marking System
2 Pages
-
 RX900F
2 Pages
-
 RX900
RX9002 Pages
-
 CX-FX series
8 Pages


Archived catalogs
-
 LX series
8 Pages